 |
 |
 |
|
KIT: |
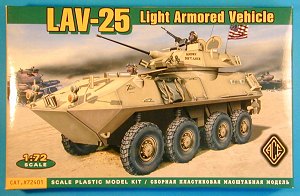
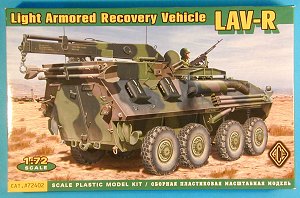
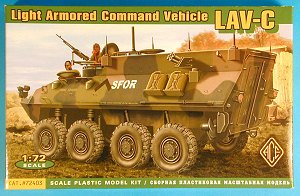
Ace Models 1/72 LAV-25/R/C |
|
KIT # |
72041/42/43 |
|
PRICE: |
AUD $20/18/18 |
|
DECALS: |
See review |
|
REVIEWER: |
|
|
NOTES: |
Short run kits |
|
|
|
|
HISTORY |
The main variant of the LAV carries a turret with a 25mm chain gun and an M60 machine gun, being designed mainly as a replacement to the Vietnam-era M-113 tracked vehicle. The LAV is produced in more than one variant, which are briefly;
· LAV-25: Basic reconnaissance version armed with a turret-mounted Bushmaster 25mm cannon and two M-60 machine guns.
· LAV-PC: Personnel carrier armed with a 0.5” M60 machine gun on a pintle mount.
· LAV-S: Surveillance version carrying a variety of range-finding and surveillance equipment on a telescopic mast.
· LAV-R: Recovery vehicle with winching and lifting capacity.
· LAV-A: Ambulance version with capacity for 3 stretchers.
· LAV-C: Command version with radio and mapping equipment.
· LAV-AD: Air Defence version with a turret-mounted infrared targeting sight and laser range finder and an option of either Stinger missiles, 25mm Gatling gun, 20mm chain gun or a combination of these weapons.
With the proven versatility of the LAV, other versions will undoubtedly continue to be developed to fulfil the requirements of armed forces around the world. All variants of the LAV are fully amphibious with a maximum of 3 minutes preparation.
|
THE KIT |
I was delighted to see the Ace Models LAVs listed on the NKR Models’ website a few months ago. So far, three variants of the LAV have been produced by Ace; the LAV-25, LAV-R and LAV-C. I ordered my LAV kits from Earl Martell at NKR Models and as usual, they arrived carefully packaged within the next few days. I rate Earl with five stars for service; in addition to his prompt despatch of orders, he is always extremely punctual with responding to queries. Who could ask for more?
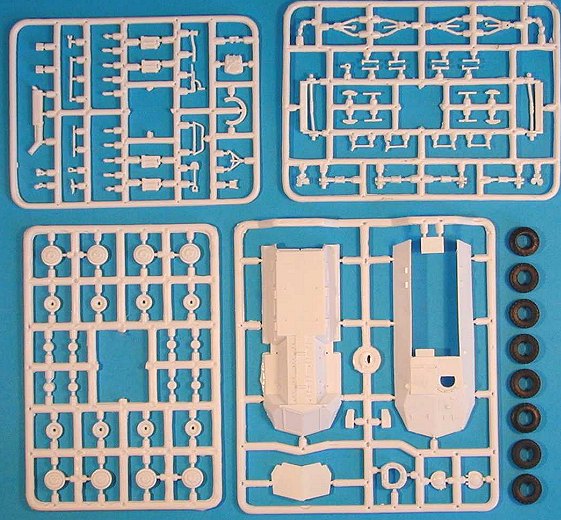
As expected, the Ace LAV kits share four common sprues, which incorporate parts for the hull, wheels, suspension and accessories. Eight rubber tyres are also common to each kit. One separate sprue is supplied in each kit, which contains the parts specific to that variant (described below). Each kit comes in a two-piece box and all sprues are thoughtfully packaged in a sturdy zip-seal plastic bag. A smaller zip-seal plastic bag contains the decals and rubber tyres and a small fret of photoetched parts is given with the LAV-25.
The common sprues comprise a total of 101 parts that are quite well done, although detail is understandably a little heavy compared Revell, Hasegawa, Italeri, etc as a result of the short-run production method. There is varying amounts of flash on all parts and on close inspection, the plastic displays a fine “pitted” surface, but I expect this to disappear under a camouflaged finish. The sprues will require a thorough wash in warm, soapy water prior to construction, as residue from a thick, blackish, greasy release agent is evident in places on the white plastic.
The decals are not quite up to the
standard of some other manufacturers, but appear to be quite accurate and
well done all the same. A reasonable amount of hull stenciling is
included. The rubber tyres are beautifully moulded with an accurate tread
pattern. The etched fret in the LAV-25 kit includes a fine cross-hatched
mesh stowage basket for the rear of the turret, wire cutting pylons, rear
vision mirrors and various towing and tie-down lugs.
The hull consists of 6 main parts, plus various hatches, fittings and accessories. There is no internal detail, though a tread pattern is moulded into the floor in the rear part of the hull, suggesting that a PC version is forthcoming with some internal detail supplied. The rear access doors are moulded in the closed position. The prominent exhaust muffler (which is fitted to the side of the upper hull) has shallow sink marks on all of my kits. A dry fit of the major components shows that the hull halves will require a light rub on a flat piece of “wet and dry” to ensure a flat joining surface.
The amphibious gear is a little heavy in detail and will require some work. I’ll be replacing the rudders with thin styrene sheet and replacing the props with those from a few old 1:700 destroyer kits that are in my spares box (should be about the right size).
Each wheel comprises 4 parts, including the rubber tyre and are designed to rotate. The front steering wheels may also be positioned in a turned attitude if desired. Unfortunately, this feature has resulted in some rather heavy and toy-like suspension components (reminiscent of early Airfix aircraft kits with retractable undercarriage). Generally, the suspension components are reasonably well detailed for the scale, but some parts will be best replaced with brass wire, styrene strip or stretched sprue to achieve scale accuracy and effect.
A reasonable selection of accessories is supplied to detail the finished model, including jerry cans, axe, pick, shovel, rolled tarpaulin and canvas carry bags. Again, the short-run nature of the kit means that some of these are a little crude, although with a careful (very careful, as they are very small and fragile) clean-up, they should be OK. The modeler may choose to replace or add to these from the spares box, however.
The instruction sheet is a folded A4 sheet, giving 4 pages in total. The front page shows the parts layout on the sprues; the rear page contains monochrome profiles displaying the colours and markings provided; and the centre fold-out contains six neat and clear exploded diagrams for kit assembly. Assembly steps are not numbered, but the sequence is quite obvious. The instruction sheet recommends the use of fine wire for details such as rear view mirror mounting brackets and various hatch or grab handles.
LAV-25
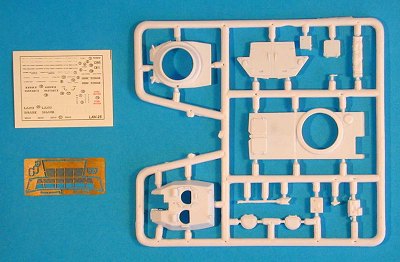 The LAV-25 sprue contains 14 parts, being
the hull deck, hull rear, turret, armament and hatches. The turret is
assembled from 6 main components plus hatches, fittings and the etched
stowage basket. The 3 parts that make up the main armament will require a
careful clean up, having a few small sink-marks and flash. Unfortunately,
the gun barrel suffers badly from the limitations of short-run moulding
and would best be replaced if you can find a suitable alternative (Revell
Bradley?). Similarly, the commander’s turret-mounted M60 machine gun is a
poor representation, but a suitable replacement should not be too hard to
find.
The LAV-25 sprue contains 14 parts, being
the hull deck, hull rear, turret, armament and hatches. The turret is
assembled from 6 main components plus hatches, fittings and the etched
stowage basket. The 3 parts that make up the main armament will require a
careful clean up, having a few small sink-marks and flash. Unfortunately,
the gun barrel suffers badly from the limitations of short-run moulding
and would best be replaced if you can find a suitable alternative (Revell
Bradley?). Similarly, the commander’s turret-mounted M60 machine gun is a
poor representation, but a suitable replacement should not be too hard to
find.
The only obvious error I noted during this in-box review was the etched brass mesh stowage basket for the rear of the turret. The X-shape of the mesh is incorrect, as the X should be horizontally long, rather than vertically long, as provided. This minor detail however, will only worry the purists and the finished product will look fabulous.
Decals are included for four different examples of the LAV-25:
1. USMC 3rd Light Armoured Infantry Battalion: Overall sand camouflage, “Steel Justice”. Desert Storm, Iraq, 1991.
2. USMC: Overall sand camouflage, “Known Distance”. Desert Storm, Iraq, 1991. This vehicle is depicted on the box top.
3. USMC (NATO): Standard NATO green/black/brown scheme, 2001.
4. USMC (KFOR): Standard NATO green/black/brown scheme, “Land Shark”, 2001.
LAV-R
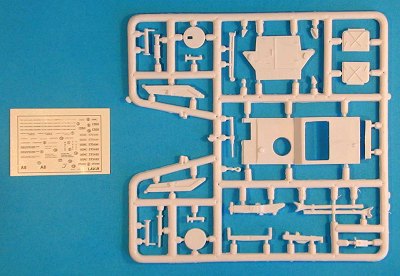 The LAV-R sprue is quite comprehensive,
containing 27 parts including the hull deck and rear, hatches, HIAB
crane, outrigger jacks and support braces. On my example, most parts on
this sprue suffer from shallow sink marks and/or rather excessive flash.
They should be OK after a careful clean-up, but if I’m not happy with
them, I’ll use the originals as templates to construct new parts from
styrene stock.
The LAV-R sprue is quite comprehensive,
containing 27 parts including the hull deck and rear, hatches, HIAB
crane, outrigger jacks and support braces. On my example, most parts on
this sprue suffer from shallow sink marks and/or rather excessive flash.
They should be OK after a careful clean-up, but if I’m not happy with
them, I’ll use the originals as templates to construct new parts from
styrene stock.
Optional markings for three machines are included in the LAV-R kit:
1. USMC: No. 572494 in standard NATO green/black/brown scheme, 1992. This machine is the subject of the box art.
2. USMC: No. 572485 in standard NATO green/black/brown scheme, 1994.
3. 2nd Cavalry Regiment, Australian Army in USMC scheme during Australian trials (refer below), 1990.
LAV-C
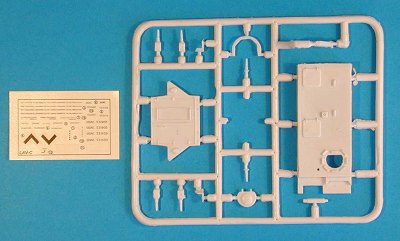 The LAV-C sprue comprises 14 parts,
including the hull top, hull rear and aerials. My example of this kit
does not show as much flash as the LAV-R, but small sink marks are
common. Similarly, these parts will be easily reproduced from styrene
stock if necessary.
The LAV-C sprue comprises 14 parts,
including the hull top, hull rear and aerials. My example of this kit
does not show as much flash as the LAV-R, but small sink marks are
common. Similarly, these parts will be easily reproduced from styrene
stock if necessary.
Markings for three machines are included in the LAV-R kit:
1. USMC: No. 521429 in standard NATO green/black/brown scheme, 1992.
2. USMC: No. 521905 in standard NATO green/black/brown scheme, 1996.
3. US Stabilisation Forces (SFOR), in standard NATO green/black/brown scheme, Bosnia, 1997. Curiously, the box art shows this vehicle with the number 521429 (as in option 1), yet the instructions do not indicate the placement of this decal on the model. This may therefore be an error by the artist and references will need to be consulted.
The Australian LAV (ASLAV) Family
I am not normally an AFV modeller, but I’m always keen to add to my collection of Australian military models, especially if I know that the model will complement a diorama incorporating an appropriate aircraft. In this case, I can envisage a dusty outback setting during an army exercise, with a camouflaged ASLAV parked beneath a stand of eucalypts on the edge of a clearing in which an army Blackhawk has landed. Perhaps there’s a few tired and sweaty infantry barbequing some kangaroo steaks on a piece of steel mesh they’ve picked up somewhere… what could be more Australian?
As such, I’ll briefly describe the Aussie LAVs and the changes that will need to be incorporated into the Ace kit to represent these versions. As I stated above, I’m not an AFV modeller, so I do not have a suitable library of references and have been limited to the information available on the Internet. If there are any experts out there who disagree with my descriptions or can provide more detail, please feel free to add to this review.
The Australian connection with the LAV-25 goes back to 1988, when the Government announced a strengthening of the northern defence capabilities and sought a high-speed and highly mobile, armed reconnaissance vehicle to equip the army in this region. Vehicles in contention for this role included the GM Canada LAV-25, the Steyr Pandur and the Saviem VAB. In the event, 14 LAV-25’s were acquired from USMC stocks and 4 LAV-PC “Bison” were loaned from Canada.
After a year-long extensive evaluation in the rugged Australian conditions, 97 vehicles were ordered from GM Canada, to complement the original 14 ex-USMC vehicles. The Australian version was designated ASLAV (the NATO code for Australia being “AS”). Several important changes were recommended as a result of the evaluation program, the most notable being the addition of airconditioning and more durable (and slightly larger) tyres. The layout of the ASLAV-PC, -C, -A, -F and -R versions is based upon the Canadian Bison model, which differs from the US version by having a larger and more roomy rear hull.
An Australian company, Tenix Defence was chosen to undertake the final assembly of the all ASLAV vehicles, including the fitting of electronics, communications and airconditioning systems at their Wingfield plant in South Australia. Tenix also developed the disruptive camouflage pattern applied to all ASLAVs. The Delco turret fitted to the ASLAV-25 variant were manufactured in Australia by General Dynamics Land Systems Australia.
The ASLAV procurement program has resulted in a total of 144 vehicles in eight different configurations, being:
· ASLAV-25: Armed reconnaissance vehicle with a three-man crew and armed with the 25mm Bushmaster cannon and two 7.62mm MAG58 machine guns.
· ASLAV-PC: Personnel carrier with a two-man crew, armed with a 0.5cal machine gun and capable of carrying seven troopers. Equipped with a rear ramp door.
· ASLAV-C: Command vehicle with a five-man crew and equipped with radios, map stowage, radio masts and a canvas annex.
· ASLAV-A: Ambulance version with a three-man crew, capable of carrying six sitting patients or three stretcher cases.
· ASLAV-S: Surveillance vehicle with a four-man crew, equipped with thermal imaging equipment, laser range finder, ground surveillance radar and television camera on a telescopic boom. Armament is a single 0.5cal machine gun.
· ASLAV-F: Fitter and maintenance support vehicle with a three-man crew and armed with one 7.62mm machine gun. Equivalent to the US LAV-R, having the HIAB crane with a 4000kg lifting capacity and outrigger support jacks. Also carries oxy-acetylene bottles and toolkits.
· ASLAV-R: Recovery and maintenance support vehicle with a three-man crew and armed with one 7.62mm machine gun. Equipped with a 8300kg pulling capacity winch for recovering damaged or bogged vehicles. Earth spades are mounted on the rear of the vehicle to assist stability during recovery operations.
· ASLAV-DTV: Driver training vehicle. Essentially an unarmed ASLAV-25 with the turret removed and replaced by a secondary cabin for the instructor.
Another variant designated ASLAV-M was trialed by the Australian Army but was not selected as part of the inventory. This was equipped with a turret mounted 120mm mortar.
For the modeller, it is the visual differences between the ASLAV and the original LAV series that are the important consideration. Such variations that will need to be incorporated into your model are:
Generic changes
· The ASLAV-PC, -C, -A, -S, -F and -R variants have a bulkier rear hull than their US equivalents, identical to the Canadian Bison version. Without plans, it’s hard to be certain of the exact dimensions of the hull additions or the positions of the upper hatches, but the differences are clearly seen on photographs and will therefore be quite easy to scratchbuild using styrene sheet. Obviously, with the change of upper hull shape, a new rear panel will also need to be fabricated. There are a variety of storage racks and accessories fitted to these vehicles, which will also need to scratchbuilt, with reference to photos.
· Addition of a rather simple protective cage is fitted around the propellers and rudders. This will have to be scratch-built from fuse wire or fine brass wire, referring to photos for the correct shape and position.
· ASLAVs have slightly larger (fatter) and more durable tyres. The tread pattern on the rubber tyres supplied in the kit is inaccurate for the ASLAV, which has a chunky, crossed pattern. This may be a difficult feature to add to your model, as I am unaware of any suitable alternatives. I’ll just make do with the kit tyres on my models for now.
· ASLAVs have a row of tie-down shackles along the side of the hull just above the rear wheels. These are quite small but clearly visible. After contemplating the best way to replicate this feature, I’m going to try taping a length of fine fuse wire across the surface of a piece of Evergreen scribed coach siding and “crimping” it into the grooves with a blunt blade to form a row of shallow inverted “U” shapes. This will then be cut to the correct length and carefully glued to the hull sides.
· The ASLAV has a different shaped exhaust muffler, being shorter and fatter than the US LAV. This should be fairly easy to represent, being a simple “squashed cylinder” shape, partly shrouded by armour plating (again, identical to the Canadian versions). A short length of Evergreen tube gently heated and flattened with ends added will be enough for this item. The muffler outlet pipe can be cut from the kit exhaust and armour added using styrene sheet.
· The position and style of the driving and tail lights on Aussie LAVs will require changing, with reference to photos. The headlights supplied in the kit can be modified quite easily and the tail lights are quite simple also, being simple rectangular orange and red lenses.
· Note that all Aussie LAVs carry a large, black “Caution Left Hand Drive” stencil on the left side of the rear of the vehicle. I don’t know of any decal sheet from which this could be taken, but perhaps suitably sized dry transfer lettering could be used. Alternatively, try the railroad modeling section of your hobby store for suitable lettering.
· The ASLAVs have plenty of grab handles on the hull which differ slightly from the US versions. These are all a simple rectangular shape and can therefore easily be fabricated from fuse or brass wire.
· The jerry can baskets on the hull sides of ASLAVs are a little different from the US counterparts, although some variation exists. Most are of a simple “cage” type, lacking the solid base of those on the LAV.
· There are other, minor differences such as the positioning of towing hitches, mounting of the on-board shovel and axe, tool boxes, etc. It will be up to the individual modeller to decide just how important these changes will be to his/her representation of their ASLAV, but in all cases, these should be quite easily fabricated from styrene stock, stretched sprue and wire.
Specific changes for ASLAV-25
Check your references when building the ASLAV-25, as available photos show a variety of stowage baskets on the turrets. Some machines carry these only at the rear of the turret whereas others have stowage baskets on the turret sides also. Check also for radio aerial positioning.
Specific changes for ASLAV-F
As stated above, this variant is equivalent to the LAV-R but will require significant changes to the upper hull structure. The hull changes will be easy to replicate using styrene sheet, as all surfaces are planar. The ASLAV-F does not have the rear-mounted bracing supports of the LAV-R, so these should be left off.
Specific changes for ASLAV-C
Aside from the different hull shape, the ASLAV-C also has 6 radio aerials in a different arrangement than the US vehicle. Refer to photographs for these.
ASLAV Markings
I am not familiar with the specific unit and other markings carried by the Aussie LAV fleet, but photos show that they are all quite subdued. Obviously, markings will need to be researched by the modeller and taken from the spares box (unless Aussie Decals comes to the rescue!!!). I will attempt to research the markings further and include a description of these in the follow-up article that I will prepare when I build my ASLAVs. I’ll also attempt to procure scale drawings to show the appropriate hull changes that need to be scratchbuilt.
|
REFERENCES |
As suggested above, the features of the ASLAV that I have described will require reference by the modeller. Luckily, there is a huge number of excellent photographs available on the following websites which will allow the modeller to make the necessary changes without too much onerous work:
http://www.diggerhistory.info/pages-armour/allied/current-aslav.htm
http://anzacsteel.hobbyvista.com/Armoured%20Vehicles/aslavph_1.htm
http://anzacsteel.hobbyvista.com/Armoured%20Vehicles/aslavph_2.htm
http://www.defence.gov.au/army/2cav/newgear.html
http://members.tripod.com/~armouredregtsa/tank9c.htm
http://www.thunderandsteel.co.uk/aslav.html
http://www.jed.simonides.org/8x8afv/alpha/aslav_series/aslav-series.html
Similarly, an enormous database is available on the Internet for the US and Canadian LAVs. A simple search on Google (or your preferred search engine) will yield plenty of good results.
|
CONCLUSIONS |
The Ace Models LAV series is a very welcome addition to the range of 1:72 scale AFV kits. The parts are nicely moulded, but show some imperfections, due to the short-run nature of the manufacturing process. With careful pre-construction cleanup and some replacement or addition of finer details from the spares box or using other media common to most modellers, these kits are sure to result in lovely little representations of the LAV variants. Congratulations to Ace for these long-awaited kits.
I cannot comment on scale accuracy, as I don’t have plans or drawings available, but I reckon they’ll look fabulous when finished.
As we all know, rubber can harden and crack with time, so perhaps the inclusion of styrene tyres would have been a better option, although this would probably have been at the expense of the beautiful detail on the tyres provided.
If you are not likely to build your model immediately, be sure to remove the rubber tyres from the bag containing the decals, as these two media don’t mix and you may end up with dirty brownish stains on the decal sheet from the rubber.
A quick perusal of the Ace Models website (www.acemodel.com) indicates that further versions of the LAV family are planned, with the LAV-AD (Air Defence) being the next, proposed for early 2004. Alternatively, other versions will be able to be built from the kits already available with only a little extra effort.
Late entry, April 2005:
Thanks to Mario in Australia for the additional info. mbiagi@bigpond.net.au
If you would like your product reviewed fairly and quickly by a site that has over 200,000 visitors a month, please contact me or see other details in the Note to Contributors.