Italeri 1/35 M4A3E8 Sherman
| KIT #: | 6529 |
| PRICE: | £29.99 |
| DECALS: | Three options |
| REVIEWER: | Richard Reynolds |
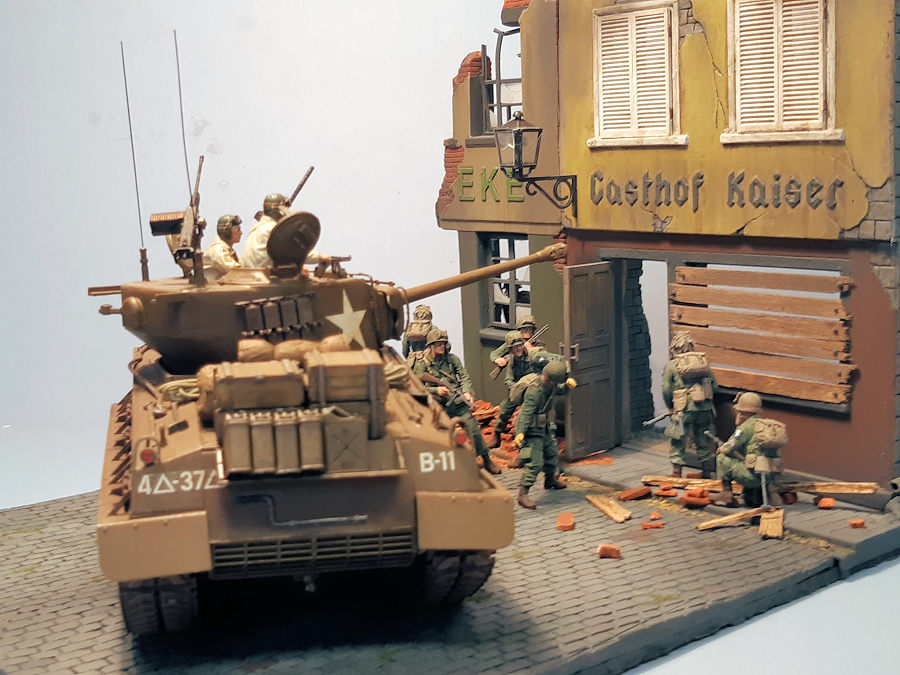
| NOTES: | The Sherman was displayed on a 1:35 Miniart base No 36038 “Ruined German House with Base”. The street section was replaced with a larger base from Fields of Glory Models. The kit was crewed by 1:35 No 347 U.S. Tank Crew Set (European Theater). The base was detailed with 1:35 U.S. 101st Airborne figures from Dragon’s U.S. Army Airborne (Operation Varsity 1945) No 6148 and Master Box 1:35 101st Airborne (Air Assault) Division, Europe, 1944-45 No MB3574 and Master Box 1:35 German Infantry, Western Europe, 1944-45. |
| HISTORY |
The M4 Sherman, officially Medium Tank, M4, was the most widely used medium tank by the United States and Western Allies in World War II. The M4 Sherman proved to be reliable, relatively cheap to produce, and available in great numbers. It was also the basis of several successful tank destroyers, such as the M10, Achilles and M36. Tens of thousands were distributed through the Lend-Lease program to the British Commonwealth and Soviet Union. The tank was named by the British after the American Civil War general William Tecumseh Sherman.
The M4 Sherman evolved from the M3 Medium Tank, which had its main armament in a side sponson mount. The M4 retained much of the previous mechanical design, but moved the main 75 mm gun into a fully traversing central turret. One feature, a one-axis gyrostabilizer, was not precise enough to allow firing when moving but did help keep the reticule on target, so that when the tank did stop to fire, the gun would be aimed in roughly the right direction.
The designers stressed mechanical reliability, ease of production and maintenance, durability, standardization of parts and ammunition in a limited number of variants, and moderate size and weight. Its width and weight were designed to conform to the War Department restrictions at the time that aimed to ease shipping problems and ensure armored vehicles would be compatible with existing bridging equipment.
 These factors, combined with the Sherman's
then-superior armor and armament, outclassed German
light
and medium tanks fielded in 1939–42. The M4 went on to be produced in large
numbers, being the most produced tank in American history. The Soviets'
T-34 medium tank (total
of some 64,549 wartime-produced examples, split roughly 55%-45% between 76 mm
and 85 mm gunned examples) was the only tank design produced in larger numbers
during World War II. The Sherman spearheaded many offensives by the Western
Allies after 1942.
These factors, combined with the Sherman's
then-superior armor and armament, outclassed German
light
and medium tanks fielded in 1939–42. The M4 went on to be produced in large
numbers, being the most produced tank in American history. The Soviets'
T-34 medium tank (total
of some 64,549 wartime-produced examples, split roughly 55%-45% between 76 mm
and 85 mm gunned examples) was the only tank design produced in larger numbers
during World War II. The Sherman spearheaded many offensives by the Western
Allies after 1942.
When the M4 tank went into combat in North Africa with the British Army at El Alamein in late 1942, it increased the advantage of Allied armor over Axis units and was superior to the lighter German and Italian tank designs. For this reason, the US Army believed that the M4 would be adequate to win the war, and relatively little pressure was initially exerted for further tank development.
Logistical and transport restrictions, such as limitations imposed by roads, ports, and bridges, also complicated the introduction of more capable but heavier tanks. Tank destroyer battalions using vehicles built on the M4 hull and chassis, but with open-topped turrets and more potent high-velocity guns, also entered widespread use in the Allied armies.
Even by 1944, most M4 Shermans kept their dual-purpose 75 mm gun. By then, the M4 was inferior in firepower and armor to increasing numbers of German heavy tanks, but was able to fight on with the help of considerable numerical superiority, greater mechanical reliability, better logistical support, and support from growing numbers of fighter-bombers and artillery pieces. Some Shermans were produced with a more capable gun, the 76 mm gun M1, or refitted with a 76.2mm calibre Ordnance QF 17-pounder gun by the British (the Sherman Firefly).
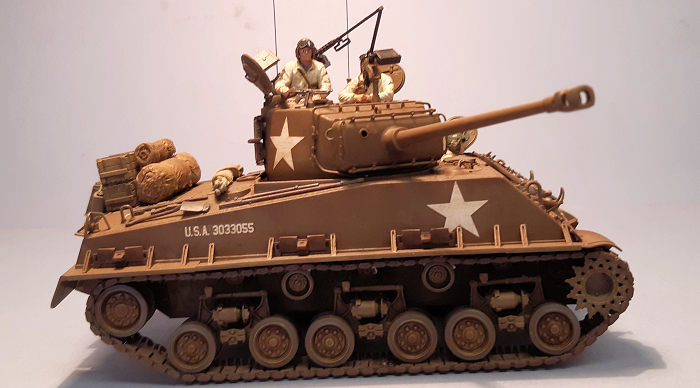
The production of the M4A3E8 versions started at the end of 1944. The M4A3E8, adopting the nickname “Easy Eight”, took several technical improvements enhancing the Sherman operational effectiveness. The 76mm M1 high velocity gun teamed with a new horizontal volute spring suspension (HVSS) system provided better driving performance and a higher speed. The “Easy Eight” participated to the final stages of World War II and took an active part in the Korean War.
The relative ease of production allowed large numbers of the M4 to be manufactured, and significant investment in tank recovery and repair units allowed disabled vehicles to be repaired and returned to service quickly. These factors combined to give the Allies numerical superiority in most battles, and many infantry divisions were provided with M4s and tank destroyers.
After World War II, the Sherman, particularly the many improved and upgraded versions, continued to see combat service in many conflicts around the world, including the UN forces in the Korean War, with Israel in the Arab–Israeli wars, briefly with South Vietnam in the Vietnam War, and on both sides of the Indo-Pakistani War of 1965.
| THE KIT |
 This is my first attempt at an armoured vehicle. I’ve
always loved the Sherman but the reputation of the M4A3E8 “Easy Eight” captured
my attention. I watched the movie “Fury” and decided I had to make one.
This is my first attempt at an armoured vehicle. I’ve
always loved the Sherman but the reputation of the M4A3E8 “Easy Eight” captured
my attention. I watched the movie “Fury” and decided I had to make one.
I did some research online. It shouldn’t have come as a surprise to me, however, there was a bewildering selection of Shermans on the market. I researched Academy, Asuka. (which came with a £60 price tag, which was a little out of my range, but when I looked in the box at my LHS, it was a jewel). Dragon, Airfix, Meng Models and Tamiya, amongst others, to provide the modeller with a plethora of kits.
I read a review of the Italeri (No 6529) kit, which received favourable feedback, and at £29.99, seemed like a good bet. The kit comes straight off the back of the Brad Pitt and Shia LaBeouf movie “Fury”. That was enough for me to make the purchase.
The kit comprises 4 sprues and a separate lower hull, in crisp, well detailed green injection moulded plastic. Two sets of tracks are supplied and are of good quality, finely moulded in grey flexible plastic.
| CONSTRUCTION |
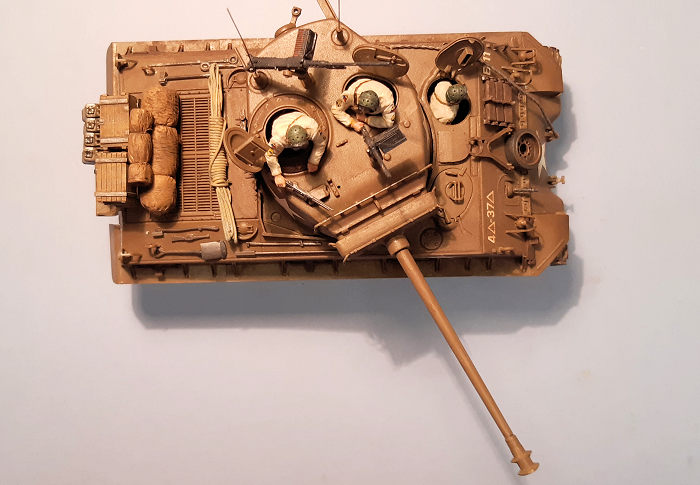
I decided to make the Tamiya in-hull crew first. They will need to be placed inside the hull before the upper and lower halves of the hull are joined. Likewise, the Commander and Gunner will need to be placed inside the turret before it’s upper and lower halves are glued, depending on whether you want them just ‘heads out’ or full body display. I chose the former.
The entire kit was primed with auto shop grey primer and then airbrushed with three coats of MIG-0925 Olive Drab Base. The tires were then hand painted with MIG-033 Rubber and Tires. Once dry, the return rollers were attached to the bogey supports and glued to the chassis side walls.
Next, the horizontal volute
spring suspension (HVS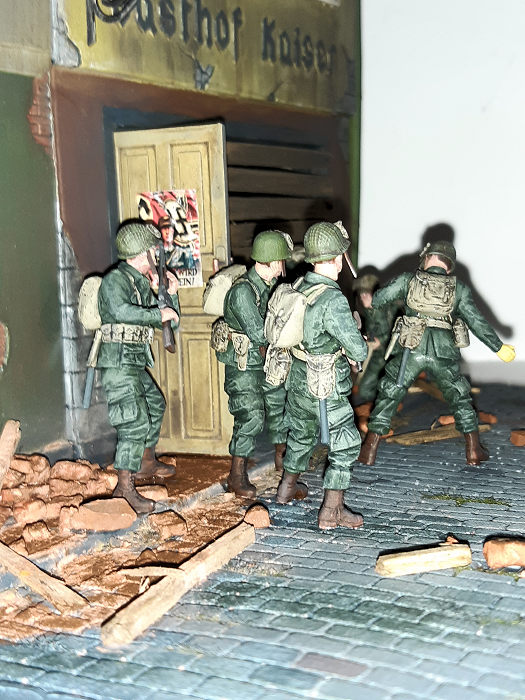 S) system was assembled. This comprised six units of 24
wheels, which were attached to the chassis along with the drive sprockets.
Finally, the rear wheels were attached to the rear axles.
S) system was assembled. This comprised six units of 24
wheels, which were attached to the chassis along with the drive sprockets.
Finally, the rear wheels were attached to the rear axles.
The next task was to remove the front mud guards from the upper hull. The M4A3E8 has square guards and the existing ones will need to be removed to accommodate them. This step is clearly laid out in the instructions.
The .30 Cal and swivel mount are then attached, this is a good time to insert the driver if you are using one. Before the upper hull is glued to the lower hull, the tracks were painted with MIG-035 Dark Tracks. Once dry, they were given a wash of MIG-1002 Tracks Wash.
Attach the tracks, making sure that the track shoes are pointing in the right direction, in this case, U shape to the front of the tank.
Once I was happy with the tracks and the cyano had dried, I glued sections of the tracks to the return rollers, to give a more authentic look.
The upper hull was then glued to the lower hull using Revell Contacta and the front glacis was added.
At this stage, I decided to construct the storage boxes and fuel cans, shovels, picks and roll mats that would decorate the vehicle. These were painted using a MIG-071 Khaki base and washed with thinned Windsor & Newton Griffin Alkyd Brown oil paint. The shovel and pick heads were painted using MIG-0045 Gun Metal.
Hatches (open) and lights, mud guards and the oil drum storage container were then glued to the hull with cyano.
The main gun was then assembled, then the upper and lower turret halves were glued together. These were sanded and given a fresh coat of olive drab base. The 76mm gun was then attached along with the upper hatches. This is the point at which I added the Commander and Gunner, before the .50 Cal and .30 Cal anti-aircraft guns were added.
The .50 and .30 Cal guns were painted with MIG-0045 Gun Metal and given a black wash. They were then attached to their mounts, but not glued, in order to enable them to be posed in different positions.
Finally, the Storage boxes, roll mats and fuel cans and accessories that were constructed earlier were added, along with the aerial wires, which I replaced with brass 0.3mm wire from Griffon Model.
| COLORS & MARKINGS |
 3 options are available. Option A, 2ND Armoured
Division, 66th Tank Battalion, “Fury”, Germany early 1945. Option B, 14TH
Armoured Division, 25th Tank Battalion, Germany early 1945. I elected to model
example C: 4th Armoured Division, 37th Tank Battalion, Germany early 1945. The
decals were of good quality and went on without any issues using Microset and
Microsol solutions.
3 options are available. Option A, 2ND Armoured
Division, 66th Tank Battalion, “Fury”, Germany early 1945. Option B, 14TH
Armoured Division, 25th Tank Battalion, Germany early 1945. I elected to model
example C: 4th Armoured Division, 37th Tank Battalion, Germany early 1945. The
decals were of good quality and went on without any issues using Microset and
Microsol solutions.
The whole kit was given a generous wash of MIG-1000 Brown Wash for German Dark Yellow and sprayed with Humbrol Acrylic Varnish aerosol.
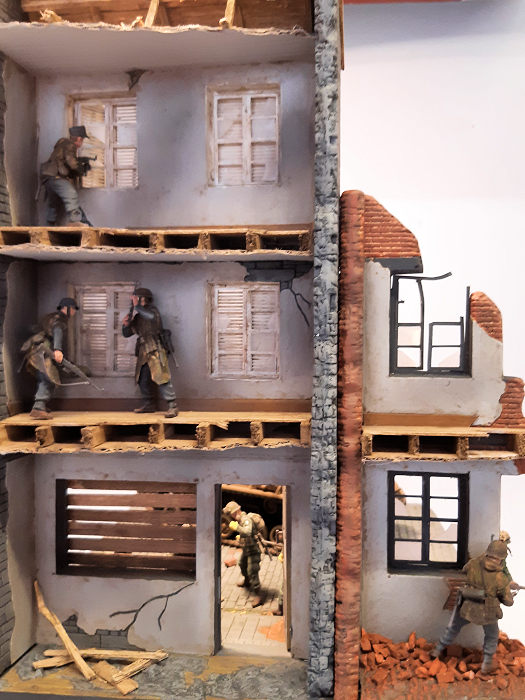
The MiniArt Ruined German House with Base, contained 12 vac-formed pieces that made up the buildings, front and back, each with side walls. A vac-form base was included. In addition, there were 8 sprues of accessories to choose from, including doors, iron railings, guttering, street furniture and a selection of window frames. The roof section was an injection moulded plastic part. I decided that I wanted to portray the guesthouse boarded up, adding a hint of menace to the diorama.
The vac-form parts required trimming, dry fitting and sanding. Once I was satisfied with the fit, the front and rear sections were glued together with Revell Contacta cement.
I decided to remove the original street base and replace it with a larger resin one from FoG, for just £9.99, in order to adequately accommodate the Sherman and 101st Assault Infantry.
The entire diorama was airbrushed using MIG acrylic paints and washes. The flooring on the inside of the buildings were constructed using a mixture of coffee stirrers found in your average Starbucks coffee shop (other coffee shops are available). These were given a wash with Windsor & Newton Griffin Alkyd Brown oil paint. The flooring was constructed by my able assistant Frank Reynolds.
The rubble was hand made from DAS modelling clay, and the street debris from coffee stirrers.
| CONCLUSIONS |
The kit was easy to assemble, the instructions were straight forward and quite frankly, I really enjoyed the build. It may not have escaped the attention of readers that I decided to display the Easy Eight on a base. The whole project took around three months, I love the 101st Airborne Division (Currahee) and couldn’t resist having a squad of these remarkable soldiers assaulting a German guesthouse with a grenade through the door, with German Infantry waiting the other side. The whole project was an extremely satisfying experience.
| REFERNCES |
The kit instructions, the internet.
9 November 2020
Copyright ModelingMadness.com
If you would like your product reviewed fairly and fairly quickly, please contact the editor or see other details in the Note to Contributors.
Back to the Main Page Back to the Review Index Page Back to the Previews Index Page