Hobby Boss 1/35
AAVP-7A1 with EAAK
|
|
82414 |
|
PRICE: |
$62.00 |
|
DECALS: |
Two options |
|
REVIEWER: |
|
|
NOTES: |
Complete Interior |
|
HISTORY |
The Amphibious Assault Vehicle (AAV) - officially
designated as the AAV-7A1 (formerly known as the LVT-7) - is a fully tracked
amphibious landing vehicle manufactured by
The AAV-7A1 is the current amphibious troop transport
of the  subsequent
mechanized operations ashore. It is also operated by other nation’s military
forces (e.g.,
subsequent
mechanized operations ashore. It is also operated by other nation’s military
forces (e.g.,
The primary responsibility of AAVs during an
amphibious operation is to spearhead a beach assault. They disembark from ship
and come ashore, carrying infantry and supplies to the area to provide a forced
entry into the amphibious assault area for the surface assault element. Once the
AAVs have landed, they can take on several different tasks: manning check
points, Military Operations in Urban Terrain (MOUT) missions, escorting food
convoys or mechanized patrol. The standard AAV is equipped with a MK-19 grenade
launcher and an M2 .50 caliber machine gun. With a 10,000 pound capacity, the
AAV can also be used as a bulk refueler or a field expedient ambulance. It is
easily the most versatile vehicle in the Marine Corps.
The
LVT-7 was first introduced in 1972 as a replacement for the LVT-5. In 1982,
Another added
improvement was the Cadillac Gage weapon station or Up-Gunned Weapon Station
(UGWS), which was armed with both a .50 cal (12.7 mm) M2HB machine gun and a
Mk-19 40 mm grenade launcher.
The AAV-7A1 was heavily used in the war in Iraq and
was criticized for providing poor protection for the crew and passengers
compared with other vehicles such as the M2 Bradley. Several of them were
disabled or destroyed during the Battle of Nasiriyah, where they faced RPG,
mortar, tank and artillery fire. At least one vehicle was destroyed by friendly
fire from USAF A-10s. E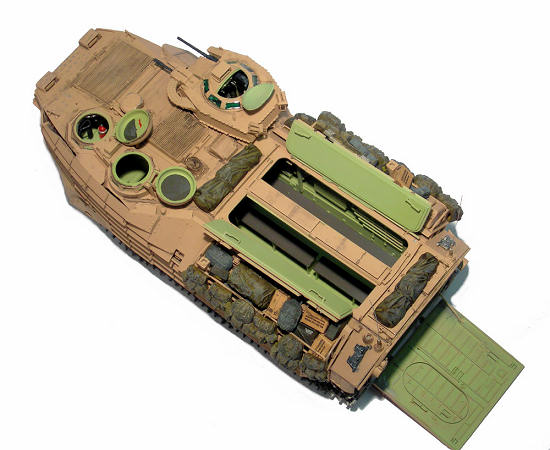 ighteen Marines were lost. AAV-7A1s were also used
extensively in the Persian Gulf War and in Operation Restore Hope. As a result,
Enhanced Applique
Armor Kits (EAAK) were developed for the AAV-7A1, and the added weight of the
new armor necessitated the addition of a bow plane kit when operating afloat.
This new armor package consists of a set of removable
corrugated steel plates, bolted to the vehicle’s armor. All AAVP7A1s were
equipped with EAAK installation brackets (small rectangular metal blocks with
holes for bolts in them) welded to the side and top armor surfaces, but not all
vehicles received the actual armor plate kits. This became a problem during
Operation Iraqi Freedom, where some USMC units had to improvise and use flat
armor plates instead of EAAK sections.
ighteen Marines were lost. AAV-7A1s were also used
extensively in the Persian Gulf War and in Operation Restore Hope. As a result,
Enhanced Applique
Armor Kits (EAAK) were developed for the AAV-7A1, and the added weight of the
new armor necessitated the addition of a bow plane kit when operating afloat.
This new armor package consists of a set of removable
corrugated steel plates, bolted to the vehicle’s armor. All AAVP7A1s were
equipped with EAAK installation brackets (small rectangular metal blocks with
holes for bolts in them) welded to the side and top armor surfaces, but not all
vehicles received the actual armor plate kits. This became a problem during
Operation Iraqi Freedom, where some USMC units had to improvise and use flat
armor plates instead of EAAK sections.
All of these changes to the original LVTP7 design
caused significant increases in vehicle weight, which placed excessive strain on
the vehicle’s suspension and power systems. For example, the vehicle’s ground
clearance was reduced from the original 16 inches to less than 12 inches. To
address these problems,
the Assault Amphibious Vehicle Reliability, Availability,
Maintainability/Rebuild to Standard (AAV
There are currently three variants of the AAV-7A1
used by the USMC: AAVP-7A1 (personnel); AAVC-7A1 (command); and AAVR-7A1
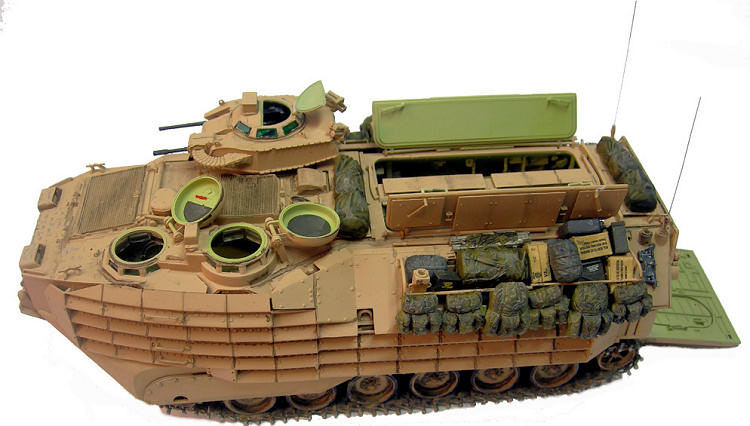
(recovery). The AAVP-7A1, the subject of this review, is the most common AAV. It
carries four crew radios as well as the AN/VIC-2 intercom system. The AAVP-7A1
can carry 25 combat-equipped Marines and its three crew members: driver, crew
chief/vehicle commander (also the gunner); and the rear crewman.
|
THE
|
|
CONSTRUCTION |
The lower hull is
first on the assembly agenda. I glued all 12 of the road wheels together and
assembled the two propulsion units used when the vehicle is “swimming.” After
attaching all of the suspension system’s torsion bars to the hull, I then glued
the 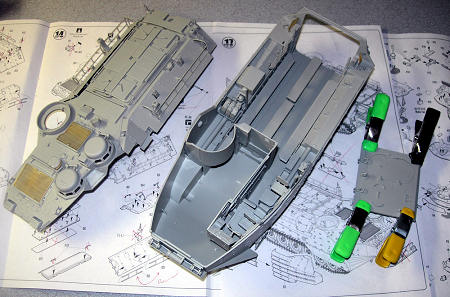 wheels and drive sprockets to the lower hull. At this stage, the
instructions say to assemble 166 track links, consisting of the link and a road
pad. That equates to gluing together 332 plastic parts, and, given my dread of
individual link track assemblies, I decided at this point to delay this task.
wheels and drive sprockets to the lower hull. At this stage, the
instructions say to assemble 166 track links, consisting of the link and a road
pad. That equates to gluing together 332 plastic parts, and, given my dread of
individual link track assemblies, I decided at this point to delay this task.
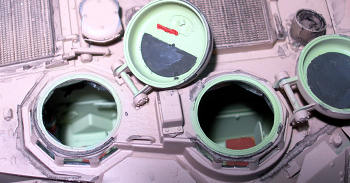
At this point, I
began assembling the vehicle’s detailed interior. The interior walls include the
replication of a number of equipment items that are mounted to the walls of the
real vehicle. I then assembled the bench seats to the interior floor and mounted
this in the lower hull. Next, I moved to the assembly of the driver’s
compartment and the lower section of the gun station. To give you some idea of
how complete the interior is on this kit, steps 5-12 in the 19-step instruction
sheet are devoted to the interior’s assembly.
After completing
the interior, it was time to paint it, but I had no idea what colors to use. I
searched the web, and managed to find a number of great interior photos of the
AAVP7, along with some discussions of the interior colors (see items 3 and 4 in
my references). The primary interior color is “Sea Foam Green,” which eerily
reminds me of the interior color of an underground Minuteman ICBM launch control
center I have seen more of those than I could ever wish for, and I wasn’t even
on a launch crew!). A good match for this almost pastel green is Tamiya XF-21,
Sky (and I 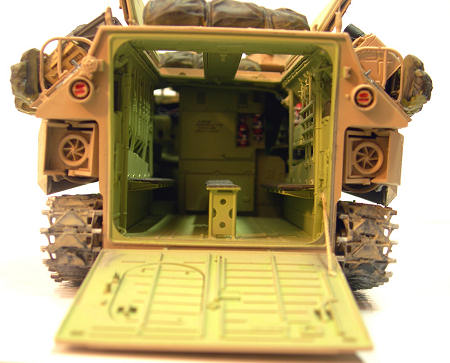 must admit, I don’t recall ever seeing a sky this color). I sprayed
the interior with Tamiya Sky and set it aside to dry (yeah, I know: the old man
is finally moving towards acrylic paints; but I still thin them with lacquer
thinner. Some habits can’t be broken). I then hand-painted various interior
equipment items such as black boxes and fire extinguishers. Finally, I dabbed on
puddles of Future and applied the interior decals (I used this “puddling”
approach to avoid having to completely gloss the interior, and the decals will
adhere nicely to the painted surfaces as the puddles of Future dry).
must admit, I don’t recall ever seeing a sky this color). I sprayed
the interior with Tamiya Sky and set it aside to dry (yeah, I know: the old man
is finally moving towards acrylic paints; but I still thin them with lacquer
thinner. Some habits can’t be broken). I then hand-painted various interior
equipment items such as black boxes and fire extinguishers. Finally, I dabbed on
puddles of Future and applied the interior decals (I used this “puddling”
approach to avoid having to completely gloss the interior, and the decals will
adhere nicely to the painted surfaces as the puddles of Future dry).
Next, I moved on
to the exterior details. I started mounting the various pieces to the upper
hull, including the two large PE screens. In Step 13, you assemble two side
antenna stands that will provide a total of 4 antennas for the vehicle, but I
found that only 2 antenna bases are included in this kit. I don’t know if this
is because Hobby Boss just neglected to include them or 4 antennas are only
found on the command version of the AAVP-7, which, if this is the case, Hobby
Boss may be intending to release at a later date. At any rate, I spent a lot of
time looking for the non-existent parts, which was a little bit inconvenient, to
say the least. Also in Step 13, Part D13, one of the external stowage assembly
end braces, is mislabeled. Finally, one needs to be very careful not to reverse
Parts R8 (Step 13) and R11 (Step 14) when assembling the vehicle’s two large top
hatches. Another minor instruction sheet glitch is that Parts Q8 and Q9 need to
be reversed.
 Continuing with
the top of the vehicle, I mounted the two left side hatches over the driver’s
compartment. I then assembled the exhaust stack, including the two very nice PE
screens that go on the sides. Be careful here: it is easy to reverse the exhaust
stack. I had read this on another web review of the kit, so searched the web for
pictures of the real thing to understand how this assembly is oriented on the
vehicle.
Continuing with
the top of the vehicle, I mounted the two left side hatches over the driver’s
compartment. I then assembled the exhaust stack, including the two very nice PE
screens that go on the sides. Be careful here: it is easy to reverse the exhaust
stack. I had read this on another web review of the kit, so searched the web for
pictures of the real thing to understand how this assembly is oriented on the
vehicle.
At this stage, it
was time to glue the upper and lower hulls together. This was the first time I
encountered a fit problem: no matter what I did, I seemed to have gaps between
the upper and lower hull. After wrestling with the problem for some time, I
concluded that the later installation of the EAAK would hide these, so I pressed
forward. My advice is to carefully fit check this assembly before applying any
glue, and to make whatever modifications you can to make them fit better. After
this struggle, I assembled the rear door, mounted it in the drop down ramp, and
set it aside.
Step 17 instructs
you to glue the EAAK plates to the side of the vehicle, but since I had delayed
assembly of the tracks, I skipped this step and finished assembling the
remaining exterior components. I then moved to Step 18, which guides you through
the 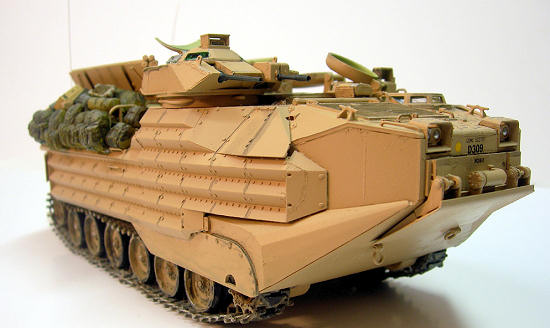 assembly of the very detailed, complete UGWS. The UGWS is a model within the
model, and it takes quite a while to assemble; but once completed, it is worth
the effort. I mounted the UGWS in its station, placed the rear ramp on the
vehicle in the closed position, and then painted the exterior color. I then took
a black Sharpie and painted the rubber road wheels.
assembly of the very detailed, complete UGWS. The UGWS is a model within the
model, and it takes quite a while to assemble; but once completed, it is worth
the effort. I mounted the UGWS in its station, placed the rear ramp on the
vehicle in the closed position, and then painted the exterior color. I then took
a black Sharpie and painted the rubber road wheels.
No longer able to
avoid it, I set out to assemble the tracks. I found these tracks to be
particularly difficult, given the fact that: (1) each link is two pieces; and
(2) the fit of the links to each other is not very precise, requiring one to
shave off some mold lines to make them fit better. While I would prefer not to
hassle with individual link tracks, I believe if one must deal with them,
Dragon’s Magic Tracks are the best fitting of all of them (although I have yet
to build a Tamiya kit with individual track links). After numerous armor kits,
I’ve decided that Dragon’s DS flexible track is my preferred track approach.
After several nights and more
than one hassle, I finally had the tracks mounted to the vehicle. I then glued
on the front side skirts and the EAAK panels. I used clear Tacky Glue to attach
the windows to the driver’s station and the rear crewman’s station. I painted
the window inserts of the UGWS with Tamiya’s X-25 Clear Green, and, while this
was drying, I pressed in the clear window panels.
|
COLORS &
MARKINGS |
The color guide
shows two different vehicles in the traditional green-brown-black camo scheme;
however, I had seen photos of AAVP7s painted in Desert Storm tan while in combat
in Iraq, so I decided this was the color for my model. Once painted, I glossed
the entire model with Future to accommodate applying washes and the few exterior
decals.
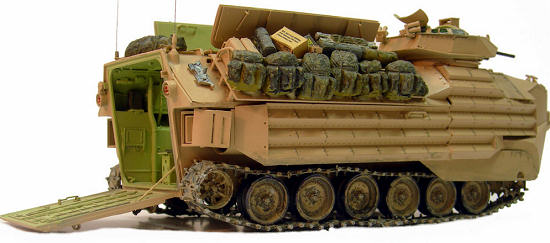
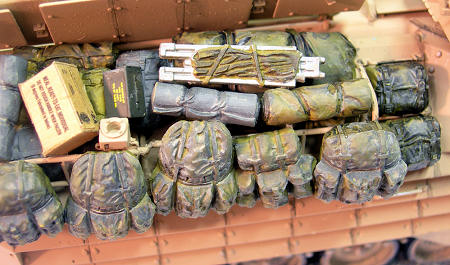 When applied, this
color scheme is not very exciting, so I decided the model needed to be spruced
up with some contrasting color. I concluded that the best way to do this was to
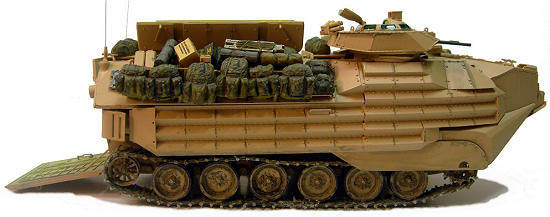
add various pieces of olive drab and green equipment and ammo boxes to the
exterior storage bins. I just happen to have one of Tamiya’s MM266 Modern US
Military Equipment Sets on hand, so I opted to paint various items from the set
and glue them to the vehicle. To provide even more contrast, this set includes
sleeping bags, sleeping mats, and plastic water cans that are dark gray. It also
includes paper Meals Ready to Eat (MRE) cartons that you can cut out, fold, and
glue together.
When applied, this
color scheme is not very exciting, so I decided the model needed to be spruced
up with some contrasting color. I concluded that the best way to do this was to
add various pieces of olive drab and green equipment and ammo boxes to the
exterior storage bins. I just happen to have one of Tamiya’s MM266 Modern US
Military Equipment Sets on hand, so I opted to paint various items from the set
and glue them to the vehicle. To provide even more contrast, this set includes
sleeping bags, sleeping mats, and plastic water cans that are dark gray. It also
includes paper Meals Ready to Eat (MRE) cartons that you can cut out, fold, and
glue together.
I decided to
display the model with all of the hatches open. The large rear upper deck
hatches, the rear crewman’s hatch, and the driver’s hatch are made to open and
close, but the rear ramp and the UGWS hatch need to be glued in the open
position. For the rear ramp, I used Super Glue to attach the small rope that is
used to raise and lower the ramp.
The final touch
was to cut two lengths of guitar string for the rear-mounted radio antenna ands
superglue them to the antenna mounts on the rear deck.
|
CONCLUSIONS |
Hobby Boss has hit a home run with this kit, and once assembled, it is impressive (I am amazed how big the real vehicle is when set next to a 1/35 scale M1 tank). The parts count alone will take your breath away, so be prepared for the long haul if you opt to assemble this kit. Needless to say, some assembly experience is recommended for those intent on tackling this kit. The kit’s interior is something to behold, and it is a nice, unique addition to my armor collection. I highly recommend this kit to armor and military vehicle buffs. Way to go, Hobby Boss!
|
REFERENCES |
1.
Assault
Amphibian Vehicle Personnel Model 7A1, Federation of
American Scientists (FAS) Military Analysis Network, April 14, 2000.
2.
Primeportal.net, 2009.
3. KitMaker Gallery - AAVP48, September 12, 2009.
Blair Stewart
If you would like your product reviewed fairly and quickly, please contact me or see other details in the Note to Contributors.