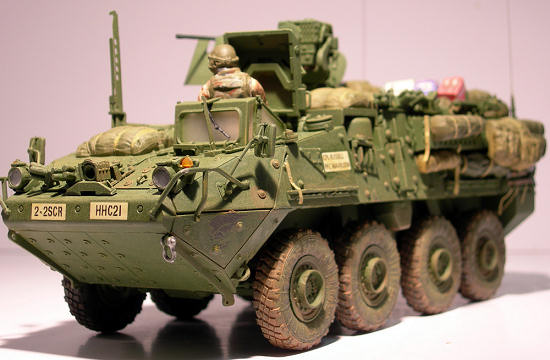
Trumpeter 1/35 M1127 Stryker Reconnaissance Vehicle
|
|
00395 |
|
PRICE: |
$48 |
|
DECALS: |
Three options |
|
REVIEWER: |
|
|
NOTES: |
PE, vinyl tires, figures, stowage equipment
|
|
HISTORY |
The Stryker is a family of
 The
Stryker uses a
Caterpillar diesel engine common in
The
Stryker uses a
Caterpillar diesel engine common in
Extensive computer support helps soldiers fight the enemy while reducing
friendly fire incidents. Each vehicle can track friendly vehicles in
the field as well as detected enemies. A day-night
thermal imaging camera allows the vehicle commander to see what the
driver sees. Soldiers can practice training with the vehicles from computer
training modules inside the vehicle. The driver and the vehicle commander (who
also serves as the gunner) have
periscopes that allow them to see outside the vehicle without
exposing themselves to outside dangers. The vehicle commander has almost a
360-degree field of vision; the driver, a little more than 90 degrees.
The vehicle’s armor suite is thicker than the MOWAG design, which enables the
Stryker to stop 14.5 mm armor-piercing machine-gun rounds and artillery
fragments.
The
M1127 Reconnaissance Vehicle (RV) is used by
The reconnaissance troop is organized into a headquarters section, three recce
platoons, and a mortar section. Each of the three recce platoons is organized
with four Stryker reconnaissance vehicles, each mounting an
M2
.50 cal machine gun or
Mk
19 40mm grenade launcher and equipped with
Javelins. Each vehicle carries a 2-man vehicle crew and a 4-man scout
squad for 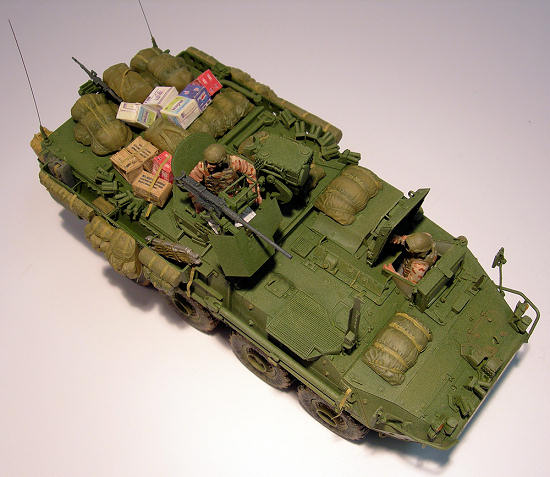 dismounted
reconnaissance (a 5-man squad if augmented by a linguist/interpreter). Each
recce squad in the platoon has an assigned human intelligence collector.
dismounted
reconnaissance (a 5-man squad if augmented by a linguist/interpreter). Each
recce squad in the platoon has an assigned human intelligence collector.
The first Stryker brigades were deployed to
The 5th Brigade 2nd Infantry Division was the first Stryker unit sent to
The Army recently announced that a protective design change is coming for the
Stryker: the addition of a V-shape hull to the bottom of the 20-ton vehicle. The
shape would help deflect blasts from the Stryker’s underbelly and is modeled on
a similar design in the Mine Resistant Ambush Protected, or MRAP, class of
armored vehicles.
|
THE |
 consists
of 440 plastic parts on 15 sprues, nicely detailed vinyl tires, and three sets
of photo-etched detail parts. Features of the kit include a one-piece
multi-slide molded lower hull, underside detailed suspension, central drive
train with differentials and drive shafts, rear panel with separate ramp and
crew entry doors, inside/outside latch handles, large jerry can racks, rubber
tires and a new molded upper hull.
consists
of 440 plastic parts on 15 sprues, nicely detailed vinyl tires, and three sets
of photo-etched detail parts. Features of the kit include a one-piece
multi-slide molded lower hull, underside detailed suspension, central drive
train with differentials and drive shafts, rear panel with separate ramp and
crew entry doors, inside/outside latch handles, large jerry can racks, rubber
tires and a new molded upper hull.
|
CONSTRUCTION |
After studying the 20-page instruction booklet (I have finally learned to at
least glance at the instructions of today’s kits before launching into them.
Hey: it only took me about 55 years of modeling to figure this out!), I began
assembling the lower hull and drive train. Steps 2-7 take you through all of the
suspension system and steering mechanisms. I deferred on Step 7, which guides
you through assembly of the wheels, to a later time in the construction process.
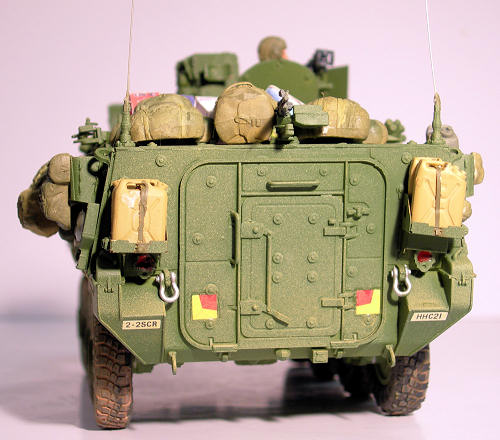
Steps 8-9 cover the assembly of the rear hull, including the personnel door.
Here, I assembled the nicely done PE jerry can racks and attached them to the
rear hull using super glue. Once I had assembled it, I glued the rear hull to
the bottom hull.
 Step 10
begins the assembly of the upper hull, and, again, one has the option of using
some very nice PE parts to represent some of the upper hull items. In step 12,
one has to assemble all of the smoke discharging units, all of which are
attached to PE bases. While tedious, the finished product is well worth it. Step
14, which is the assembly of the side stowage bins, requires some finesse as
several of the parts are quite small. Also, I found that Part J49 is mislabeled
in the instructions: it is actually J29. Be sure and drill out the two holes in
Step 16 to accommodate mounting of the front smoke dischargers.
Step 10
begins the assembly of the upper hull, and, again, one has the option of using
some very nice PE parts to represent some of the upper hull items. In step 12,
one has to assemble all of the smoke discharging units, all of which are
attached to PE bases. While tedious, the finished product is well worth it. Step
14, which is the assembly of the side stowage bins, requires some finesse as
several of the parts are quite small. Also, I found that Part J49 is mislabeled
in the instructions: it is actually J29. Be sure and drill out the two holes in
Step 16 to accommodate mounting of the front smoke dischargers.
Steps 18-20 involve more assembly of upper hull items such as the head light
assemblies, driver’s hatch and the winch. Once these are finished, Step 21
guides you through attaching them to the upper hull. At this stage, I attached
the two PE grill covers to the grills on the vehicle’s topside. Step 22 involves
drilling another hole, so be careful again.
In Step 23, I assembled the clear plastic parts into the driver’s windshield
assembly. Trumpeter includes nice masks for the clear parts so that this
assembly can be glued to the vehicle and painted at the same time as the entire
vehicle. Once the upper hull was
completed, I began gluing it to the lower hull. Here is where I ran into my one
and only fit problem: I had a somewhat difficult time mating the two hulls
together. After fiddling, using a combination of liquid, tube and super glues,
clamping, and in general struggling with the fit of the two pieces, I finally
realized that the permanent gap I ended up with along the sides would not be
overtly visible to the casual observer, and decided to live with it. My only
caution to others is to dry fit, dry fit, and then dry fit again when you get to
this stage.
At this point I began to feel like the end was near; then, however, I turned the
page in the instructions and discovered that the turret assembly and the two
machineguns were mini-kits in themselves. Once assembled, the Ma Deuce is
impressive and quite detailed. The optional PE shield really adds to its scale
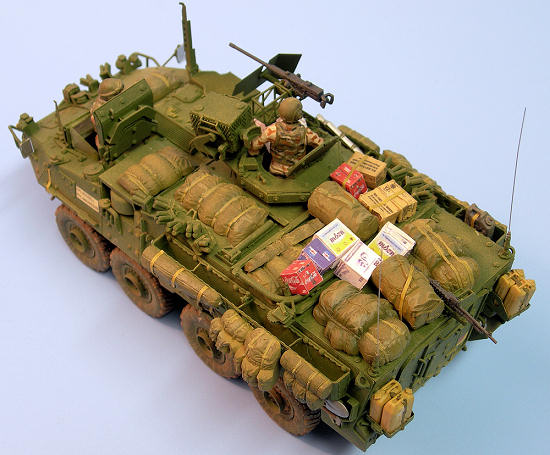
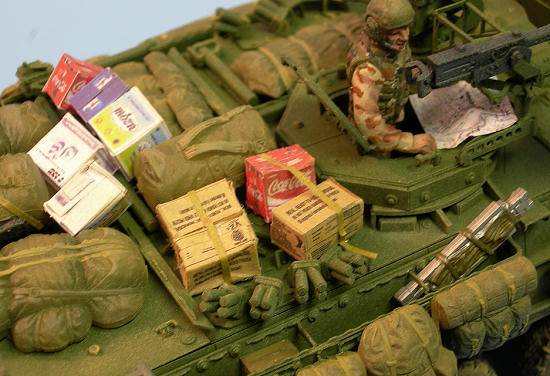
look. Steps 30-32 involve assembling the crew members and attaching and making
the stowage “tapes” or straps that are used to mount personnel equipment to the
vehicle. I then cut out the stowage set boxes and glued them together with tacky
glue. This requires a little bit of skill as the paper is naturally thin and you
are forming a 3D object from a planar material. I found it very useful to scribe
each potential box fold with an Xacto knife to facilitate folding the box flaps
into the final shape. . The last assembly step was to drill holes in the antenna
mounts and super glue a length of steel guitar wire in each to represent radio
antennas.
|
COLORS & MARKINGS |
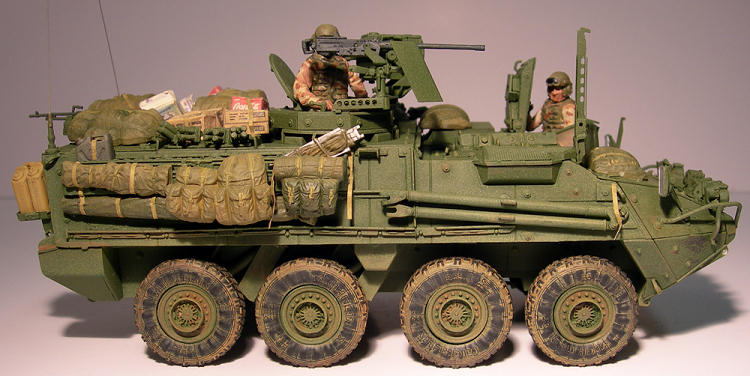
Once everything was assembled, I headed to my basement paint shop. Strykers are
a dark green color (not OD), and the Trumpeter full color painting guide in the
kit calls for FS34102, so I opted for Testors Model Master Medium Green 34102.
I painted the wheels separately and set
them aside to dry.
 After the
exterior coat was dry, I applied what few decals there are for these vehicles by
transferring them to a puddle of Future at each decal location on the model (I
didn’t want to go through the hate, pain and grief of giving the entire model a
coat of Future). I then painted the soft cover equipment items with various
shades of green and dry brushed them to highlight their folds, etc. I painted
the two crew figures with a combination of oils and Model Master enamels. I
added a few equipment items (such as a water can and a cot) from a Tamiya Modern
After the
exterior coat was dry, I applied what few decals there are for these vehicles by
transferring them to a puddle of Future at each decal location on the model (I
didn’t want to go through the hate, pain and grief of giving the entire model a
coat of Future). I then painted the soft cover equipment items with various
shades of green and dry brushed them to highlight their folds, etc. I painted
the two crew figures with a combination of oils and Model Master enamels. I
added a few equipment items (such as a water can and a cot) from a Tamiya Modern
Once I finished all the painting, I slipped the vinyl tires onto their wheels
and glued the wheels to the lower suspension. I covered the wheels and lower
hull with a thin wash of reddish brown acrylic paint and then used artist chalk
dust to simulate road dust over most of the vehicle.
The final step in painting the model was to brush paint the sledgehammer, shovel
and axe on the vehicle’s rear and their wooden handles.
|
CONCLUSIONS |
In a relatively short time, Trumpeter has become a serious competitor in the
1/35 scale vehicle modeling world. I enjoyed every step of this project, and
can’t wait to build my next Trumpeter kit. I highly recommend Trumpeter’s
Stryker kits to armor nuts and others.
|
REFERENCES |
 “Stryker,”
Wikipedia, April 2010.
“Stryker,”
Wikipedia, April 2010. If you would like your product reviewed fairly and fairly quickly, please contact the editor or see other details in the Note to Contributors.