| KIT #: | 97 |
| PRICE: | $10 SRP for the base kit |
| DECALS: | One option |
| REVIEWER: | Dale Rannals |
| NOTES: | Conversion using Tamiya M5A1 Stuart |
| HISTORY |
 Development
of the T82 started in December 1943. The vehicle was put on trials in August
1944, but was never mass-produced, nor saw service.
The T82 was built by the Heil Company to a specific Ordinance Department
requirement for a small,
M5A1-based lightweight self-propelled howitzer
for Pacific jungle operations. To
keep the weight to a minimum the turret was eliminated and the howitzer mounted
in the front glacis
The M3 105mm howitzer’s
traverse
was limited to a few degrees each side and elevation was +30° to -5.
The
30 pound projectile could be fired about 5 miles and 58 rounds could be carried.
Two pilot models were built but the project was abandoned in May 1945.
Development
of the T82 started in December 1943. The vehicle was put on trials in August
1944, but was never mass-produced, nor saw service.
The T82 was built by the Heil Company to a specific Ordinance Department
requirement for a small,
M5A1-based lightweight self-propelled howitzer
for Pacific jungle operations. To
keep the weight to a minimum the turret was eliminated and the howitzer mounted
in the front glacis
The M3 105mm howitzer’s
traverse
was limited to a few degrees each side and elevation was +30° to -5.
The
30 pound projectile could be fired about 5 miles and 58 rounds could be carried.
Two pilot models were built but the project was abandoned in May 1945.
| THE KIT |
Motivation comes from strange places sometimes.
Well, a lot of times actually.
In this case it came from a computer game I’ve been playing for well over
a year now.
The game is called
World of Tanks.
It is a free online
game where you and 29 random other people, divided into two teams, battle for
supremacy on various 1km x 1km maps.
Well, one of the tanks you can drive is the T82, in this case categorized
as an 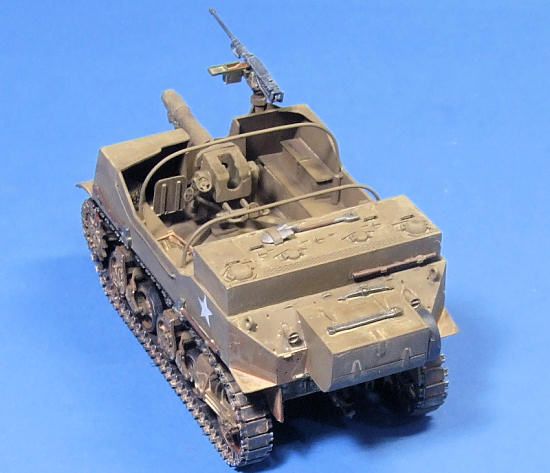 bash was in the making.
The
Tamiya kit is old, dating somewhere in the 1970’s.
My kit was molded in a hard dark green plastic, on which there was very
little flash on any of the parts.
I
don’t know if this is a testament to the molds or if this is an early boxing.
Two lengths of vinyl tracks are included, these being the heat-squish
together type that are impervious to any known cement.
So, yes, the Tamiya kit is old. It was
the only game in town until the arrival of a much more modern and detailed
offering by
However, the short hull didn’t bother me in the least. You see, I did not have a whole lot to go on to make a T82. I had a couple of photos I found on the Internet and the 3D model from the World of Tanks game (which may sound silly, but the developers of this game continually strive to get the details right). So, I knew I was going to need do a lot of assuming on this build. But I was more worried about getting the general shape and character of the little tank than pure dimensional accuracy anyway. Sometimes not having a lot of reference data can make things easier.
| CONSTRUCTION |
I started this build out by assembling the parts common to the M5, ie: the drive
train/lower hull.
The twin wheel
bogies are neat little assemblies and are fairly well detailed considering their
age. I left the road wheels free to turn to facilitate painting later on.
The idler wheels lack detail on the spring housing, so I found a circular
doo-dad from the spares bin to busy things up a bit.
 I then turned my attention to the upper hull. I carefully cut out the rear deck
and glued in its place a similar sized piece of Evergreen sheet.
This rear deck was in an elevated box on the T82.
But I was now going to need some dimensions to make this box the right
height and also to make the upper hull.
Off to the computer I went.
I loaded up World of Tanks (WoT) and brought up the T82 3D model.
I maneuvered this so I was looking at its side and then I hit the
print-screen button to save this as an image.
Then, I shut down WoT, loaded up my image editor of choice (Gimp … its
free and very powerful), and brought up the picture I just captured.
I then re-sized the picture of the T82 to the same length of the M5’s
hull and printed out several copies.
This gave me some templates from which to work. Not NASA precision for
sure, but it should be accurate enough for me to get the “look” right.
I measured the rear deck height off the template and cut a strip of
Evergreen sheet the same.
Using
this I boxed in the rear deck piece and glued it atop the blank plate I glued
into the hull previously.
Good so
far.
At this point the trusty razor
saw came out and I cut the middle of the upper hull away, from forward of the
rear deck to just aft of the fenders/ lower glacis.
The front part of the fenders was also cut away.
With most of the upper hull gone it was time to fabricate a new one.
I then turned my attention to the upper hull. I carefully cut out the rear deck
and glued in its place a similar sized piece of Evergreen sheet.
This rear deck was in an elevated box on the T82.
But I was now going to need some dimensions to make this box the right
height and also to make the upper hull.
Off to the computer I went.
I loaded up World of Tanks (WoT) and brought up the T82 3D model.
I maneuvered this so I was looking at its side and then I hit the
print-screen button to save this as an image.
Then, I shut down WoT, loaded up my image editor of choice (Gimp … its
free and very powerful), and brought up the picture I just captured.
I then re-sized the picture of the T82 to the same length of the M5’s
hull and printed out several copies.
This gave me some templates from which to work. Not NASA precision for
sure, but it should be accurate enough for me to get the “look” right.
I measured the rear deck height off the template and cut a strip of
Evergreen sheet the same.
Using
this I boxed in the rear deck piece and glued it atop the blank plate I glued
into the hull previously.
Good so
far.
At this point the trusty razor
saw came out and I cut the middle of the upper hull away, from forward of the
rear deck to just aft of the fenders/ lower glacis.
The front part of the fenders was also cut away.
With most of the upper hull gone it was time to fabricate a new one.
 I cut out a side armor template from one of the prints and transferred this to
some thin Evergreen sheet, twice.
Once I had both cut out from the sheet, I sanded them stacked together to ensure
they would be the same dimensionally.
Using these and the width of the M5 hull I was able to cut out a front
armor piece (I use the word “armor” here lightly, as “lightweight
I cut out a side armor template from one of the prints and transferred this to
some thin Evergreen sheet, twice.
Once I had both cut out from the sheet, I sanded them stacked together to ensure
they would be the same dimensionally.
Using these and the width of the M5 hull I was able to cut out a front
armor piece (I use the word “armor” here lightly, as “lightweight
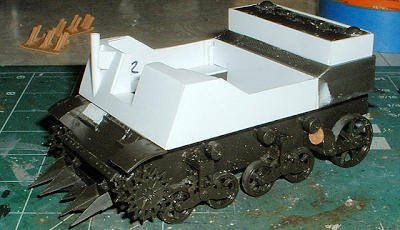 I now had a fairly complete hull and it was time to add some detail.
The driver’s vision port was a combination of a couple tank hatches from
the parts bin and a few bits of Evergreen plastic.
The MG mount was made from plastic tube and sheet. The .50
I now had a fairly complete hull and it was time to add some detail.
The driver’s vision port was a combination of a couple tank hatches from
the parts bin and a few bits of Evergreen plastic.
The MG mount was made from plastic tube and sheet. The .50
 and glued into place.
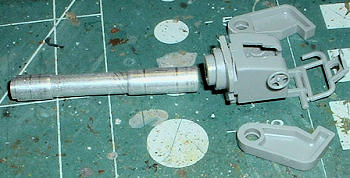
Well, now I had pretty much everything except one.
I still needed to find or make a cannon.
I had a few spare cannons from the bin, some 88mm cannon barrels from
Tiger kits.
Unfortunately they were
too small…. Remember this little guy was going to carry a big stick.
I ended up using aluminum tubing for the barrel and mated this to a
much-shortened breech from a Tiger II kit.
The mount came from various bits from the spares bin.
Again, not accurate at all for an M3 105mm cannon, but it at least looks
the part.
Plopped it in place and
then added some braces on the cabin floor.
| COLORS & MARKINGS |
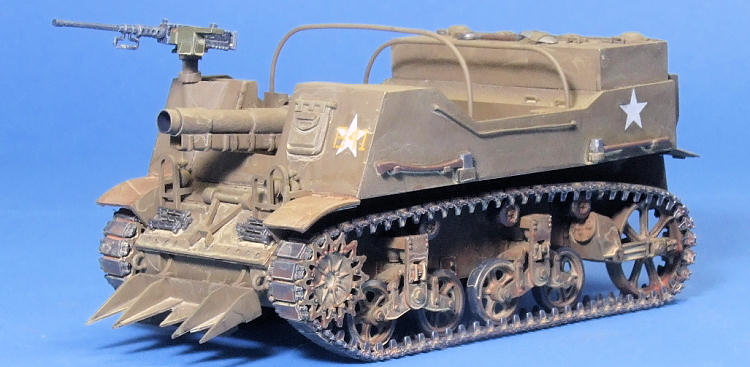
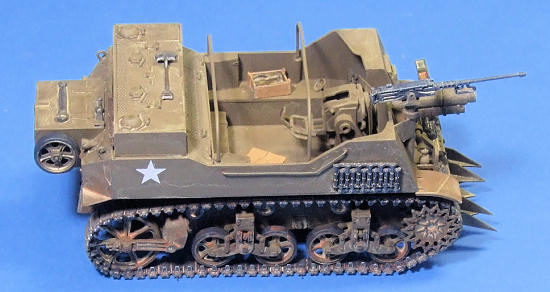 Painting was quite easy ….. Olive Drab overall.
I added a bit of Italian Brown to the Model Master Olive Drab and sprayed
it on everything.
Once this was dry
I painted the rubber portion of the road wheels and then laid a thin black wash
on everything to pop out the details.
Over this I added brown and red brown washes, a bit thicker, to show the
dirt.
Decals came from the decal
dungeon just for the fact that the kit decals were not in good shape.
The tracks were painted a very dark gray and added the same washes to
them, just more liberally.
I
lightly dry-brushed them with Testors Steel to show some wear and placed them on
the tank.
Painting was quite easy ….. Olive Drab overall.
I added a bit of Italian Brown to the Model Master Olive Drab and sprayed
it on everything.
Once this was dry
I painted the rubber portion of the road wheels and then laid a thin black wash
on everything to pop out the details.
Over this I added brown and red brown washes, a bit thicker, to show the
dirt.
Decals came from the decal
dungeon just for the fact that the kit decals were not in good shape.
The tracks were painted a very dark gray and added the same washes to
them, just more liberally.
I
lightly dry-brushed them with Testors Steel to show some wear and placed them on
the tank.
| CONCLUSIONS |
| REFERENCES |
The Internet
World of Tanks online game
Dale Rannals
August 2012
If you would like your product reviewed fairly and fairly quickly, please contact the editor or see other details in the Note to Contributors.