Airfix 1/76 M4A3 Sherman
|
KIT #: |
? |
|
PRICE: |
AUD$9.00 |
|
DECALS: |
Oneptions |
|
REVIEWER: |
George Oh |
|
NOTES: |
Now
it’s a primitive kit and I LOVED to butcher it. |
I am an
Australian soldier, so I appreciate the vital role that camouflage and deception
play for an Army deployed in the field.
And I am a modeller who enjoys building WWII and thinking outside the
square.
Many
years ago, I was doing some private research (= reading books) on camouflaging.
I was absorbed by the extent to which
the Allies laboured prior to D-Day, to convince the Germans that General Patton
was in command of the very large First US Army Group (FUSAG) hiding to the north
of
London.
FUSAG was to spearhead the Allied landing near the Pas-de-Calais after
they’d moved their forces to attack the diversion that was
Normandy.
FUSAG was manifested as thousands of mundane routine signal messages
between Units, the building of hundreds of ammo dumps, fuel dumps & supply
dumps, and the appearance of hundreds of landing craft, ships, tanks & other
vehicles.
But FUSAG numbered only a
few hundred soldiers, the dumps were empty, and the equipment wasn’t real.
They were decoys or dummies.
Only the anti-aircraft guns ‘protecting’ them from the prying cameras of
Luftwaffe reconnaissance aircraft were real, and they fired live ammunition.
The gun-crews were under strict orders to ‘scare the pilots, but do not
destroy the aircraft’.
And they had
to endure in silence, the jibes of locals who derided their ineffectiveness.
Among the dummy
vehicles were
Sherman
tanks build by the Dunlop Tyre & Rubber Company.
Each of these was a single, shaped-bag of rubber-impregnated canvas,
imprinted with external images.
Inflated by a blower fan much like a current-day children’s jumping castle, it
expanded into the tank-shape, correct in all dimensions.
The printing gave the shape its wheels, hatches, tools and the like.
Naturally, the inflated tank had to be staked down to the ground, and its
air-cells regularly topped-up with air.
Poor camouflage, a few boxes and similar Military impedimenta scattered
around the ‘tank’ completed the illusion.
Special vehicles delivered the deflated tank (they were still quite
heavy) and produced the required tank tracks.
Inflatable vehicles would not have passed a close inspection, but they
were very convincing when seen from a distance or height - by enemy photographic
reconnaissance, for example.
Despite
being present in
England
in their hundreds, there are no models of one of these (or any other) inflatable
tanks in any scale – probably because, as a model kit, it would be a poor
seller.
So I resolved to build one.
I intended to complete it in time for a National model competition – not
for trophies, but to have fun and shake-up the serious modellers (of which I am
not).
The Airfix
76-scale
Sherman
tank has been around for at least 35 years, and it has been superseded by later
moulding by other kit manufacturers.
It has about 45 parts, including a one-piece cast turret, all moulded in
a green, and two vinyl tracks that are impervious to most modelling glues.
Last
Christmas (2010), I was presented with an Airfix 76-scale
Sherman
tank by my children.
Wanting to
appear delighted in their eyes, I immediately started construction with this
idea in mind.
In order to build a
dummy
Sherman
tank, correct in all dimensions, it is logical to start with a
Sherman
tank.
And this cheap Airfix
76-scale tank was ideal.
As the
dummies were externally smooth, all of the external details of the kit tank
would have to be removed.
I
had the kit hull and turret 85% complete all within a week (we were on a
travelling holiday).
Forewarned
from when I’d built this kit as a boy, I attached the sides under the hull,
rather than to the belly plate.
In
another week, I had erased all of the raised external details with sidecutters
and had the hull sanded to a smooth surface (while I watched TV) using cheap
cardboard nail/emery boards (my Dremmel was packed away).
I shoulda glued-in the front hull hatches and the turret hatch before I
started the sanding.
Instead, I had
to place a strip under the holes, then fill them with discs of card.
The back of the turret was smoothed by wrapping a strip of plastic card
around it and blending it in with putty.
In
lieu of the tracks and running gear, I extended the four sides of the hull
downwards with more plastic card.
The bow was a little difficult because of its shape and because of the
projecting tracks.
Extensive
internal bracing with sprue was required for structural strength.
This was harder than it sounds because of the rigidity of the plastic.
It needed to be glued in sections, and clamped while it dried.
Other areas with more complex contours were filled with Milliput.
All join seams were filled with Mr. Surfacer, and while I was smoothing
them, I rounded-off all of the sharp angles of the hull.
Finally, the ‘main armament’ was attached to the ‘turret’.
Initial
painting was easy.
The whole was
covered with an overall coat of Olive Drab.
Now came the hard part – brush-painting all of the details using only two
colours – black and grey.
Black
paint was used to indicate cavities (like under the overhangs of the sponsons
where the running gear and tracks should be) and shadows.
Grey was used to simulate raised surfaces that would catch the light –
like the running gear.
In order to
get the wheels roughly correct, I made a primitive stamp out of a kit wheel.
Logically, I
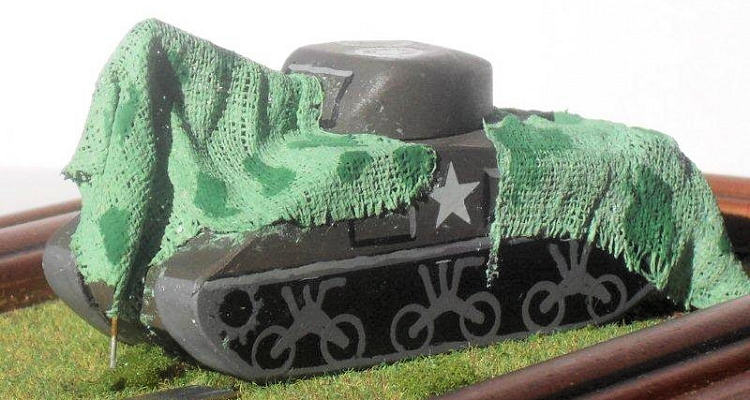
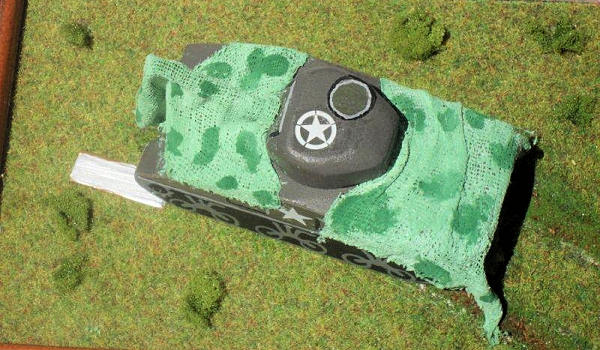
used the kit decals to replicate the printed-on national markings on the decoy.
These were kept a nice clean white because the decoy was supposed to be
seen (but not look like it was supposed to be seen).
No individual markings were used, though I would have, if I could have
discovered which fictitious armoured Units were part of FUSAG.
As the ‘tank’ was painted in a matt colour, I put the decals down onto a
splash of Future, to avoid the dreaded silvering effect.
was compelled
to use a base because the decoys were staked to the ground so that they didn’t
give the game away by being blown over in a strong wind.
I used a cheap wooden picture-frame ($3) onto which I placed an underlay
of six sheets of newspaper, then an overlay of short ‘grass’.
This consisted of an A4 sheet of paper coated with the ‘grass’, which I
purchased from a model railway shop for less than $4.
A few bits of green material were scattered around to break the plainness
of the ‘grass’.
For visual
accuracy, I cut two sections from the ground-work, and covered it with spare
‘grass’ to produce disturbed depressions apparently left by the tank’s tracks.
I stuck my
‘tank’ onto the ‘grass’ and attached pieces to replicate the anchor pegs.
Pieces of bandage, dyed green, were placed over the tank, but they leave
the turret completely exposed and the markings still visible.
To explain why a tank is out in the open, I placed a piece of ‘board’
made from a piece of plastic card, in front of it.
Hopefully, it looks like the tank has shed a track, and that the crew has
tried to camouflage it (and done a poor job) while they wait for a recovery
vehicle.
I didn’t use a piece of
kit track because I gave them to a junior modeller who had lost his.
A logical observer will object to the inflated ‘tank barrel’ being able
to support the cam-net without drooping.
If you look at the ground at the bow of the ‘tank’ you’ll see a
supporting pole.
And you will note
that the tank went a little off-course when its track broke.
It is details like this that make the diorama believable.
While there is
a kit of an Ersatz Panzer (a 1944 Panther made-up to resemble an M.10 Tank
Destroyer), I’ve never seen a kit of a decoy tank, and I probably never will.
That makes my model pretty unique.
It was pretty easy to build, but hard to paint.
No surprises, but I predict that my inflatable tank (with poor cam), will
hardly rated a mention at Model Expo 12.
My camouflaged Crusader is in the same boat.
DILLIGAFF!!
I built it
because I wanted-to.
“What did you
do in the War, Daddy?”
“I blew-up
200 tanks, Honey!!”
the kit
instructions, internet photos and historical research.
PS – my wife
extracted this model from my stash BEFORE Christmas, and had our children
gift-wrap it.
George Oh
April 2012
If you would like your product reviewed fairly and fairly quickly, please contact the editor or see other details in the
Note to
Contributors.
Back to the Main Page
Back to the Review
Index Page