
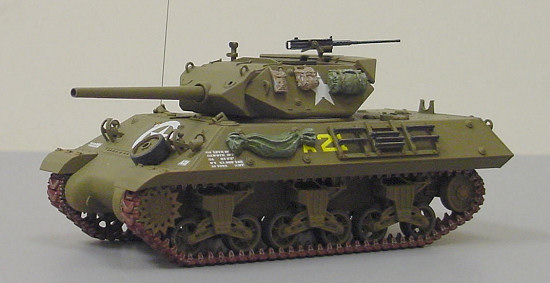
Tamiya 1/48 M-10 Tank Destroyer (mid production)
| KIT #: | 32519 |
| PRICE: | $26.00 MSRP |
| DECALS: | Three options |
| REVIEWER: | Bill Michaels |
| NOTES: | Die cast lower hull, extra gear. |
| HISTORY |
As WW2 approached, the US Army’s doctrine called for tanks to be used in infantry support. Engaging enemy tanks was not the mission of the tank forces—that job was assigned to the Tank Destroyers. (This is one of the reasons why the Sherman was not designed to slug it out with German tanks.)
Quoting from the kit’s history section:
In 1941-42, the M3 half track, mounting a 36 caliber 75mm cannon, was the mainstay of US Tank Destroyer units. Experience in North Africa in late 1942 and early 1943 showed that this short-barreled 75mm gun was ineffective against German armor. Also, the halftrack platform was less mobile in rough terrain, and was sorely lacking in armor, compared to its quarry.
A more maneuverable vehicle with better firepower was needed. Fortunately, the US Army had already started work on just such a vehicle. The prototype T35 Tank Destroyer appeared in November of 1941, and it went into production as the M-10 Tank Destroyer.
 The
M-10 was based on the lower chassis of the M4A2 Sherman, which was already in
production. This meant that the M-10 was powered by the same 375 hp diesel
engine. (Crews preferred the slightly less powerful diesels over the gas
engines, because of the reduced fire risk.) The M-10 featured a newly designed
upper hull, with a lower profile than the Sherman. Because it was designed for
maximum maneuverability, the M-10 was built with relatively light armor, and an
open turret. To compensate for the light armor, an angular hull was used, to
enhance shot deflection .
The
M-10 was based on the lower chassis of the M4A2 Sherman, which was already in
production. This meant that the M-10 was powered by the same 375 hp diesel
engine. (Crews preferred the slightly less powerful diesels over the gas
engines, because of the reduced fire risk.) The M-10 featured a newly designed
upper hull, with a lower profile than the Sherman. Because it was designed for
maximum maneuverability, the M-10 was built with relatively light armor, and an
open turret. To compensate for the light armor, an angular hull was used, to
enhance shot deflection .
The open-topped turret housed a powerful 76mm, 50 caliber cannon, which fired armor piercing ammunition. (A similar gun was also used on later models of the Sherman, to give them more punch.) This more powerful gun could penetrate 88mm of armor at a range of 1000 meters, which made it a threat to nearly all German tanks. The weight of the gun required a large counterweight in the rear of the turret, which gave the M-10 its distinctive shape.
M-10s were used throughout the war, especially in Europe, right up to the end. M-10s continued in front line service, even as the new M36 came on the scene, with its even more powerful 90mm gun.
In action, the M-10 and M-36 Tank Destroyers were generally pretty effective, though they still had their shortcomings. Light armor was one, and the open turrets left the crew exposed, and more than a bit uncomfortable in bad weather. I’ve played the M-10 in a miniatures wargame, and found the above limitations to be accurate. I found that the M-10 was certainly capable, though. With the open turret, I had a higher rate of fire, and could get three shots off for every two of my opponent. But, I had to keep the light armor in mind, and try to maneuver so I could get the first shot off.
| THE KIT |
This is my second Tamiya 1/48 scale armor kit. I bought this one because I had thoroughly enjoyed the build of my first one, the M4 Sherman. I knew that the M-10 shared the same lower hull with the Sherman, so I figured that this kit was off to a great start.
 The
die cast lower hull, running gear, and tracks are the same as the ones found in
the M4 Sherman kit, with one exception—the M-10 kit has the one-piece welded
transmission cover instead of the early M-4’s three piece unit. Given that the
rest of the parts are the same as the M-4, I knew the link and length tracks
would fit well.
The
die cast lower hull, running gear, and tracks are the same as the ones found in
the M4 Sherman kit, with one exception—the M-10 kit has the one-piece welded
transmission cover instead of the early M-4’s three piece unit. Given that the
rest of the parts are the same as the M-4, I knew the link and length tracks
would fit well.
The upper hull is well molded, with sharp detail, and a nice, subtle rough texture to the armored surfaces. Again, this is similar in quality to the Sherman kit.
The open topped turret is what makes this kit even better than the Sherman kit. The turret has a lot of detail inside, with a nicely detailed gun, and ammo storage racks that include 76mm rounds. Other highlights include nicely molded diamond tread on the floor of the fighting compartment in the hull under the turret.
There is yet another bonus to this kit— it also comes with a bunch of accessories. The kit includes knapsacks, rolled tarps, roadwheels, and extra tracks to hand on the sides of the turret and hull. It also includes several jerry cans and fuel drums to use on or next to the model. Here is a preview with images of the kit prior to construction.
| CONSTRUCTION |
Before you start the model, there is one choice to be made. Two of the subjects of the kit use the solid roadwheels, while the third has open-spoked road wheels. (The extra dozen roadwheels, the ones unique to the M-10, are provided on a small sprue.)I liked the look of the open wheels, so that meant I was building the third option on the decal sheet.
Assembly of the lower hull of the M-10 is essentially the same as described in my recent review of the M-4 Sherman, so I’ll just hit the highlights here. In fact the sprues for the running gear and tracks are the same as those found in the Sherman kit.
Similar to the Sherman, you need to pay attention to the roadwheels when assembling the bogey assemblies, to make sure the correct side is facing out. Like last time, I painted all the parts while they were still on the sprue, but this time, I didn’t paint the tires until after the parts were assembled. (I don’t think it was any easier or more difficult.) If you are going to paint the tires after the suspension is assembled, just be sure to leave them free-wheeling. Once they are painted, you will find it easier to attach the tracks if they are fixed in place. I used a dab of liquid glue to lock them after the painting was finished.
 Construction of the upper
hull is more involved than on the Sherman, because of the interior. The
interior walls get a coat of white paint, and some details are painted in OD.
The fighting compartment floor has nice diamond tread molded on it, and includes
the seats for the driver and co-driver. The interior parts do fit well, but
they do complicate painting a little—you can’t just paint everything OD.
Construction of the upper
hull is more involved than on the Sherman, because of the interior. The
interior walls get a coat of white paint, and some details are painted in OD.
The fighting compartment floor has nice diamond tread molded on it, and includes
the seats for the driver and co-driver. The interior parts do fit well, but
they do complicate painting a little—you can’t just paint everything OD.
Just like the Sherman, the upper hull goes together well. The joint with the transmission cover is tight, so the upper hull can be installed at any time that is convenient—you won’t need to worry about filling a seam. The pioneer tools are all molded separately, so they can be painted off the vehicle and installed after the hull is painted.
The drivers’ hatches can be attached in the closed or open position. Again, like the Sherman, the hatches have a couple of ejector pin marks on the inside surface that would have to be filled if you pose them in the open position. I would only recommend opening them if you’re going to put a figure in there, as there is no detail inside except for the seats. Also, there is a large, non-scale column between the seats, for the screw that holds the upper and lower hulls together, so that’s another reason not to leave the hatches wide open, with nothing to fill the void.
Turret Assembly
The basic parts of the turret went together well—fit was very good, with no filler needed. I painted the interior walls of the turret and the detail parts before assembly. The turret has a pretty complete interior, with a detailed gun, and assorted storage and ammo racks.
The gun is mounted on vinyl bushings, which means you can elevate the gun as desired, and the gun will stay where it is put. The barrel is molded in two halves, but fit was good, and the seam was easy to fill. (I don’t see a reason to spend $$ on an aftermarket metal barrel.)
The turret-top .50 caliber machine gun is nicely molded. It includes nice mount detail, and a separate (closed) ammo box. I painted the gun with “gunmetal” color, and then highlighted the edges with my silver artist’s pencil. The mount and ammo box were painted olive drab.
| COLORS & MARKINGS |
The kit includes decals to do three different vehicles. All are finished in basically the same scheme- overall olive drab. (It appears that M-10s didn’t carry the variety of camouflage that the Shermans did.) The first two vehicles had solid roadwheels, while the third, the one I chose, used the roadwheels with the open spokes. The options are:
 1.
601st TD Battalion, 3rd
Infantry Div., Southern France, 1944
1.
601st TD Battalion, 3rd
Infantry Div., Southern France, 1944
2. 634th TD Battalion, 1st Infantry Div., Aachen, Germany, October 1944
3. A. Co., 703rd TD Battalion, 3rd Armored Div., Normandy, July 1944.
I brushed a coat of Future on the model in the spots where the decals were to go, and let that dry overnight. I was a little concerned about the decals on this model—some of the big stars have to go on top of some large raised details. I applied the decals with Micro-set, and let them dry overnight. I knew that they wouldn’t settle down completely, so I just concentrated on getting them in the right place and getting at least part of the decal down. A subsequent treatment with Micro-sol really did the trick, and the decals really settled down well over the raised details.
I then brushed a topcoat of Future over the decals to help seal the edges. Once that was dry, I airbrushed a flat coat, using PollyScale clear flat. The tracks got a drybrushing of silver, to highlight the wear points.
| FINAL CONSTRUCTION |
Once the model was assembled, and decaled, I was able to add some of the extra gear. I painted the tarps and bags with slightly different shades of green, and the small packs different shades of khaki. I gave the khaki packs a dark wash to bring out some of the detail, and then drybrushed with white on all of the bages to highlight the edges. All in all, I was very pleased with how the tarps and bags came out.
I also used one of the leftover roadwheels on the front of the hull. You only get 12 of each type, so if you use any of the extras, they won’t match the style used on the model. I decided to use one anyways—perhaps the crew picked one up from another vehicle along the way! I didn’t use the jerry cans or drums, at least not yet- but I may add them later.
I painted the cloth bag and duffel bag using the same color, wash, and drybrush techniques, and mounted them inside the vehicle, in out of the way corners. (I figured the crew would keep their personal gear inside the vehicle, where it wouldn’t get lost.) The final touch was to drill out the antenna base, and install a piece of .005 steel wire for the antenna.
| CONCLUSIONS |
Highly Recommended. These Tamiya small armor kits are nice models – the M-10 was a very enjoyable build. Parts fit was good throughout. Tamiya continues to expand their line of 1/48 WW2 vehicles, and it is nice to see that this one includes all the extra stowage.
Diorama builders are getting more and more from Tamiya in this scale. The kit instructions show two new accessory kits—a “Sandbags and Barricades” set, and a separate set of drums and jerry cans. Tamiya also has a set of US infantry figures in 1/48, which includes two tank crewmen.
Review kit from the local shop, courtesy of a Christmas gift certificate from my dear wife. (Thanks again, dear!)
March 2006
Copyright ModelingMadness.com
If you would like your product reviewed fairly and quickly, please contact the editor or see other details in the Note to Contributors.