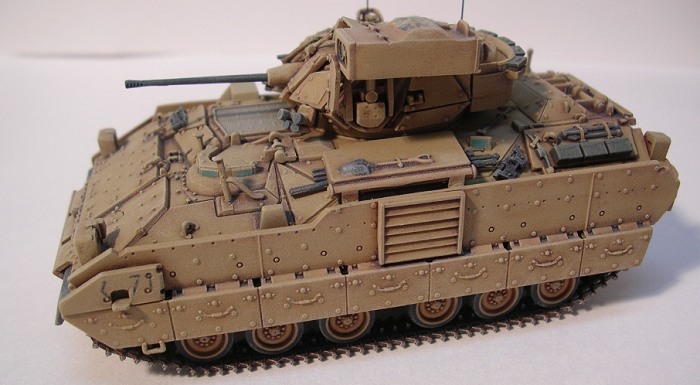
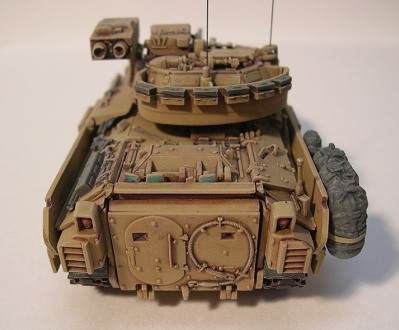
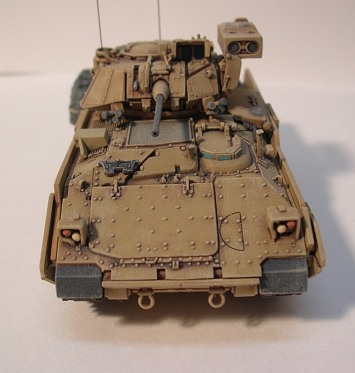
Dragon 1/72 M2A2
Bradley ODS
|
KIT #: |
7226 |
|
PRICE: |
$8.99 MSRP |
|
DECALS: |
One option |
|
REVIEWER: |
Mark Smith |
|
NOTES: |
161 parts (35
vinyl) |
After a long development period,
production approval was granted for the Bradley Infantry Fighting vehicle
in January of 1980. In a departure from the vehicle it was designed to
replace the M113, the Bradley was not just an armored troop transport but
a true fighting vehicle.
The Bradley was met with much media
hype on how it's mostly aluminum construction made it a "Death Trap" to
the troops it was designed to carry into battle. It would go on to prove
itself not in Europe against the Warsaw pact forces for which it was
 designed but in the sands of the
Middle East.
In February of 91 the Bradley saw it's
first use in combat during operation Desert Storm. The Bradley's
performance in the lopsided victory over Saddam's Iraqi military was
quite impressive but not without a few short comings. Reliability was
excellent as was the effectiveness of It's weapon systems with the
exception of It's 7.62mm co-axle machine gun which was prone to jamming.
The 25mm main gun proved very effective and on a few occasions was even
able to knock out Iraq's older tanks(T-55's & Chinese type 59's) with
depleted uranium rounds. The twin TOW missile launcher was also very
effective though some crews complained of it's slow raise to the firing
position.
Of the 20 Bradley's lost during Desert
Storm, 17 were due to "friendly fire" with only 3 destroyed due to enemy
action. Identification panels have been added to current Bradley's to
help reduce this problem.
Bradley's again returned to Iraq
during Operation Iraqi Freedom and helped lead the way to Baghdad and the
final defeat of Saddam's Army.
A recent issue of FineScale Modeler contained a readers poll in which
this kit won first place in the non l/35th scale armor category. Open the
box and shuffle through it's contents and you will quickly see why. The
two sprues of soft vinyl and 3 sprues of dragons typical gray plastic are
beautifully molded with virtually no flash. A tiny decal sheet is also
included with markings representing a vehicle used in Operation Iraqi
Freedom. This was also my first small scale Dragon Kit without the
die-cast metal hull. The 8 step instructions are well printed but a bit
tricky (more on this later) and include a nice color photo of the actual
vehicle that comes in handy as a reference. The box art is also of this
same photo. Pleased with the contents of the box it was time to throw
this little baby on the bench, and roll up my sleeves and get to work.
 First off before we even get started with cutting parts and flinging
tenax let me highly stress to study the directions CAREFULLY. Many small
parts are illustrated already installed with just a part number by them.
I found no major error's in the directions but you really need to study
them so you don't miss anything.
First off before we even get started with cutting parts and flinging
tenax let me highly stress to study the directions CAREFULLY. Many small
parts are illustrated already installed with just a part number by them.
I found no major error's in the directions but you really need to study
them so you don't miss anything.
Step 1: Assembly of the drive wheels,
return rollers, and road wheels. Tiny pollycaps are included to ease
painting later on and fit of all these parts was excellent. Be careful
during assembly and when done store these carefully as no extra's are
included and the Carpet Monster just love's these little things! For some
reason if Dragon included a dozen extra's he wouldn't seem to like them
as much.
Step 2: Is the lower hull assembly and
is pretty straight forward. The hinges for the loading ramp are a bit
"fiddly" but everything fits reasonably well. I elected to leave off all
the wheels until after painting.
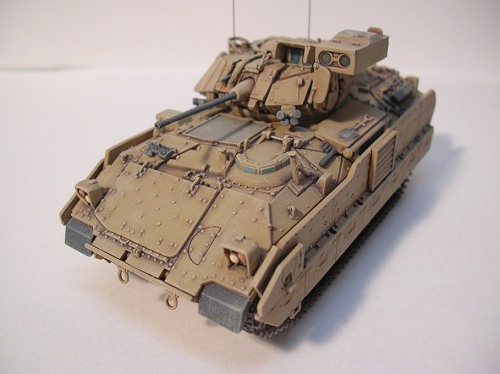
Steps 3 & 4: Are the turret assembly.
Pay close attention here as many of the armor plates are shown already in
place, look for the part numbers carefully and it all goes together fine.
I did sand down the antenna bases and drilled them out to add fine wire
to these later. The TOW missile launcher can be installed in the lowered
or raised (firing) position. I elected the later and fit was excellent
although the two pieces in the rear (parts C6) are very small and a bit
difficult for an ox like me. Take care with the smoke grenade launchers.
If you just put them on like it looks like they should fit they will
point straight forward. Found this out the hard way but was able to angle
them up okay before the glue fully cured. With the turret complete in my
hand I turned it over to examine the bottom and here
 I came across my
first problem. The lower turret (Piece C27) is totally missing a section
in the lower right hand front leaving a fairly large "hole" in the
bottom. I re-read the directions a few times to find the "missing" part
but there isn't one. If I would have caught this prior to having it
assembled it could probably be fixed relatively easy with some sheet
stock but with the angles now it would be difficult. Finally I decided to
fill it with 2-part epoxy putty which I then smoothed out with a small
putty knife and water. It came out fairly well and after painting was
hardly noticeable.
I came across my
first problem. The lower turret (Piece C27) is totally missing a section
in the lower right hand front leaving a fairly large "hole" in the
bottom. I re-read the directions a few times to find the "missing" part
but there isn't one. If I would have caught this prior to having it
assembled it could probably be fixed relatively easy with some sheet
stock but with the angles now it would be difficult. Finally I decided to
fill it with 2-part epoxy putty which I then smoothed out with a small
putty knife and water. It came out fairly well and after painting was
hardly noticeable.
Step 5: Is the mantlet and main gun
assembly. No problems here although I did leave off the gun barrel until
after painting and weathering so I didn't break it off.
Step 6: Is the upper hull. Keep an eye
out here again as some parts are easy to miss. I substituted some copper
wire for part (C39), carpet monster got it and I didn't even attempt to
crawl around on the floor looking for the tiny grab handle. Took less
time to make a new one and it really looked better to boot. Here also I
ran into problem #2, the headlight/guard assembly's fit poorly. Careful
filing and dry fitting will cure this and after a little time and elbow
grease they went on fine.
Step 7: Is attaching the upper hull to
the lower hull. Fit is excellent and you don't have to worry about the
long seams down the side as the armor side skirts cover these completely.
Step 8: Is the armored side skirts and
a small antenna. Be careful drilling out the holes on the side skirts for
the IFF panels. Be sure and drill the right ones. I assembled these but
left them off until after painting was completed.
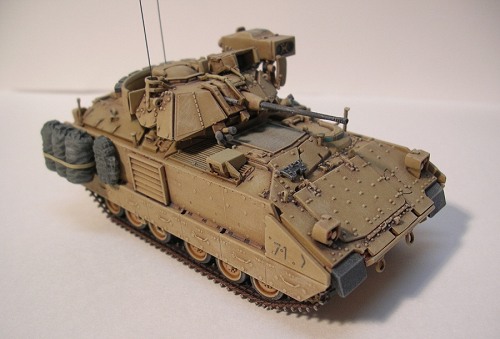
I airbrushed the completed hull, turret, side skirts and wheel with model
master acrylic Gulf War Sand. I then took the road wheels and using
masking tape stuck them to a sheet of cardboard and sprayed them flat
black on the back and sides. This left me to only go around the rims with
a fine point sharpie and touch them up with a brush and some flat black.
Next I got ready to do all the little detail items. Tow cables, tools,
head and tail lights. For these I use a very fine point brush or
toothpick and enamel paints. Acrylics tend to dry to fast and clump up
making brush painting these items difficult. A good lighted magnifier is
also very helpful.
 I finished the soft vinyl 1 pc tracks
by simply giving them a healthy wash of rustall and then dry brushing
them with Tamiya acrylic titanium sliver. They were already black so I
didn't see the need to paint them first. After the silver dry brushing I
did go back over the track pads with a dry brushing of flat black. I
highly recommend using only acrylics paints on dragons soft vinyl parts
and tracks. Some enamels seem to re-act to it and not dry properly as I
was about to find out the hard way.
I finished the soft vinyl 1 pc tracks
by simply giving them a healthy wash of rustall and then dry brushing
them with Tamiya acrylic titanium sliver. They were already black so I
didn't see the need to paint them first. After the silver dry brushing I
did go back over the track pads with a dry brushing of flat black. I
highly recommend using only acrylics paints on dragons soft vinyl parts
and tracks. Some enamels seem to re-act to it and not dry properly as I
was about to find out the hard way.
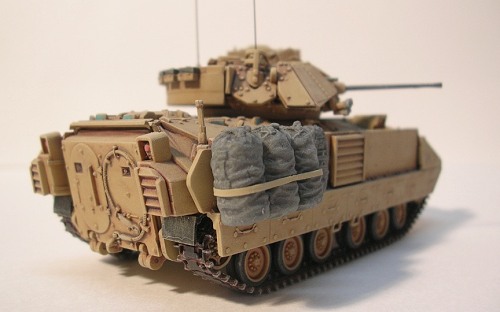
The kit also contains a sprue of soft
vinyl stowage items. I wanted to put a few on but not all as I just
didn't want to cover up some of the kits really nice detail. I brush
painted some duffle bags and a back pack with MM olive drab enamel. Big
mistake as two days later it was still extremely sticky. I ended up
removing this paint with an old brush and Testors brush cleaner. I let
them dry out for a day then drilled a small hole in the back of each for
a tooth pick to hold them and airbrush MM acrylic olive drab. This worked
much better and they then got a dry brushing of faded olive drab and
gray.
I painted the extra track links flat
black on the spure and when dry removed them and dry brushed with steel.
I carefully removed the 25mm gun
barrel from the sprue and was going to drill it out and brush paint it
flat black but here I had a problem and it was all my fault. The newer
Bradley's have a fluted barrel, this creates more surface area for the
barrel and helps it cool more efficiently. For me it also made for a very
delicate piece and I muffed it big time trying to drill it out and bent
it causing an ugly flex cracked area. I would like to blame this on
Dragon somewhat soft plastic but hey I flat messed it up. Lucky for me
the kit also contains a non-fluted somewhat thicker barrel which I ended
up drilling out and using. It isn't really correct for this model Bradley
but most folks will never notice. Well and If all you guys don't rat me
out as well!!
 Next up I shot a coat of future on the
turret, hull, wheels, and side skirts to prepare them for decals and an
oil based wash. The decals went on fine and I used a little solvent to
settle them down. At this time I also cut some small strips of a decal
from the spares box using a metal straight edge and a new sharp razor
blade. I cut these into little pieces for the vision ports. The first one
I put on rolled up into a tiny white tube the minute I put some
micro-set to it so I removed it and used future with a fine tip brush
from then on with good results. It may have been a bit more tedious but I
think it came out better than trying to paint them.
Next up I shot a coat of future on the
turret, hull, wheels, and side skirts to prepare them for decals and an
oil based wash. The decals went on fine and I used a little solvent to
settle them down. At this time I also cut some small strips of a decal
from the spares box using a metal straight edge and a new sharp razor
blade. I cut these into little pieces for the vision ports. The first one
I put on rolled up into a tiny white tube the minute I put some
micro-set to it so I removed it and used future with a fine tip brush
from then on with good results. It may have been a bit more tedious but I
think it came out better than trying to paint them.
After the decals had set and dried (24
to 48 hours) I applied a oil wash using burnt umber tube oil paints
thinned with turpinoid. The coat of future helps this flow into all the
nooks and crannies plus it protects the underlying paint.
After this has dried for several hours
I remove the excess wash with Q-tips lightly dipped in fresh clean
turpenoid. Be careful when doing this not to rub to hard and damage the
base coat of paint or break off any small fragile parts.
Next I shot everything with MM acrylic
flat. I like to dry-brush on a flat, non-glossy surface. I used a
lightened mixture of the base Gulf war Sand for most of the vehicle with
some steel and gray for some of the finer details.
 I started final assembly with the
wheels and tracks. The poly caps work great here as you just pop each
wheel on it's axle. Previous l/72nd scale Dragon Kits I've done their
tracks have all been a little on the snug side. The ones for this Bradley
fit absolutely perfect with just a tiny bit of stretch needed to engage
all the teeth of the drive wheels into the tracks properly.
I started final assembly with the
wheels and tracks. The poly caps work great here as you just pop each
wheel on it's axle. Previous l/72nd scale Dragon Kits I've done their
tracks have all been a little on the snug side. The ones for this Bradley
fit absolutely perfect with just a tiny bit of stretch needed to engage
all the teeth of the drive wheels into the tracks properly.
The side skirts went on next and fit
very well. Each side has two posts that fit into corresponding holes in
the hull. A drop of CA on the posts secured them nicely. Next up was the
main gun barrel, spare track links and stowage items.
Last up was the tiny metal wire I had
painted black for the antenna. I usually always save these for last, as
it seems if I don't I always bend or break one.
With assembly now complete I gave it a
couple of light coats of pollyscale dust thinned about 50/50 with MM
acrylic thinner and one final coat of MM acrylic flat to seal everything
up.
Well I had allot of fun doing this
great little kit. I had a few problems, most of which were of my own
doing but I was pleased with the results. If not for the big "hole" on
the underside of the turret this kit would be near perfect. The fit of
the headlight/guard assemblies was easily fixed with a little sanding and
test fitting. overall I highly recommend this kit and I sure hope Dragon
keeps these little l/72nd scale armor kits coming!
Steve Zaloga and Peter Sarson,
America's One-Two Punch, Osprey Military 2000
Yves Debay, Victory in Baghdad,
Concord Publications 2003
Mark Smith
June 2005
Copyright ModelingMadness.com
If you would like your product reviewed fairly and fairly quickly, please contact the editor or see other details in the
Note to
Contributors.
Back to the Main Page
Back to the Review
Index Page 2018