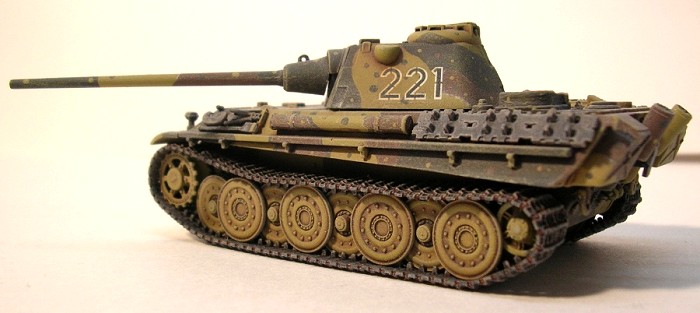
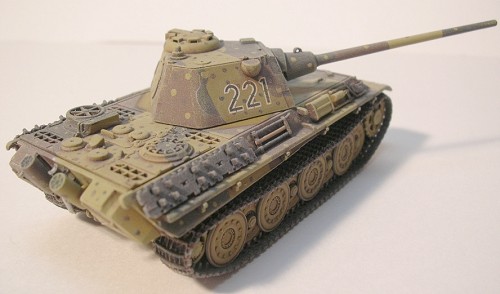
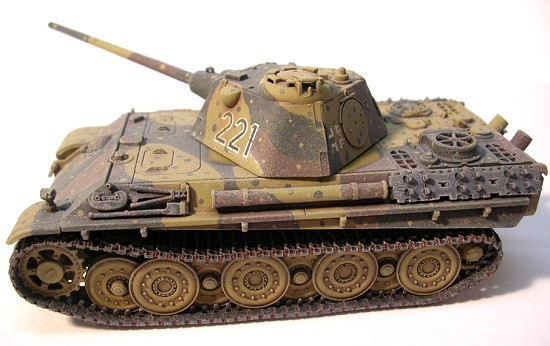
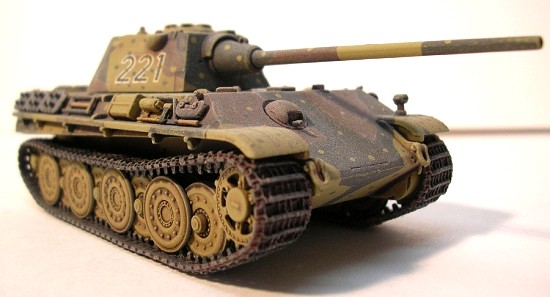
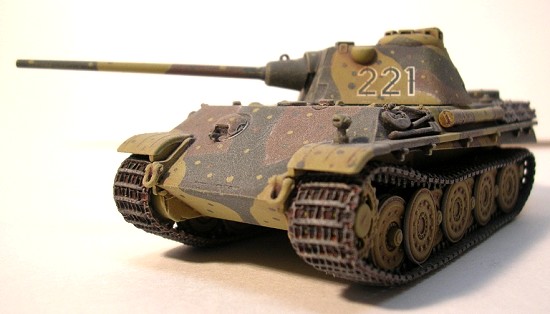
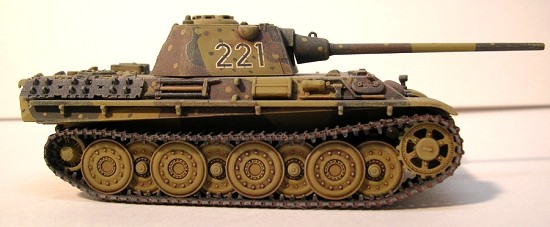
Dragon 1/72 SdKfz 171 Panther Ausf F
| KIT #: | 7207 |
| PRICE: | $8.99 MSRP |
| DECALS: | One option |
| REVIEWER: | Mark Smith |
| NOTES: |
| HISTORY |
The Panther F was a proposed update to the Panther tank at wars end. It was basically a Panther G chassis with a schmalturm turret and more powerful main gun. Only one prototype was ever produced.
| THE KIT |
 First off I've always been a
bit intimidated by small scale armor, the infamous "Braille scale".
The idea of tiny parts and my middle aged eyes just sounded like a recipe
for frustration.
First off I've always been a
bit intimidated by small scale armor, the infamous "Braille scale".
The idea of tiny parts and my middle aged eyes just sounded like a recipe
for frustration.
At a recent model show a friend of mine showed me a new Dragon 1/72nd Tiger 2 he had purchased. Digging through the box I was amazed at the quality of the moldings and how great this kit looked in the box. Off to the vendor area I went in search of one of these little gems. This little Panther caught my eye and 9 bucks later i was trying to talk my wife into driving home so I could start working on it. All attempts at this failed so i had to wait until the next day to get started on it. The kit consists of 3 plastic sprues, an upper and lower die cast metal hull and 2 vinyl tracks.
| CONSTRUCTION |
Assembly begins with the turret, which consists of 13 well molded plastic parts. One nice touch is the one piece main gun barrel so you don't have a seam to worry about. The barrel is also "pre-drilled", another nice touch.
On armor models I always try to do as much gluing from the inside as possible so I attached the front and back (parts B7,B6) of the turret first using Tenax liquid cement. Next i added the turret bottom. Fit was excellent with no need of any filler. After this set up I added the mantlet and gun and other small bits. Care must be taken in gluing parts B13 so the main gun can move up and down.
 Next
up was the hull and one of the first things a bit different you will
notice is it is die cast metal. It has two parts, an upper and
lower assembly. I've read some comments by guys who really hammer
Dragon over this and granted if you want to open some hatches or do a
major conversion project this may cause some problems. Personally I think
this is a bit of a "nit-pick" as the parts are very well cast and fit
together fairly well. They also give the model a nice weighty feel. The
lower hull did have two small holes in the bottom that kind of puzzled me
at first. I bet these are there for the fully assembled and painted
version you can buy to attach them to their base. I used CA glue and some
scrap sheet stock to cover these from the inside so i could fill them
later.
Next
up was the hull and one of the first things a bit different you will
notice is it is die cast metal. It has two parts, an upper and
lower assembly. I've read some comments by guys who really hammer
Dragon over this and granted if you want to open some hatches or do a
major conversion project this may cause some problems. Personally I think
this is a bit of a "nit-pick" as the parts are very well cast and fit
together fairly well. They also give the model a nice weighty feel. The
lower hull did have two small holes in the bottom that kind of puzzled me
at first. I bet these are there for the fully assembled and painted
version you can buy to attach them to their base. I used CA glue and some
scrap sheet stock to cover these from the inside so i could fill them
later.
The upper and lower hull attach with two Phillips screws placed in area's that later on will be covered up so you don't see them. I didn't on this model but the next one I do it may not be a bad idea to dab a little Locktite on these screws just in case. Once the hull was assembled I did end up with a small but noticeable gap in front. I wanted to fix it but knowing there is a seam here on the actual tank it didn't have to be perfect. CA glue run into the gap with a toothpick, a little accelerator and a medium sanding stick took care of it. At this time I also filled and sanded the holes in the bottom.
 Next came adding the small details and tools to the hull. Everything fit
perfectly and i left off the spare track links until after painting.
These I brush painted black along with piece D33/34 that represents the
engine and cooling fans. I dry-brushed these with "steel" and set
them off to the side for final assembly after painting.
Next came adding the small details and tools to the hull. Everything fit
perfectly and i left off the spare track links until after painting.
These I brush painted black along with piece D33/34 that represents the
engine and cooling fans. I dry-brushed these with "steel" and set
them off to the side for final assembly after painting.
| COLORS & MARKINGS |
| FINAL CONSTRUCTION |
 I hand painted all the tools
and details with a fine point brush and also used a toothpick were
needed. Another light coat of Future was airbrushed, again just to
protect the underlying paint from the oil wash. After this dried for 24
hours I prepared a wash with burnt umber oil paint and turpeniod. I
applied this to the various seams and surface detail with a brush and
after it dried I removed the excess with Q-tips lightly dipped in clean
turpeniod. Next I dry brushed with a lightened color of the yellow base
coat. A little steel was also dry brushed to the various tools followed
by a little rust colored pastel chalk applied with a micro brush.
I hand painted all the tools
and details with a fine point brush and also used a toothpick were
needed. Another light coat of Future was airbrushed, again just to
protect the underlying paint from the oil wash. After this dried for 24
hours I prepared a wash with burnt umber oil paint and turpeniod. I
applied this to the various seams and surface detail with a brush and
after it dried I removed the excess with Q-tips lightly dipped in clean
turpeniod. Next I dry brushed with a lightened color of the yellow base
coat. A little steel was also dry brushed to the various tools followed
by a little rust colored pastel chalk applied with a micro brush.
This complete, I glued in place the engine/cooling fan plate and installed the engine deck. I assembled and installed the road wheels and drive sprockets and here is where I ran into my second minor problem. The metal axles molded into the lower hull are slightly too short for the drive sprockets. The tension of the tracks will pull them off if they are not glued in place very strongly. I applied several good sized drops of CA glue to each from behind and allowed them to cure for 20 to 30 minutes and that seemed to take care of it. While I had the CA out I carefully applied some to the top of the road wheels and glued down the track to give it the proper "sag". Final finishing was a couple of misted on coats of Polly Scale acrylic dust and a coat of MM acrylic flat.
| CONCLUSIONS |
 This was one of the most enjoyable
kits I've built in awhile. The couple of fit issue's I had were minor and
were easily fixed. Using CA type glue, the metal hull was not an issue
either. I'm not an expert on German armor so I can't attest to the kits
overall accuracy but it sure came out looking like a Panther to me.
This was one of the most enjoyable
kits I've built in awhile. The couple of fit issue's I had were minor and
were easily fixed. Using CA type glue, the metal hull was not an issue
either. I'm not an expert on German armor so I can't attest to the kits
overall accuracy but it sure came out looking like a Panther to me.
Bottom line there is a lot of modeling fun packed in that little box and at $9. 00 U. S. they are a great value. So if you are like me and have always been a bit afraid of "Braille scale" armor pick up one of these little Dragon kits and give it a try. But I warn you. . . . . . . bet you can't buy just one!!!
May 2005
If you would like your product reviewed fairly and fairly quickly, please contact the editor or see other details in the Note to Contributors.
Back to the Review Index Page 2018