Trumpeter 1/72 JS-3M 'Pike'
| KIT #: | 07228 |
| PRICE: | AUD $18.95 |
| DECALS: | two options |
| REVIEWER: | Michael Johnson |
| NOTES: |
| HISTORY |
By 1942 the Soviet Union’s series of KV heavy tanks were being criticised by their crews as slow, under gunned and lacking in combat mobility. In that year, as a stop gap measure, the lighter and faster KV-1S was introduced; however the KV series still remained more expensive than the T-34 with little increase in firepower and was on the verge of cancellation.
However the deployment of large numbers of German Panther and Tiger tanks during the Battle of Kursk in the summer of 1943 revitalised Stalin’s desire to maintain the heavy tank programme. As such, a quick stopgap KV-85 was introduced while design continued to create a tank with better armour and more powerful main gun.
Eventually after much debate the A-19 122mm cannon was selected to arm the new tank which was lighter and faster than the heaviest KV series tank. Production stepped up with the JS-2 (or Iosif Stalin IS-2) armed with the A-19 tank cannon.
 The
A-19 122mm gun had very good armour penetration, delivering 3.5 times the
kinetic energy of the older 76.2mm gun of the T-34/76, and when it didn't
penetrate, could often knock a turret right off a tank with the combination of
the impact and explosive filler. Also it’s very large high explosive shells were
very effective against bunkers, infantry and antitank guns.
The
A-19 122mm gun had very good armour penetration, delivering 3.5 times the
kinetic energy of the older 76.2mm gun of the T-34/76, and when it didn't
penetrate, could often knock a turret right off a tank with the combination of
the impact and explosive filler. Also it’s very large high explosive shells were
very effective against bunkers, infantry and antitank guns.
However the main disadvantage of the gun was its huge, two-part ammunition, which were difficult to manhandle, slow to reload (the rate of fire was only about two rounds per minute), and only allowed 28 rounds to be carried. In a prolonged tank engagement, this would put the JS-2 at a serious disadvantage.
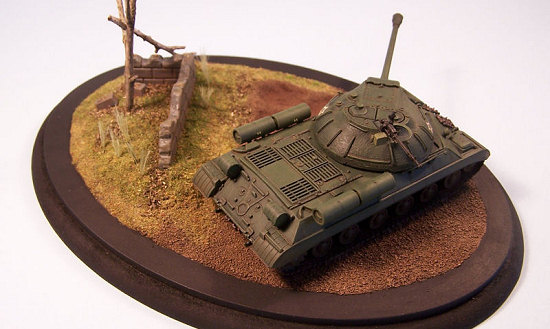
In late 1944 the IS-3 was introduced into service. This new version had improved armour layout with a redesigned pointed front, and a hemispherical cast turret (looking like overturned "soup bowl") and destined to be the hallmark of post-war Soviet tanks. The pointed front earned it the nickname Shchuka (Pike) from its crews.
The IS-3’s front armour was increased to 200mm, 80mm thicker than the JS-2’s and it weighed less. By the time the JS-3 was delivered to front line tank regiments, the war in Europe was over, though it was possible the tank saw action in Manchuria against the Japanese.
During the 1950’s all JS-3’s were modernised and redesignated JS-3M. It was the JS-3M’s in the service of Egypt that saw combat in the Six Day War against Israel’s M48 Patton’s.
Preamble
I have always liked Soviet/Russian armour, though I am not exactly sure why. Perhaps the low round turrets with very large guns, towards the front of the low chassis.
I have only recently rediscovered the fun that can be had constructing small scale 1:72/1:76 armour kits and was very pleasantly surprised in the huge leap in quality and detail that abound in newer releases from Dragon, Revell and Trumpeter.
| THE KIT |
 Comes in a nicely packaged box
containing bagged sprues in light grey plastic. What drew me to this kit is the
provision of either link and length tracks, separate sprockets and wheels or
full track runs for either side with the rear wheels and sprockets moulded in
place. The later option required careful painting and the addition of the front
wheels to make snap in subassemblies which greatly simplifies construction.
Comes in a nicely packaged box
containing bagged sprues in light grey plastic. What drew me to this kit is the
provision of either link and length tracks, separate sprockets and wheels or
full track runs for either side with the rear wheels and sprockets moulded in
place. The later option required careful painting and the addition of the front
wheels to make snap in subassemblies which greatly simplifies construction.
The mandatory instructions and a comprehensive decal sheet which offers more than the two finishing options outlined in the instructions.
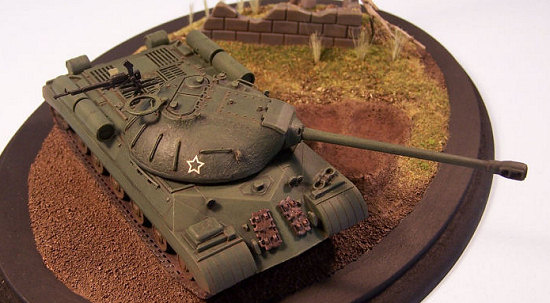
All parts are crisply moulded with the turret in particular having a very nicely defined cast texture. The cannon barrel is moulded using slide mould technology resulting in a beautiful one piece barrel with hollowed muzzle brake.
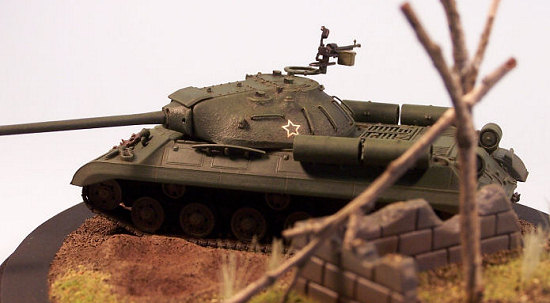
Trumpeter provides pre-formed wire “staples” for the many turret grab handles as well, further enhancing the turret detail provided out of the box.
| CONSTRUCTION |
 I normally start with the turret
on my armour builds and this project was no exception. I drilled out the
locations for the grab handles and installed each in turn, securing the wire
from the inside of the torrent with CA and accelerator, then moved onto the
lifting hooks and gun mantlet.
I normally start with the turret
on my armour builds and this project was no exception. I drilled out the
locations for the grab handles and installed each in turn, securing the wire
from the inside of the torrent with CA and accelerator, then moved onto the
lifting hooks and gun mantlet.
Assembly proceeded quickly, with only mould lines being needed to be removed from some parts. Worst were the pre-formed tracks and the rear mounted external fuel tanks which needed more attention than the rest of the kit.
This kit is a joy to build with no particular vices of any sort. Care will be needed to attach the external fuel tanks to the chassis and I would recommend attaching these prior to painting as they are quite fiddly to install.
| COLORS & MARKINGS |
Now that construction was finished I could settle down to painting. I followed my normal painting procedure for Soviet armour and sprayed the turret, track assembly and the upper and lower chassis assemblies Tamiya spray can flat black. The synthetic lacquer lays down nice and smooth without obscuring surface detail and provides an excellent base for subsequent paint layers.
Using Ceramcoat
dark forest green, I glazed over the black with multiple thin coats until good
colour density was achieved and then dry brushed Ceramcoat medium forest green
over each sub assembly. This popped out all the surface detail and lightened
 the darker underlying dark
foliage green finish. Once the green was to my satisfaction a filter of Vallejo
flat earth was washed over the entire model followed by a thin pin wash of
Vallejo burnt umber. Finally a very light dry brushing of Citadel Codex grey was
applied to all edges, high points and bolts.
the darker underlying dark
foliage green finish. Once the green was to my satisfaction a filter of Vallejo
flat earth was washed over the entire model followed by a thin pin wash of
Vallejo burnt umber. Finally a very light dry brushing of Citadel Codex grey was
applied to all edges, high points and bolts.
The tracks were then dry brushed with Modelmaster Rust, washed with flat black and then flat earth. Track contact points and teeth were then treated with a dry brush of Citadel boltgun metal to impart a worn metal look. Humbrol metalcote polished steel took care of the road wheel wear surfaces and sprocket gear.
The Trumpeter decals adhered beautifully and snuggled down over the cast texture of the turret without any solution. Once dry I painted a couple of thinned coats of Pollyscale flat followed by a wash of flat earth to tone down the white of the stars.
The DShK machine gun and ring mount comprised of 5 parts which were assembled then carefully painted with appropriate colours. The DShK itself was dry brushed using Humbrol polished steel.
All the subassemblies were then brought together and set aside to cure.
| FINAL CONSTRUCTION |
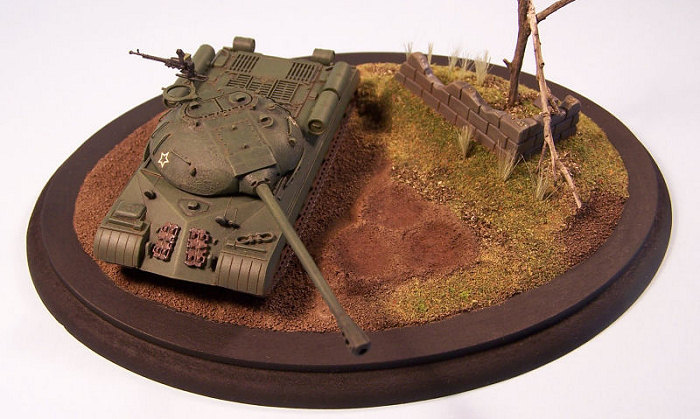
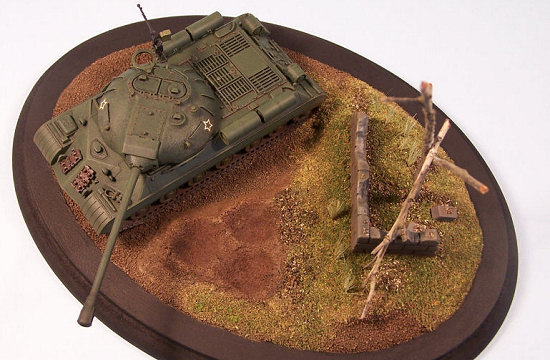 I prefer to see an armour model
set on a small base, so I selected a small oval MDF base with a nice routed
edge. I buy these from a large hardware chain for under $2 and they really are
perfect for 1:72 armour models.
I prefer to see an armour model
set on a small base, so I selected a small oval MDF base with a nice routed
edge. I buy these from a large hardware chain for under $2 and they really are
perfect for 1:72 armour models.
The base was simple to assemble, with a small wall from an Italeri accessories set, a resin crater accessory and Polly filler. This was then covered in Woodland Scenic flocks and some tall grass. Crushed peppermint tea leaves provided the leaf litter blown against the base of the wall and into undulations. As the base at that stage appeared to need a little more height, I added a dead tree which was from picked up from the park across the road.
I dry brushed the dirt track with various shades of Vallejo earth tone acrylics blending the shades into the resin craters to give a sense of depth. Once the base was completed, the tank was added and earth tone pastels used to blend the tank and base together.
My little JS-3 was now completed.
| CONCLUSIONS |
The 1:72 scale armour modeller now has a growing selection of excellent kits to choose from which offer the same detail and finesse of the larger kits. A recommended kit to build.
Good fun and it looks great!
August 2007
If you would like your product reviewed fairly and fairly quickly, please contact the editor or see other details in the Note to Contributors.