This Kit brought back many pleasant memories of riding my
bike just two blocks south to buy the latest 1/48 addition from AURORA,
The Stalin Tank. The unique and evil shape just oooozed COLD WAR......a
period that I indeed remember well............
It
might be going on ten years now that I've had the 1/35 TRUMPETER JSIIIm
Tank in the stash. In fact, I shelved it after sanding clean the road
wheels and just a few weeks ago found it tucked in the corner of the
storage area. I recently got on a 67 Six Day War kick, due to the fact
of joining yet another Facebook Page Group on Middle East Conflicts. So,
as Yul Brenner said in the Ten
 Commandment's............"So
it is written......So let it be done......."
Commandment's............"So
it is written......So let it be done......."
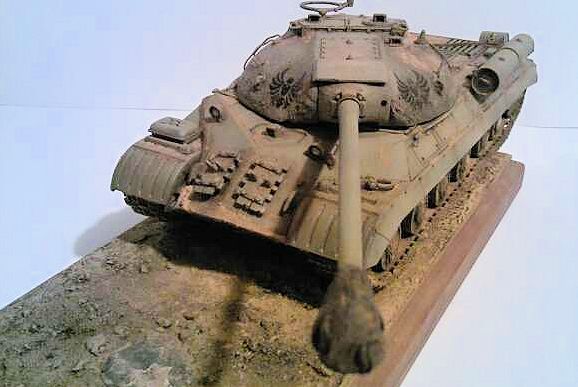
The
appearance of the JS III at the very end of the War in Europe stunned
the Allied Nations as it seamed the Soviet Union was still on War
footing. Nicknamed, "PIKE" because of the unique bow shape, it was a
brutal machine designed to combat Tiger II's and dare I say other
possible Armor it may have had to face. Postwar and British Independence
came and one of the Best Customers for Russian Armor were the Nations
surrounding Israel starting from the 1950's thru Present Day. Built
with the powerful 122mm gun as found in JS II machines, the JS
III featured a well sloped, low profile Hull with a rounded turret.
Actually, it was a very pretty machine. Years went by and JS III
development moved forward to now have larger fenders and storage bins on
the side as well as side sand shields. Thus, the JS IIIm series. Upon
the appearance of the T-54/55 and later the T-62 series, the JS Tanks
were put out of business. Needless to say, JS IIIm's were mauled by
Up-gunned Shermans, Centurion's and better tactics and strategy of the
IDF. After the Six Day War, captured units were put to use in the IDF
and I was really surprised to see pictures of these brutes and having a
short stove pipe exhaust mounted. I will do one of those soon...... Ya
alwayz find something!!
 What you get in the box is normal for a Soviet Tank. Basically four
green sprues with Turret and Hull in addition to the SMALL decal sheet.
The cool thing about the decals was that it did have a Unit for an
Egyptian Tank. Well, that was easy enough to be on my way. The
tracks??? Well, I tossed them right in the bin. After trying to decide
on buying the FRUIL set I went with an extra set of JS II tracks from
DRAGON...........I made it a rule never to invest more in track than I
did with everything else for a project. The Casting on the turret was
really nice and based on EARLY TRUMPETER kits, this offering was a
little above average from them............of coarse, now the latest kits
are pretty well made. Also in the box you had the rope (cable) and poly
caps. instructions were pretty good, but ya gotta look often and pay
attention ;) The box art is pretty funny as it's a JS IIIm, and what
appears to be German "Door Knocker" and a LOT of fire...I bought this
kit at a swap for $12....All righty now.............
What you get in the box is normal for a Soviet Tank. Basically four
green sprues with Turret and Hull in addition to the SMALL decal sheet.
The cool thing about the decals was that it did have a Unit for an
Egyptian Tank. Well, that was easy enough to be on my way. The
tracks??? Well, I tossed them right in the bin. After trying to decide
on buying the FRUIL set I went with an extra set of JS II tracks from
DRAGON...........I made it a rule never to invest more in track than I
did with everything else for a project. The Casting on the turret was
really nice and based on EARLY TRUMPETER kits, this offering was a
little above average from them............of coarse, now the latest kits
are pretty well made. Also in the box you had the rope (cable) and poly
caps. instructions were pretty good, but ya gotta look often and pay
attention ;) The box art is pretty funny as it's a JS IIIm, and what
appears to be German "Door Knocker" and a LOT of fire...I bought this
kit at a swap for $12....All righty now.............
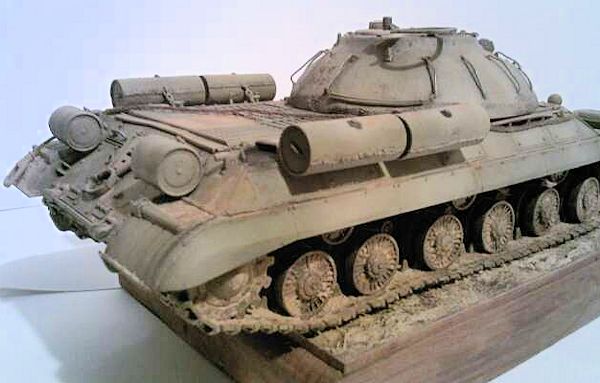
In less than an afternoon, while watching one
of the rare Cub wins, I had the Road Wheels and Running gear cleaned up
and mounted to the chassis. This is really easy and just pay attention
to making sure everything lines up right and the wheels that are
SUPPOSED too, all touch the ground. I had an extra bitch kit of a
DRAGON JS II Tank that I gutted for parts. The tracks were a perfect fit
and it again took a very short time in cleaning these up and getting
them put together. I've said it before.....I love DRAGON track. This
was the old link to link but there's just something about these that I
alwayz enjoyed. I use the TESTORS Black "LONG NECK" plastic glue for
these because it apply's well and gives me plenty of drying time.
Although the side shields pretty much hide the entire top run of the
track, I still added extra links to get that beautiful looking Soviet
Sag that I like so much. Like a fine
 curvy
woman with no back flap ;) This part of the project was finished after
both sides of the tracks were mounted .........on to the Hull.
curvy
woman with no back flap ;) This part of the project was finished after
both sides of the tracks were mounted .........on to the Hull.
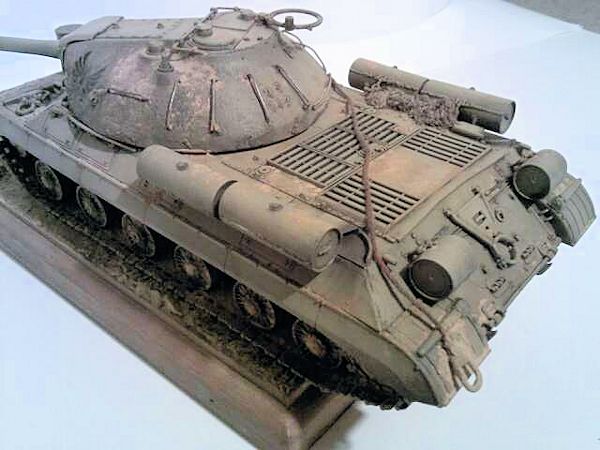
The Hull was a very well engineered. Not
too many pieces but plenty of room for improvement. I substituted in a
few area's that I'll pass on to you........the headlights are okay but
the endgame featured the addition of MV lenses. Wait until the end to
put them in. They are hard to find but the Galzz at Majors, in Davenport
IOWA, hooked me up. I used real wire instead of the supplied rope.
Now, one of the fun parts. Call it artistic licence if you like, but
I've often seen Fuel Drums that are welded. Wanting to stand out I dug
into my stash and got some small plastic strip and using liquid glue,
melted the strip over the seams and used a new #11 blade to make weld
beads. I must say they came out really nice. The Smoke Cannisters were
last and found their place on the rear ........I could get funny here
but I'll let it slide.
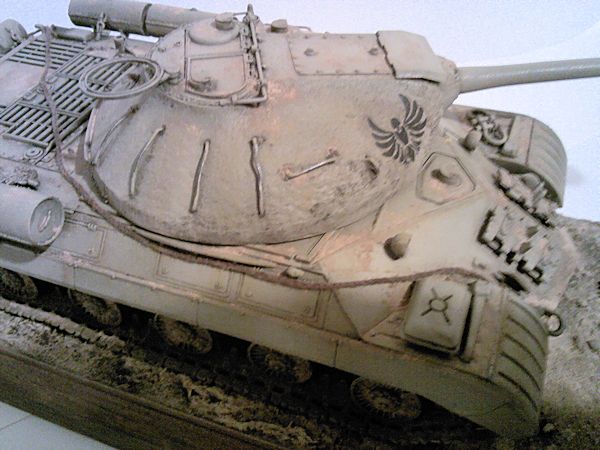
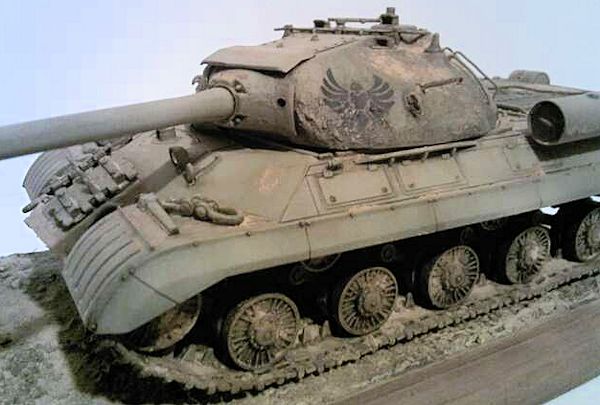
I'm of the opinion that the whole LOOK
of the kit was going to be the turret. So, I started by adding more
texture with green putty and a stiple brush. I tossed the kit grab
handles and again substituted fine wire for this. I bent them up a bit
too just for a more ballsey disco look. The 122mm gun was now installed
and in most pictures AND because of Desert action, I added a muzzle
cover of tissue soaked with water and white glue. On to the Paint Shop.
The Tank was in three units, Chassis,
Hull & Turret. I sprayed, out of a rattle can, the entire kit Flat
Black. I put this off to the side letting it dry for an afternoon (which
I then started something else) . Having just picked up a new GREX
Package I converted over to VALLEJO paints. I liked the colors and used
three different "yellows" to get the look I wanted. At the same time you
create
 depth
to the look. Keep into consideration that the top of the vehicle would
be lighter to compensate for fading. I gave this an afternoon to cure
and then shot it with light applications of FUTURE. I use this as my
barrier for oil washes and also the gloss for the very cool Eagle Decal
of an Egyptian Unit. The decal was softened with SOLVASET. After the
decal cured and was melted into the turret I took a brush and applied a
little FUTURE over it to protect it from my Terp/Windsor-Newton Dick Van
Dyke brown wash. I use a large and medium brush to apply my washes and
alwayzz move front to back. The trick with washes is to apply light and
if you want more, you can. I like a steady build up of
color/grime/effect because it does happen that way in real time,
Right???? Using a clean brush and a clean pair of cotton panties (don't
get me started) I removed some of the oily film and played with the tone
here and there. I placed it under an old desk lamp to speed up the
drying. When the entire kit was as to what I wanted I used VALLEJO Matt
Finish for a sealed DEAD FLAT look. MIG Pigments have been around and I
took out the apporpriate one's I wanted. I added a lot to the track and
running gear using TAMIYA thinner and a small eye dropper to fix it in
place. Once you get the hang of this you'll love what you can do. When
all was said and done I started to dry brush using yellow oils and
applied pencil to the grab handles. A little Chain here and a net there
and it was done.
depth
to the look. Keep into consideration that the top of the vehicle would
be lighter to compensate for fading. I gave this an afternoon to cure
and then shot it with light applications of FUTURE. I use this as my
barrier for oil washes and also the gloss for the very cool Eagle Decal
of an Egyptian Unit. The decal was softened with SOLVASET. After the
decal cured and was melted into the turret I took a brush and applied a
little FUTURE over it to protect it from my Terp/Windsor-Newton Dick Van
Dyke brown wash. I use a large and medium brush to apply my washes and
alwayzz move front to back. The trick with washes is to apply light and
if you want more, you can. I like a steady build up of
color/grime/effect because it does happen that way in real time,
Right???? Using a clean brush and a clean pair of cotton panties (don't
get me started) I removed some of the oily film and played with the tone
here and there. I placed it under an old desk lamp to speed up the
drying. When the entire kit was as to what I wanted I used VALLEJO Matt
Finish for a sealed DEAD FLAT look. MIG Pigments have been around and I
took out the apporpriate one's I wanted. I added a lot to the track and
running gear using TAMIYA thinner and a small eye dropper to fix it in
place. Once you get the hang of this you'll love what you can do. When
all was said and done I started to dry brush using yellow oils and
applied pencil to the grab handles. A little Chain here and a net there
and it was done.
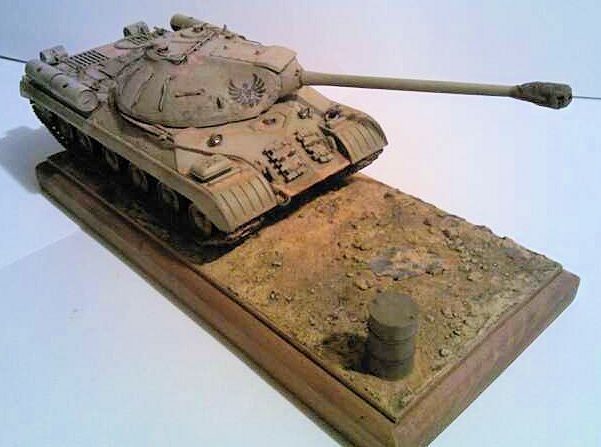
The Base was a simple affair, just the way they
are intended, and was CELLUCLAY mixed with
 water
and white glue on wood that I told the guyzz at the Meeting was a real
piece of bark from a deserted hut in Egypt.........they bought it. A
little curbside rubble and a VERLINDEN resin fuel drum was added for
scale size ..........but, I needed more. I had a few decal sheets for
Aircraft and using the Star of David decal, I cut a piece of foil down,
ruffled it a bit, then pressed it down to where I wanted it. I then
painted it blue and applied the decal over it. While I was painting the
base I let it dry and then mounted it on the pre determined spot. It
got wheathered along with the rest of the base and the last two things
done for the project was applying pigments to the flag using the same
method as the Tank and placing the MV lenses into the headlight with
white glue. There you have it
water
and white glue on wood that I told the guyzz at the Meeting was a real
piece of bark from a deserted hut in Egypt.........they bought it. A
little curbside rubble and a VERLINDEN resin fuel drum was added for
scale size ..........but, I needed more. I had a few decal sheets for
Aircraft and using the Star of David decal, I cut a piece of foil down,
ruffled it a bit, then pressed it down to where I wanted it. I then
painted it blue and applied the decal over it. While I was painting the
base I let it dry and then mounted it on the pre determined spot. It
got wheathered along with the rest of the base and the last two things
done for the project was applying pigments to the flag using the same
method as the Tank and placing the MV lenses into the headlight with
white glue. There you have it