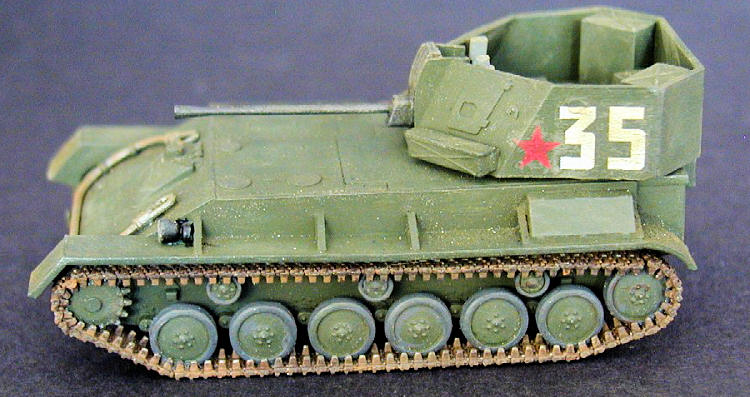
UM 1/72 ZSU-37 Anti-Aircraft Tank
| KIT #: | 309 |
| PRICE: | $10.98 MSRP |
| DECALS: | One option but lots of extra markings |
| REVIEWER: | Llarry Amrose |
| NOTES: |
| HISTORY |
In 1942, the T-70 light tank entered
Soviet service.
With a two-man crew and a 45mm main gun, it was well received and
over 8000 were built.
An improved version, the T-80 was developed, but the
days of the light tank were ending. As with any successful
 vehicle
design, it was natural that special-purpose designs would follow.
The most produced and best-known was the SU-76 (and
SU-76M) self-propelled gun (76mm), which was built on a widened and lengthened
version of this hull.
vehicle
design, it was natural that special-purpose designs would follow.
The most produced and best-known was the SU-76 (and
SU-76M) self-propelled gun (76mm), which was built on a widened and lengthened
version of this hull.
| THE KIT |
Inside the usual blue UM end-opening
box are the usual green UM sprues.
Sprue A (2 copies) contains the wheels, track links, and
a few other usually symmetric doodads.
B has the lower hull and sides and F the upper hull.
Together, these will look pretty familiar if you've seen
the UM SU-76 or SU-76M kits.
Sprues D and E contain the gun and turret parts. Finally
there is a photoetched fret with the hull brackets, escape hatches and lift
hooks, and some parts from the SU-76s that aren’t used here.
| CONSTRUCTION |
Assembly begins with the lower hull, as
well it should.
With link-and-length tracks, it is generally easier to assemble
them before adding the upper hull and fenders.
In fact, it is quite possible to work on the upper and
lower hulls and turret simultaneously, which has the advantage of allowing work
on one part to continue while the others wait for glue or paint to dry.
 working
on the tracks so I can make sure I get them lined up right.
Paint comes next, while I can still get in, between, and
behind everything.
working
on the tracks so I can make sure I get them lined up right.
Paint comes next, while I can still get in, between, and
behind everything.
After painting the tracks, in a
multilayer treatment of metal, rust, and blackwash, I start by positioning the
long bottom run, but without glue.
I then start to glue the next sections on each end,
which bridge from the bottom up to the front sprocket and rear idler. Only once
I have these lined up and attached do I go back and run a little glue to fix the
bottom run in place.
Starting with the bottom means that I will finish up on
top, where any unevenness in the final connections can end up in track sag and
eventually hidden by the fenders and upper hull.
After the first couple of links are connected to the
sprocket, I run a little liquid glue into the axle connection around back to fix
the sprocket in place.
Continuing around both ends with the individual links
needed for the tighter curve, I finish up with the connection between the long
top length and one of the shorter lengths next to it. A few minutes for the glue
to set, and the other side quickly follows.
 Meanwhile,
the upper hull has gathered just about all of its structural and detail parts
and a coat of paint. This
way, the remaining paintwork once the upper and lower are united will be
minimal, consisting mainly of touchup along the seams.
Meanwhile,
the upper hull has gathered just about all of its structural and detail parts
and a coat of paint. This
way, the remaining paintwork once the upper and lower are united will be
minimal, consisting mainly of touchup along the seams.
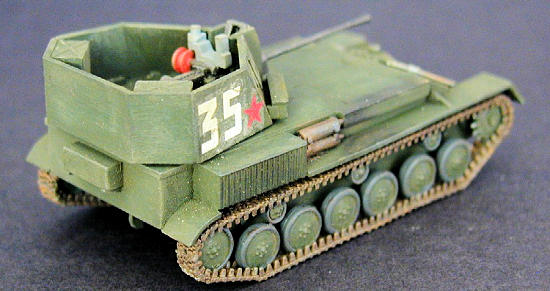
The turret goes together fairly simply,
with a little care during construction and painting to not damage the gun
barrel. UM's brass is among the thickest I've ever seen, but fortunately in this
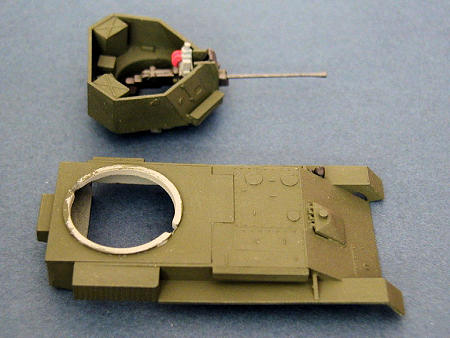
kit, none of the parts require bending. There is one “gotcha” to watch out for
regarding the turret. The hull rear (part 117E) intrudes upon the space the
turret ring needs when inserted into place on the upper hull.
You’ll definitely need to carve away part of the top
surface of 117E to clear the ring.
If you want full 360 degree rotation, you’ll need to
carve away space under the edge of the ring so the turret locking tabs have room
to move (or remove the tabs from the turret), but if not, you can get by with
less surgery.
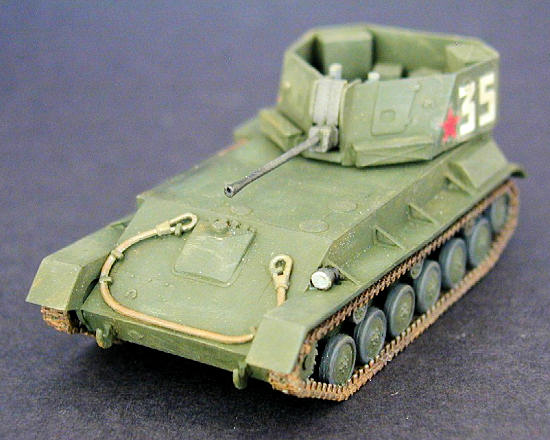
Finally, the top meets the bottom, and
all that remains is some seam and paint touch-up. I’ve built a couple of these
SU-76-type hulls, and there’s been some variation in fit.
It’s easiest to make sure that the hull front is
properly aligned, and leave any gaps to the rear. A gap there is not inevitable,
but if one appears, the design of the parts makes it easy to fill with a bit of
plastic strip.
| COLORS & MARKINGS |
You can have your Soviet vehicle in any
color you want, as long as it's green.
Well, that's not exactly true, but it's the way to bet.
There were some two-tone camouflages, and winter white
schemes, but green predominates.
There were specifications, but no matter how closely
they were followed, variations will exist. Whether due to a bad batch, bad
application, or just differences in wear and tear, two tanks sitting next to
each may be different shades. Normally I use
The instructions include one paint
scheme, with absolutely no identification of date, unit or location.
The decals are matte, fairly thin, but with fairly wide
carrier film.
Generally this isn't much of a problem if you have room to leave
the entire carrier in place, as it tapers down well in thickness towards the
edges and snuggles down to the surface pretty well.
Lastly, Tamiya Weathering Master pastels were used to
finish off the look.
| CONCLUSIONS |
 All in
all, an enjoyable and recommended build.
The kit goes together quite well and appears quite
accurate.
Dimensionally the hull matches the specifications I have for the
SU-76 perfectly, and the shape matches the drawings and photos I have rather
well, though I will admit that I am not an expert in Soviet armor.
All in
all, an enjoyable and recommended build.
The kit goes together quite well and appears quite
accurate.
Dimensionally the hull matches the specifications I have for the
SU-76 perfectly, and the shape matches the drawings and photos I have rather
well, though I will admit that I am not an expert in Soviet armor.
At this rate, I am likely to end up
completing UM’s entire catalog.
While the moldings and engineering may not be quite up
to state of the art, they are far better than what we usually call "short-run".
They're pretty affordable, and cover subjects and
variants that have rarely if ever been kitted in 1/72, and to a reasonable
standard of accuracy.
I particularly like the link-and-length tracks.
As I said above, if you've never built l-n-l tracks in
this scale, and are a little hesitant, a UM T-34-hulled kit is probably the best
place to start.
The ZSU-37 is an
attractive and unusual vehicle which will look good on just about any model
shelf.
| REFERENCES |
Wikipedia.com and various books off the book shelves.
Kit courtesy of my
wallet.
November 2010
If you would like your product reviewed fairly and quickly, please contact me or see other details in the Note to Contributors.