Dragon 1/72 Type 95 Ha-Go
| KIT #: | 7394 |
| PRICE: | $17.00 SRP |
| DECALS: | One option |
| REVIEWER: | Bill Koppos |
| NOTES: | Small but perfectly formed. |
| HISTORY |
Ubiquitous — adj having or seeming to have the ability to be everywhere at once;
omnipresent
Ah, at least one good word to describe our little subject. From the far flung
Islands of the Central Pacific to the steaming fringes of India, from the Icy
Aluetian Islands to the remotest tip of New Guinea, the Ha-Go was-ubiquitous.
Allied forces had to deal with them on Tarawa, Guam, Peleliu and many other
Pacific atolls in their dozens. Numbers of them were in the Japanese order of
battle in the big offensives to invade India through Imphal and Kohima. Type
95's were there when the Japanese tried to flank Australian forces in the South
Pacific at the Milne Bay landings in New Guinea. Several of these tanks became
the only such to touch American soil when they were landed on Attu island, part
of U.S. territory in the frozen arctic. They gave as good as they got in the
Philippines, but perhaps their biggest suc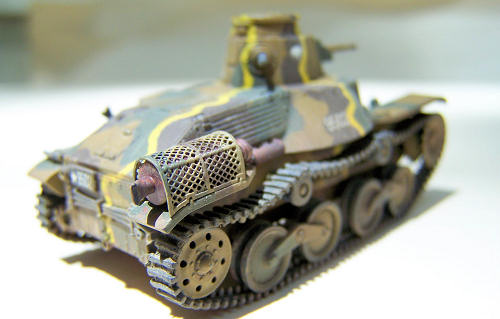 cess
was in the Malayan campaign, where their mere presence sent unprepared and
anti-tank weaponless opponents fleeing their defense lines. But, like so many
other Japanese weapons at war's start, their enemies quickly gained the measure
of the lightly armed and armored little machines, and their effectiveness waned
rapidly as the fighting wore on.
cess
was in the Malayan campaign, where their mere presence sent unprepared and
anti-tank weaponless opponents fleeing their defense lines. But, like so many
other Japanese weapons at war's start, their enemies quickly gained the measure
of the lightly armed and armored little machines, and their effectiveness waned
rapidly as the fighting wore on.
The
Type 95 Ha-Go light tank first rolled off a Mitsubishi Heavy Industries
production line in 1935. At the time of it's introduction it was on a par with
other country's light tank designs, even better than some. It's turret bore a
37mm cannon, which could fire High Explosive shells, or a reasonably effective
armor-piercing round. 7.7mm machine guns were mounted in the forward hull and
the rear of the asymetrical turret. This small turret could accommodate only one
man, who had to command the tank and aim, load and fire all the turret's
weaponry. Two other crew were present, a mechanic/machine gunner, and the
driver. Motive power was a 120 horsepower diesel engine, superior to gas engines
for tank use. Mobility was a prime requirement, speed being important for the
tanks to keep up with the motorized infantry columns. It was the most produced
of the Japanese tanks, 2300 or so being turned out by several manufacturers
The Ha-Go fared well in China and as mentioned, against lighter opposition at
WW2's start. By 1942 it's 1935 origins were showing. Any American gun of 37mm
and up could defeat it's thin armor, and the introduction of the Sherman and the
Bazooka guaranteed it's quick demise in any battle. They were however
ubiquitous, and had to be fought to the end like any other Japanese weapon. In
keeping with it's ubiquity, a salvaged example still exists at the Aberdeen
Proving grounds in Maryland, which I have visited several times.
| THE KIT |
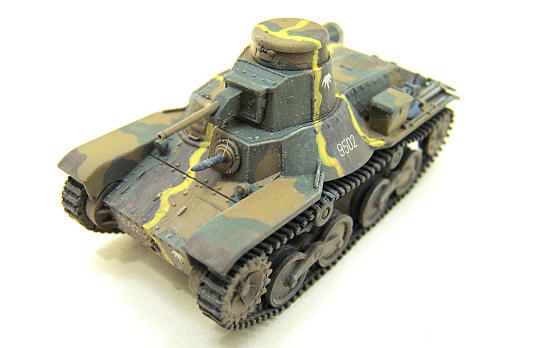 Aside from
all the above, I've always thought the Ha-Go was a good-looking little tank,
well balanced shape wise, with a mix of curves and angles. So I was glad to hear
of Dragon's release of this one, even though I don't normally do this scale. It
is in the "Armor Pro" series, all of which feature fine details and molding. In
fact, the side of the box proudly proclaims the sprocket wheels have
"breath-taking details" and "sharply on-vehicle tools produced". Well my
breathing was not really affected, but they are nice. What you get here is one
sprue-yep one, with all of twenty parts hanging off it. Add the separately
bagged upper and lower hulls and you've got a whopping 22 parts, plus the photo-
etched muffler screen. A Cartograph decal sheet represents a machine from the
Philippines in 1942. Tracks are the DS kind, mixed blessing that these are. The
instruction sheet is in color, the picture type. Shall we glue?
Aside from
all the above, I've always thought the Ha-Go was a good-looking little tank,
well balanced shape wise, with a mix of curves and angles. So I was glad to hear
of Dragon's release of this one, even though I don't normally do this scale. It
is in the "Armor Pro" series, all of which feature fine details and molding. In
fact, the side of the box proudly proclaims the sprocket wheels have
"breath-taking details" and "sharply on-vehicle tools produced". Well my
breathing was not really affected, but they are nice. What you get here is one
sprue-yep one, with all of twenty parts hanging off it. Add the separately
bagged upper and lower hulls and you've got a whopping 22 parts, plus the photo-
etched muffler screen. A Cartograph decal sheet represents a machine from the
Philippines in 1942. Tracks are the DS kind, mixed blessing that these are. The
instruction sheet is in color, the picture type. Shall we glue?
| CONSTRUCTION |
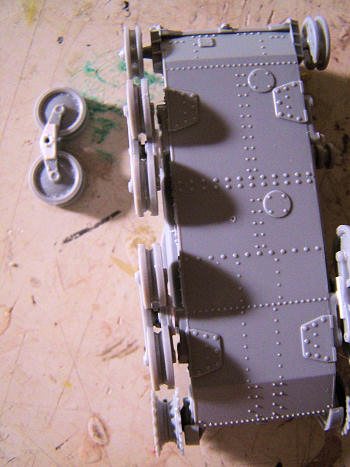 One would
think with only 22 parts, things would be pretty easy, but I found trouble right
off the bat. I first glued on the little return rollers, breathtaking sprockets
and the idler wheels. Then I assembled the 2-half bogie trucks, parts 6 and 7.
Upon trying to install these found that they did not line up with the other
wheels at all, being too far in, and the holes in the inner trucks were much too
big for the hull mounting pins. After some WTH and head scratching, my solution
was to cement some .005 styrene shims, cut to shape, over the inside holes. I
let these dry overnight, then drilled new smaller holes into the old location.
Now when installed everything lines up. One of the pics tells the story. All the
wheels were carefully lined up for straightness, and allow to dry overnight
again.
One would
think with only 22 parts, things would be pretty easy, but I found trouble right
off the bat. I first glued on the little return rollers, breathtaking sprockets
and the idler wheels. Then I assembled the 2-half bogie trucks, parts 6 and 7.
Upon trying to install these found that they did not line up with the other
wheels at all, being too far in, and the holes in the inner trucks were much too
big for the hull mounting pins. After some WTH and head scratching, my solution
was to cement some .005 styrene shims, cut to shape, over the inside holes. I
let these dry overnight, then drilled new smaller holes into the old location.
Now when installed everything lines up. One of the pics tells the story. All the
wheels were carefully lined up for straightness, and allow to dry overnight
again.
All other assembly was trouble free, fit being good. The inside of the turret
hatches are detailed, but no figure is given, I closed mine. The main gun is
hollowed out for you. If you can hollow out the muzzles of those miniscule
machine guns, you are much much better than me. The fit of the hull top to the
bottom is good enough that I left it off to make it easier to paint and w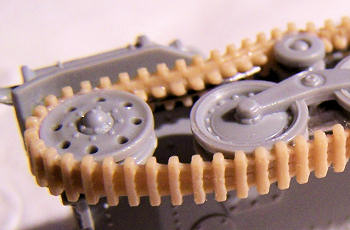 eather
the tracks later. These tracks are the "DS" type, basically rubber-band tracks
that take glues. The instructions have a section that prompts you to either
stretch or shorten the tracks if they don't fit to your liking. How to put them
back together if cut is unclear. However this was no problem for me, as I like
lots of sag in my tracks. So I stretched them a bit to see how they would sit.
The big plus here is the DS tracks will respond to any liquid cement or cyano
glue. First I tried to cement the tracks low on the return rollers, but the
sections in between would not sag, and stayed straight. I had some very fine
steel wire, and cut small pieces of this, using cyano super glue to lay these on
the inner run behind the guide links between the rollers and sprockets. Then
using fine tweezers nice sag was put in to my satisfaction. The wire is not
visible unless you really look hard for it. I'm gonna cover it up with mud too.
Again I tried to show this in a picture. Off to the paint department.
eather
the tracks later. These tracks are the "DS" type, basically rubber-band tracks
that take glues. The instructions have a section that prompts you to either
stretch or shorten the tracks if they don't fit to your liking. How to put them
back together if cut is unclear. However this was no problem for me, as I like
lots of sag in my tracks. So I stretched them a bit to see how they would sit.
The big plus here is the DS tracks will respond to any liquid cement or cyano
glue. First I tried to cement the tracks low on the return rollers, but the
sections in between would not sag, and stayed straight. I had some very fine
steel wire, and cut small pieces of this, using cyano super glue to lay these on
the inner run behind the guide links between the rollers and sprockets. Then
using fine tweezers nice sag was put in to my satisfaction. The wire is not
visible unless you really look hard for it. I'm gonna cover it up with mud too.
Again I tried to show this in a picture. Off to the paint department.
| COLORS & MARKINGS |
The
usual coat of flat black with a touch of white was applied first, making sure to
get all the nooks and crannies. At first I thought I had no Khaki, but turned up
an old tin of Humbrol 26 that was still quite good. This was the basecoat. Coats
go pretty quick with 1/72 tanks, when you're used to 1/32 aircraft! Now the
Japanese armor used 3-color schemes brush painted at the factory, no way I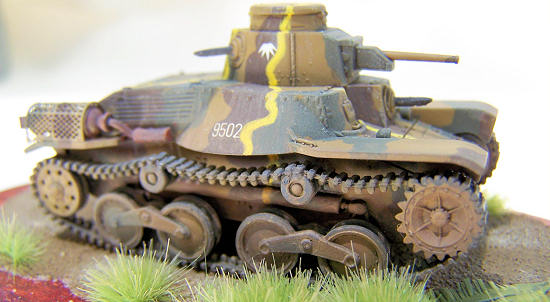 'm
masking this peanut. So we must brush the next two colors. Vallejo to the
rescue, their standard acrylic line is very brushable, leaving no brush marks
especially if thinned a bit with water. Sometimes this needs two coats, but it
is worth doing for a smooth finish. The 3-view drawing in the plans falls short,
as all they give you is a front, rear and left side view. So I winged it on the
left and top, but each scheme was different so WTH. I used U.S. Green and
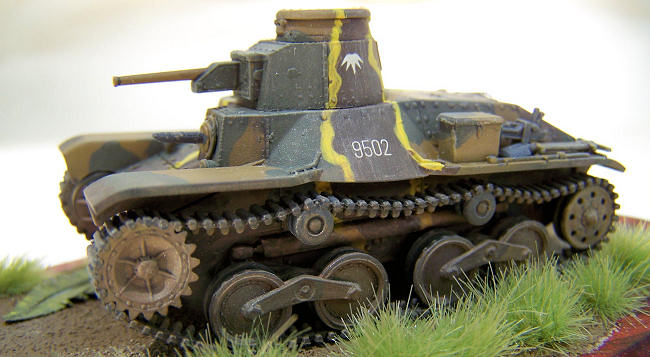
Chocolate brown for the other two colors, these matching the colors given in the
3 view fairly well. Then using a very fine tipped brush the yellow profile
break-up stripes were added. Here having the hull top still unglued to the
bottom came in handy as these stripes go down the hull sides also.
'm
masking this peanut. So we must brush the next two colors. Vallejo to the
rescue, their standard acrylic line is very brushable, leaving no brush marks
especially if thinned a bit with water. Sometimes this needs two coats, but it
is worth doing for a smooth finish. The 3-view drawing in the plans falls short,
as all they give you is a front, rear and left side view. So I winged it on the
left and top, but each scheme was different so WTH. I used U.S. Green and
Chocolate brown for the other two colors, these matching the colors given in the
3 view fairly well. Then using a very fine tipped brush the yellow profile
break-up stripes were added. Here having the hull top still unglued to the
bottom came in handy as these stripes go down the hull sides also.
Now the small detail parts get paint, the muffler rusty brown, tools and machine
guns steel, tires dark grey. The etched muffler screen was bent around a
suitably sized sprue piece, installed with white glue (it fits beautifully) and
camouflaged to match. Testor's Metallizer Sealer is my choice of Glosscoat, this
job took ten minutes, ten minutes of drying, and decals were applied. Man ,these
are tiny decals. They behaved properly, and went on well. Despite having a flat
finish, the next sealing-in glosscoat blended them in nicely. At this point I
applied my water-based black wash to panel lines, machine gun mounts grill slots
and such. It's so weird being done with this job in 5 minutes. These tiny models
do have advantages. Now the whole giant thing was flatcoated, and weathering
started.
| FINAL CONSTRUCTION |
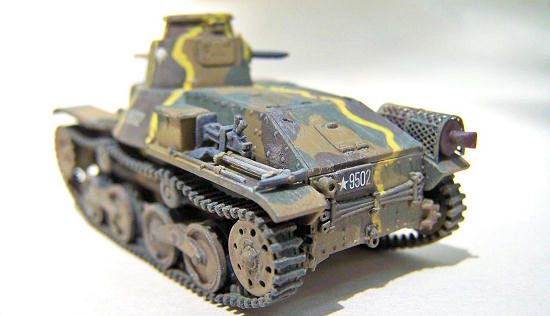 Tamiya
weathering sticks were used along with some Mig Pigment to dirty Ha-Go up. I
started by giving the running gear, tracks and lower areas a wash of "Mud" and
water, followed by a lighter wash of "Light Earth". This I streaked on the upper
areas also, then dusted the uppers with Mig "Light Dust". This turned out a
little TOO dusty so I knocked it back a bit. Now to glue on the fiddly bits-wait
there are no fiddly bits. All 22 parts are already attached, and the Type 95's
had no radio, so not even an antennas to do! Here I finally glued the upper hull
to the lower. I had an old oval wood base laying around, glued on some sand,
slopped on some Dark Earth, and glued down some Battlefield "Jungle Tufts". On
to Manila.
Tamiya
weathering sticks were used along with some Mig Pigment to dirty Ha-Go up. I
started by giving the running gear, tracks and lower areas a wash of "Mud" and
water, followed by a lighter wash of "Light Earth". This I streaked on the upper
areas also, then dusted the uppers with Mig "Light Dust". This turned out a
little TOO dusty so I knocked it back a bit. Now to glue on the fiddly bits-wait
there are no fiddly bits. All 22 parts are already attached, and the Type 95's
had no radio, so not even an antennas to do! Here I finally glued the upper hull
to the lower. I had an old oval wood base laying around, glued on some sand,
slopped on some Dark Earth, and glued down some Battlefield "Jungle Tufts". On
to Manila.
| CONCLUSIONS |
A very fun build, unfortunately due to the wheel problems and tracks I can only recommend it for experienced types. When done it looks every bit like the ubiquitous type 95, small as it is. I believe I'm starting to get hooked on tiny tanks. Now to get my hands on the Type 97 Medium I hear is available.
| REFERENCES |
Japanese Tanks 1939-45 Osprey New Vanguard no. 137 2007
Japanese WW2 Tank Tactics Osprey Elite no.169 2008
Wikipedia and other internet sites
July 2011
If you would like your product reviewed fairly and fairly quickly , please contact me or see other details in the Note to Contributors.