Bronco 1/35 CV33
| KIT #: | CB-35006 |
| PRICE: | $70.00 MSRP |
| DECALS: | several options |
| REVIEWER: | Bill Koppos |
| NOTES: | Size matters |
| HISTORY |
 ewsreels
on U-Tube show these scooters traversing all kinds of terrain, and even
fording some pretty deep streams, and one shows L3's going over an almost
vertical wall and slamming down on the bottom. I hope the Italian tankers
had real good helmets and seat belts! At any rate, this is what the Italian
armored units went to war with in 1940. Previous use in Italy's African
colonies did not turn up much serious opposition, but in Spain their faults
started showing. By the time of the Italian entry into WW2, something better
was clearly needed. Really just an armored machine-gun carrier, they were
totally outclassed in facing the British tanks and armored cars that were
the nemesis of Italian forces in North Africa. As soon as medium tanks were
available the CV-33's were retired.
ewsreels
on U-Tube show these scooters traversing all kinds of terrain, and even
fording some pretty deep streams, and one shows L3's going over an almost
vertical wall and slamming down on the bottom. I hope the Italian tankers
had real good helmets and seat belts! At any rate, this is what the Italian
armored units went to war with in 1940. Previous use in Italy's African
colonies did not turn up much serious opposition, but in Spain their faults
started showing. By the time of the Italian entry into WW2, something better
was clearly needed. Really just an armored machine-gun carrier, they were
totally outclassed in facing the British tanks and armored cars that were
the nemesis of Italian forces in North Africa. As soon as medium tanks were
available the CV-33's were retired.| THE KIT |
 weaponry,
and models keep coming these days. Never did I expect to see the L3 in "big"
scale but here it is recently released by Bronco and nicely done, too. 5
sprues of tan plastic, a small photo-etch fret and 2 headlight lenses make
up what you get. One of these sprues is entirely devoted a complete set of
interior parts, which will make most purchasers happy after paying the
rather steep price of such a small model. The tracks are well molded link
and length, even having tiny "Ansaldo's" molded into the pads. There are
some really tiny items here, all delicately formed and flaw free.
weaponry,
and models keep coming these days. Never did I expect to see the L3 in "big"
scale but here it is recently released by Bronco and nicely done, too. 5
sprues of tan plastic, a small photo-etch fret and 2 headlight lenses make
up what you get. One of these sprues is entirely devoted a complete set of
interior parts, which will make most purchasers happy after paying the
rather steep price of such a small model. The tracks are well molded link
and length, even having tiny "Ansaldo's" molded into the pads. There are
some really tiny items here, all delicately formed and flaw free. | CONSTRUCTION |
 The undercart is made up of a bunch of very small wheels, springs, plates
and rails, all of which are very fiddly to get together. The holes on the
wheels and plates are too small to accept the necessary pins, and opening
them up is challenging. Follow the instructions here step by step, paying
close attention to the numbers. Use tweezers at your own risk- I had
microscopic wheels flying all over till I quit that. I recommend glueing the
assemblies all at once then trying to line everything up while the glue
sets. I used a straight run of track to do this. You have to make sure the
wheels are straight fore-and-aft and all touching the "ground" at once. (If
your vehicle is on level ground). I also attached the sprocket and idlers
before the bogie trucks (ooh-official terminology) so when the trucks were
glued all could be lined up. This is important on link-and-length tracks to
keep things straight. At this point the top rails can be added and the boxy
things in front. Some of the parts in these assemblies are truly tiny, so
the single track links that come next are going to seem very easy.
The undercart is made up of a bunch of very small wheels, springs, plates
and rails, all of which are very fiddly to get together. The holes on the
wheels and plates are too small to accept the necessary pins, and opening
them up is challenging. Follow the instructions here step by step, paying
close attention to the numbers. Use tweezers at your own risk- I had
microscopic wheels flying all over till I quit that. I recommend glueing the
assemblies all at once then trying to line everything up while the glue
sets. I used a straight run of track to do this. You have to make sure the
wheels are straight fore-and-aft and all touching the "ground" at once. (If
your vehicle is on level ground). I also attached the sprocket and idlers
before the bogie trucks (ooh-official terminology) so when the trucks were
glued all could be lined up. This is important on link-and-length tracks to
keep things straight. At this point the top rails can be added and the boxy
things in front. Some of the parts in these assemblies are truly tiny, so
the single track links that come next are going to seem very easy. fit
of the single links that wrap around it. Behind the sprocket and after the
top rails are he only places sag can be put in, by gently bending the short
lengths there. As usual the ends did not join perfectly, some trimming being
necessary to get them together, and look right. This is a tough one because
there are no fenders or mudguards to hide screw-ups. Some "mud" will be
needed here at the end.
fit
of the single links that wrap around it. Behind the sprocket and after the
top rails are he only places sag can be put in, by gently bending the short
lengths there. As usual the ends did not join perfectly, some trimming being
necessary to get them together, and look right. This is a tough one because
there are no fenders or mudguards to hide screw-ups. Some "mud" will be
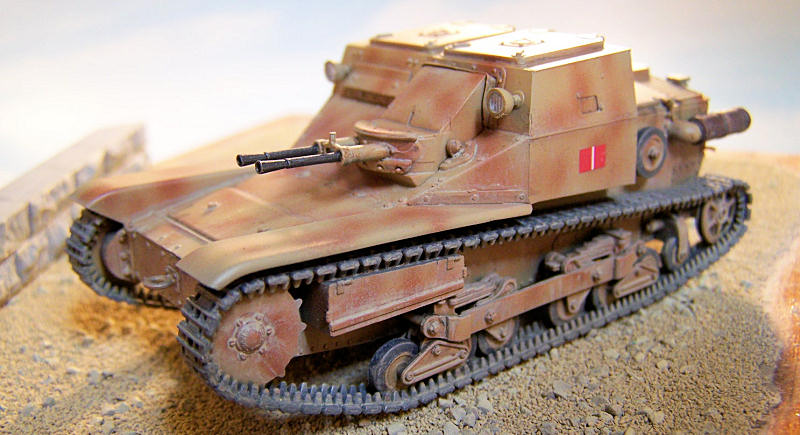
needed here at the end.| COLORS & MARKINGS |
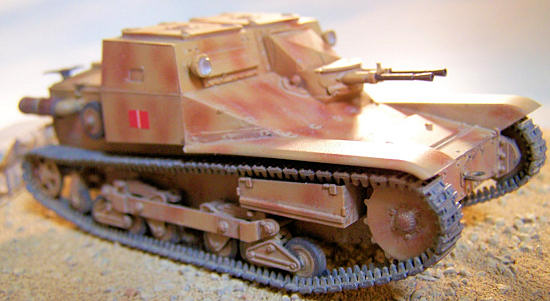 already
in place, it makes painting them their "steel" color easier. Various refs
called for a light sand as a base color. Aircraft "Italian Sand" looked too
pink to me, I went with RLM 79 Sandgelb lightened with white. I applied this
avoiding the tracks and tires as much as possible. One of the schemes in the
plans calls for Red Brown spots overall so I went with this. Thinning the
paint well and screwing down the tip of my trusty Paasche H way down, I
splooged some random spots on the sand uppers and running gear, as per some
internet pictures. The tip kept clogging and needing to be blown out, so
it's a good thing this was a little guy.
already
in place, it makes painting them their "steel" color easier. Various refs
called for a light sand as a base color. Aircraft "Italian Sand" looked too
pink to me, I went with RLM 79 Sandgelb lightened with white. I applied this
avoiding the tracks and tires as much as possible. One of the schemes in the
plans calls for Red Brown spots overall so I went with this. Thinning the
paint well and screwing down the tip of my trusty Paasche H way down, I
splooged some random spots on the sand uppers and running gear, as per some
internet pictures. The tip kept clogging and needing to be blown out, so
it's a good thing this was a little guy. | FINAL CONSTRUCTION |
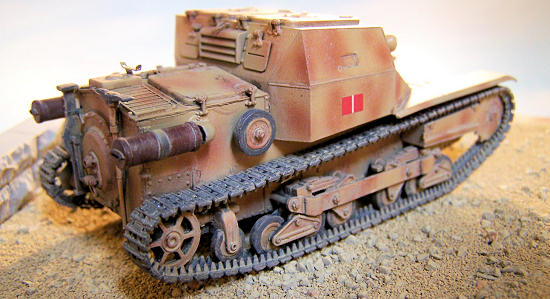
 The tires were painstakingly picked out with Dark grey, mufflers rusted a
bit, tools painted as tools should. Now I applied a Burnt Uber wash to the
recessed parts of the hull, hinges and running gear. Black wash was used in
the grills and vision slits. Now the Tamiya Weathering Sticks come out. I
have really gotten to like these easy to use tools. Just smear a little on a
palate, it can be applied by brush straight for gloppy mud, or watered down
as much as you want all the way to a wash. It dries nicely and can be
flatcoated over with no effect on the color. I used the "Light Earth" here
to slightly mud up the lower areas and springs, and "Sand" to coat the whole
upper areas to desert dust the vehicle. If you don't like your results,
just wipe off with water. I also washed with the Sand around the larger
rivets and seams, to mimic a look I see often on pictures of desert
vehicles. The tracks were also covered, especially the fudged-up join at the
back.
The tires were painstakingly picked out with Dark grey, mufflers rusted a
bit, tools painted as tools should. Now I applied a Burnt Uber wash to the
recessed parts of the hull, hinges and running gear. Black wash was used in
the grills and vision slits. Now the Tamiya Weathering Sticks come out. I
have really gotten to like these easy to use tools. Just smear a little on a
palate, it can be applied by brush straight for gloppy mud, or watered down
as much as you want all the way to a wash. It dries nicely and can be
flatcoated over with no effect on the color. I used the "Light Earth" here
to slightly mud up the lower areas and springs, and "Sand" to coat the whole
upper areas to desert dust the vehicle. If you don't like your results,
just wipe off with water. I also washed with the Sand around the larger
rivets and seams, to mimic a look I see often on pictures of desert
vehicles. The tracks were also covered, especially the fudged-up join at the
back.| CONCLUSIONS |
| REFERENCES |
 Beda Fomm The Classic Victory Kenneth Macksey Ballantine battle no. 22
1971
Beda Fomm The Classic Victory Kenneth Macksey Ballantine battle no. 22
1971If you would like your product reviewed fairly and quickly, please contact me or see other details in the Note to Contributors.