Bandai 1/48 88mm FlaK 18
| KIT #: | ? |
| PRICE: | Around 25 euros |
| DECALS: | Stickers for one |
| REVIEWER: | Sjon van der Heiden |
| NOTES: | Kit has been reissued by Fuman |
| HISTORY |
Most people probably know about the “mighty eighty-eight”. Since I’m no historian, I have very little to add to what is already there in abundance on the internet and other sources. There’s probably a bit of its history somewhere on the box or in the instructions too, but if so, they’re in Japanese or Chinese and I read neither particularly well. Suffice it to say it was a fearsome weapon both in the anti aircraft and anti tank role.
| THE KIT |
This is a reissue of the old Bandai kit by Fuman. The moulds show their age
as there is flash galore. Many parts on the sprues dedicated to the gun’s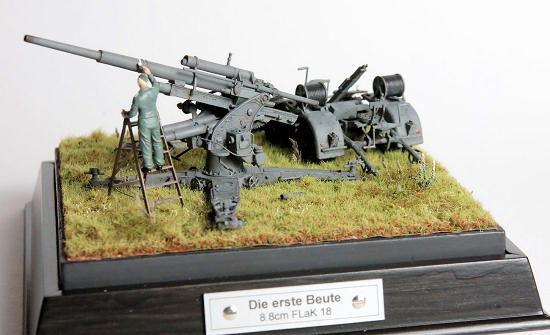 trailers (C and D) are short shot (mainly the wheels and its hubs) and the
larger components are all warped to some degree. Apart from that, the kit holds
an incredible amount of detail, especially considering its age. Nearly all of
the smaller detail is cast separately and this results in some serious tiny
parts. Some details such as handlebars may be a tad oversized, but these could
easily be replaced by scratch build ones from wire if one so wishes. The kit
appears to be very accurate apart from the barrel being a few scale millimetres
too short. Being an older kit, a lot of items are designed to be moveable. The
barrel can be moved front to back (recoil) and the gun can be mounted on its
trailers (and taken off again). This latter feature comprises the detail
concerning this area somewhat, but it still bears resemblance to the original.
There are optional cylinder pieces according to the desired elevation of the
gun, and once assembled, the elevation can still be adjusted to some degree (no
pun intended). All in all there are 174 pieces dedicated to the gun and its
trailers. My copy came with an additional sprue containing a lot (a whole lot!)
of 88mm shells and crates. These suffer badly from mould misalignment and I’ve
been told they are of the wrong type. Despite the obvious age related
shortcomings of this kit I’m still pretty impressed so far.
trailers (C and D) are short shot (mainly the wheels and its hubs) and the
larger components are all warped to some degree. Apart from that, the kit holds
an incredible amount of detail, especially considering its age. Nearly all of
the smaller detail is cast separately and this results in some serious tiny
parts. Some details such as handlebars may be a tad oversized, but these could
easily be replaced by scratch build ones from wire if one so wishes. The kit
appears to be very accurate apart from the barrel being a few scale millimetres
too short. Being an older kit, a lot of items are designed to be moveable. The
barrel can be moved front to back (recoil) and the gun can be mounted on its
trailers (and taken off again). This latter feature comprises the detail
concerning this area somewhat, but it still bears resemblance to the original.
There are optional cylinder pieces according to the desired elevation of the
gun, and once assembled, the elevation can still be adjusted to some degree (no
pun intended). All in all there are 174 pieces dedicated to the gun and its
trailers. My copy came with an additional sprue containing a lot (a whole lot!)
of 88mm shells and crates. These suffer badly from mould misalignment and I’ve
been told they are of the wrong type. Despite the obvious age related
shortcomings of this kit I’m still pretty impressed so far.
| CONSTRUCTION |
 I started filling the short shots and the sink marks in the wheels and its
hubs. Because the places in need of filling are rather difficult to reach, this
job was rather difficult as well. Still, the results were good enough. Even
though I couldn’t read a single syllable of the instructions due to the language
barrier, the drawings are thus clear that construction was actually a breeze.
The fit was very good as well and even the warped parts worked out OK.
I started filling the short shots and the sink marks in the wheels and its
hubs. Because the places in need of filling are rather difficult to reach, this
job was rather difficult as well. Still, the results were good enough. Even
though I couldn’t read a single syllable of the instructions due to the language
barrier, the drawings are thus clear that construction was actually a breeze.
The fit was very good as well and even the warped parts worked out OK.
I had decided to build this one straight from the box. The only alterations I
made were to remove the moulded on cables from the front fenders and replace one
of them with steel painted yarn. I only added brackets to the other fender. I
also drilled out the holes in the gunner’s seat and tried to give it a more
three dimensional look by adding a rim around it. All of the field gear looks
rather clunky and these were either omitted, or carved into better shape. Three
electrical cables regarding fire control were added later on in the build, but
I’m not sure if these cables would have been present on all guns.
| COLORS & MARKINGS |
I assembled as much as I could until I had to paint it all before I could
continue with assembling. I opted to paint it panzergrau. First two layers of
the basecoat were hand painted with Humbrol enamel paint. This was followed with
several highly diluted flat black washes. After this the entire subassembly
 was drybrushed with the original panzergrau, and some places were highlighted with a
lighter gray. By now there are no brush marks left noticeable.
was drybrushed with the original panzergrau, and some places were highlighted with a
lighter gray. By now there are no brush marks left noticeable.
To give the gun a worn look I made many tiny scratches with a lighter gray. Most
of the centres of these lighter patches were then filled with a mixture of
gunmetal and red brown simulating rust, others were filled in with a soft
graphite pencil. The trailers and the gun carriage were given a coat of mud and
dirt and that was it.
On closer examination the markings Fuman provides (mostly kill stripes) turned
out to be genuine stickers! Absolutely worthless! Still it was this lack of kill
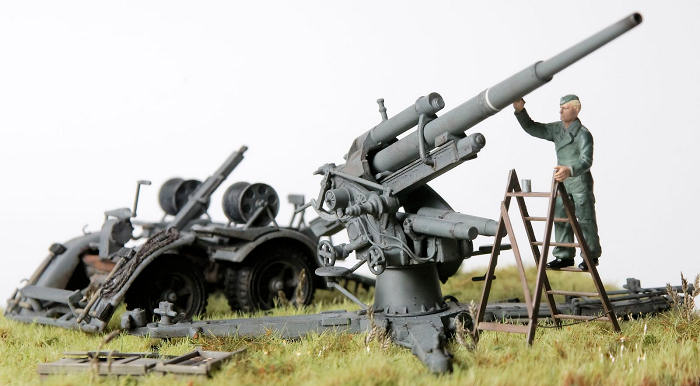
stripes which gave me the idea for the small vignette I made. I still had a
small stepladder and a German with a paintbrush in his hand in the stash. A
friend of mine suggested I’d call it “Die erste Beute” or “first kill”.
| FINAL CONSTRUCTION |
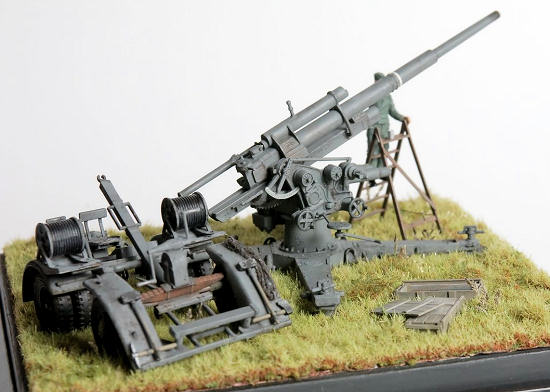
I put the gun and its trailers on a piece of meadow from Polák models (# 5959, withered grass). These pieces are rather expensive but look unbelievably realistic. I further enhanced it with very small patches of Decovlies from Heki (# 1574), some Underbrush from Woodland Scenics and various seeds of actual grass which pose as nettles. I even painted some daisies. Two wooden crates and some 88mm shells from a Tamiya set were added as a final touch.
| CONCLUSIONS |
 This is a beautiful kit! Especially considering it’s about the same age as I
am. It’s highly detailed and easy to assemble. You don’t come across these kits
very often but they can still be found on the internet (which is where I got
mine). Do not hesitate to grab one when the opportunity presents itself. You
will not be disappointed. Highly recommended to you all.
This is a beautiful kit! Especially considering it’s about the same age as I
am. It’s highly detailed and easy to assemble. You don’t come across these kits
very often but they can still be found on the internet (which is where I got
mine). Do not hesitate to grab one when the opportunity presents itself. You
will not be disappointed. Highly recommended to you all.
| REFERENCES |
Very useful box art and some pictures on the internet.
April 2011
Copyright ModelingMadness.com
If you would like your product reviewed fairly and fairly quickly, please contact the editor or see other details in the Note to Contributors.