Dragon 1/35
Panther G with Zimmerit
|
KIT # |
6384 |
|
PRICE: |
$58.00 MSRP |
|
DECALS: |
4 options |
|
REVIEWER: |
|
|
NOTES: |
|
|
HISTORY |
The Panther
was a direct response to the Soviet T-34. When German panzer divisions first
encountered it on the battlefield, the T-34 outclassed the existing Panzer III
and IV. General Heinz Guderian insisted that a team go to the Eastern Front to
assess the T-34. This team found that several significant performance features
in the Soviet tank: sloping armor, which gave much improved shot deflection and
also increased the effective armor thickness against penetration; a
wide track, which improved mobility over soft ground; and the 76.2 mm
gun, which had good armor penetration and employed an effective high-explosive
round. After this assessment, Daimler-Benz and Maschinenfabrik Augsburg-Nurnberg
began designing a new thirty to thirty-five-ton tank, designated the VK3002.
The two
proposals were delivered in April 1942. The Daimler design resembled the T-34
hull and turret form. Daimler offered both leaf spring suspension and
torsion-bar suspension variants as opposed to the T-34’s coil spring suspension.
The Daimler turret was smaller than the Maschinenfabrik design. Unlike the T-34,
both variants had a three-man turret crew: commander, gunner, and loader. But as
the planned gun was much longer and heavier than the T-34's, mounting it in the
Daimler-Benz turret was difficult. Plans to reduce the turret crew to two men to
stem this problem were eventually dropped.
 The
Maschinenfabrik design displayed more conventional German thinking: it was
higher and wider with a substantial turret centrally located on the hull, a
gasoline engine and eight torsion-bar suspension axles per side. The
Maschinenfabrik Panther design repeated the Tiger I’s use of a "slack-track"
pattern of large road wheels with no return rollers for the upper run of track,
and with the main road wheels being overlapping and interleaved in layout.
Although Hitler preferred the Daimler design, The Maschinenfabrik design was
accepted in May 1942. Among the Maschinenfabrik design’s advantages over the
Daimler design were: an existing turret design as opposed to the Daimler design,
which would have required a brand new turret to be designed and produced,
substantially delaying the commencement of production; better fording ability;
easier gun servicing; and higher mobility due to better suspension, wider
tracks, and a bigger fuel tank.
The
Maschinenfabrik design displayed more conventional German thinking: it was
higher and wider with a substantial turret centrally located on the hull, a
gasoline engine and eight torsion-bar suspension axles per side. The
Maschinenfabrik Panther design repeated the Tiger I’s use of a "slack-track"
pattern of large road wheels with no return rollers for the upper run of track,
and with the main road wheels being overlapping and interleaved in layout.
Although Hitler preferred the Daimler design, The Maschinenfabrik design was
accepted in May 1942. Among the Maschinenfabrik design’s advantages over the
Daimler design were: an existing turret design as opposed to the Daimler design,
which would have required a brand new turret to be designed and produced,
substantially delaying the commencement of production; better fording ability;
easier gun servicing; and higher mobility due to better suspension, wider
tracks, and a bigger fuel tank.
Maschinenfabrik produced a prototype by September 1942 and, after testing it was
officially accepted. It was put into immediate production, but production was
delayed because there were too few specialized machine tools needed for the
machining of the hull. Finished tanks were produced in December and suffered
from reliability problems as a result of this haste. The demand for this tank
was so high that the manufacturing was soon expanded beyond Maschinenfabrik to
include Daimler-Benz, Maschinenfabrik Niedersachsen-Hannover (MNH) and Henschel.
The initial
production target was 250 tanks per month, increasing to 600 per month in
January 1943. That production figure was never reached due to disruption by
Allied bombing, manufacturing bottlenecks, and other difficulties. The Germans
were able to increase production from an average of 148 per month in 1943 to 315
a month in 1944, and peaked their Panther production at 380 in July 1944.
Panther production ended in March 1945, with at least 6,000 built.
The Panther Ausf G was first produced in March 1944, and it
became the most numerous Panther model. It’s new features included: a new design
for the top hull hatches; removal of the driver’s vision port in the glacis
plate to strengthen the frontal armor; A new driver’s seat, which could be
raised up so that the driver’s head would emerge from his hatch, allowing for
better 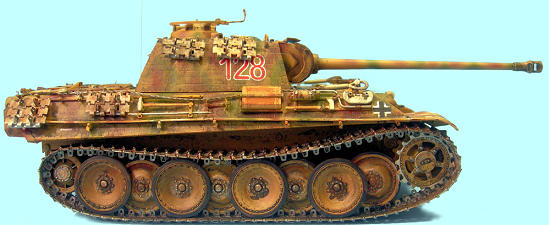 visibility when moving away from the battlefield; and upper hull sides
closer to the vertical. Later G variants had a rotating periscope for the
driver, a new exhaust arrangement, a new mantlet design and a new engine deck
layout with a raised fan cover. The most distinctive feature of the Ausf G was
the tapered one-piece upper hull side plate on the sponson over the suspension.
visibility when moving away from the battlefield; and upper hull sides
closer to the vertical. Later G variants had a rotating periscope for the
driver, a new exhaust arrangement, a new mantlet design and a new engine deck
layout with a raised fan cover. The most distinctive feature of the Ausf G was
the tapered one-piece upper hull side plate on the sponson over the suspension.
During the production run of the Ausf G the gun mantlet was
also modified. On earlier tanks it had a circular profile, which created a “shot
trap” below the gun, where incoming rounds could hit the base of the mantlet and
be deflected down onto the thin roof armor. The bottom half of the new mantlet
was wedge shaped, eliminating this problem.
A shortage of raw materials forced the installation of
all-steel running gear on the Panther Ausf G, beginning with chassis number
121052. During the production run a number of further changes were made,
including the addition of a gearbox oil cooler, 3mm armored ammo bins and a
heater for the fighting compartment. Some 2,950 Panther Gs were produced from
March 1944 to April 1945.
|
THE KIT |
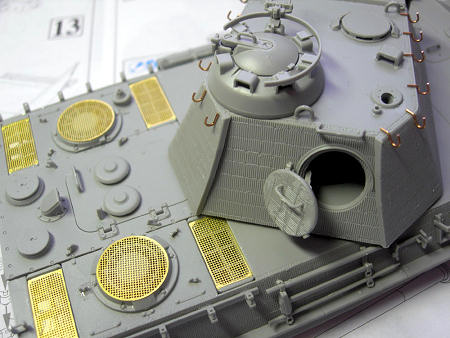
 Once again, Dragon has
upped the ante for armor kits. The most prominent feature of this kit is the
injection-molded zimmerit, which replicates the real thing to a “t.” Additional
“wow” features include accurate weld patterns on the turret; “Dragon Styrene
100” (DS) stowage boxes with simulated damage and zimmerit; metal spare track
brackets on the turret sides; photo-etched parts for engine-deck grills and
cupola details; a one-piece, slide-molded hull bottom with excellent detail; a
full suspension assembly, allowing the road wheels and idler arms to be
positioned on uneven terrain; and multi-part idler wheels. Much to this
modeler’s delight, this kit continues the latest Dragon trend of
newly tooled, one piece DS tracks
(sorry, all you track purists who want to punish yourselves with individual
track links and the attendant, long hours of assembly are out of luck!)
Once again, Dragon has
upped the ante for armor kits. The most prominent feature of this kit is the
injection-molded zimmerit, which replicates the real thing to a “t.” Additional
“wow” features include accurate weld patterns on the turret; “Dragon Styrene
100” (DS) stowage boxes with simulated damage and zimmerit; metal spare track
brackets on the turret sides; photo-etched parts for engine-deck grills and
cupola details; a one-piece, slide-molded hull bottom with excellent detail; a
full suspension assembly, allowing the road wheels and idler arms to be
positioned on uneven terrain; and multi-part idler wheels. Much to this
modeler’s delight, this kit continues the latest Dragon trend of
newly tooled, one piece DS tracks
(sorry, all you track purists who want to punish yourselves with individual
track links and the attendant, long hours of assembly are out of luck!)
As usual, you will end up with a host of spare parts, as this kit contains
sprues with many parts for other variants as well as the optional parts
specifically intended for this kit.
|
CONSTRUCTION |
 I followed the step-by-step assembly
sequences in the Dragon instructions. I also followed my routine of keeping a
pencil handy during construction and deliberately marking off each part in each
step that I complete, so if I skip ahead to another subassembly (sometimes a
necessary step to avoid the tedium of some subassemblies), I can go back over
the instructions and see what specific assembly items I have not yet completed.
I followed the step-by-step assembly
sequences in the Dragon instructions. I also followed my routine of keeping a
pencil handy during construction and deliberately marking off each part in each
step that I complete, so if I skip ahead to another subassembly (sometimes a
necessary step to avoid the tedium of some subassemblies), I can go back over
the instructions and see what specific assembly items I have not yet completed.
As with all Dragon kits of late, one
must remain focused on the “version” or options you are including in your
particular model, as the numerous parts can throw you if you don’t do this.
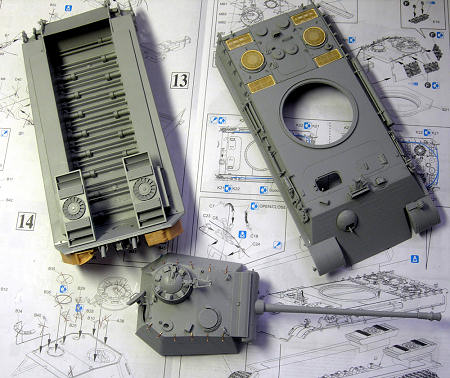
Per the instructions, I finished the
lower hull and all the running gear first, including the unique torsion bar
suspension. I then moved to the rear hull and engine deck. There are a myriad of
pieces for both of these, and I just methodically stepped through all the parts
until I completed each. The rear engine deck is the first encounter of the
dreaded photoetch (PE), with the intakes being covered by mesh PE screens. I
must say, these are striking and give a great look to the model. I used
superglue to secure them to the deck. I also opted for the DS-molded stowage
boxes, which are dented to simulate typical battle damage seen on many Panthers.
I prefer to assemble hull mounted tools and other items during the assembly process and then hand-paint items such as wooden shovel, axe and sledge hammer components.
The turret is another area of great
detail and many parts. While Dragon does not provide a complete interior on this
kit, it does provide the complete gun breech assembly so that one can display
the main turret hatch open and not be concerned about what will be showing.
The one noticeable absence is that of the turret mounted machine gun: the
mount is there, but no gun is included in the vast box of parts. On the other
hand, there are numerous wartime photos of Panthers where the gun is not
mounted, so the gun’s absence is not overly critical to the finished kit’s
authenticity.
The kit includes wire to make tow
cables, and these look very realistic when combined with the plastic ends. I
made up one long of metal cable and attached both ends to the front tow cable
mounting tabs on either hull side, and then draped the cable around the hull. I
mounted the other, shorter cable through the cable clamps on the hull’s rear.
|
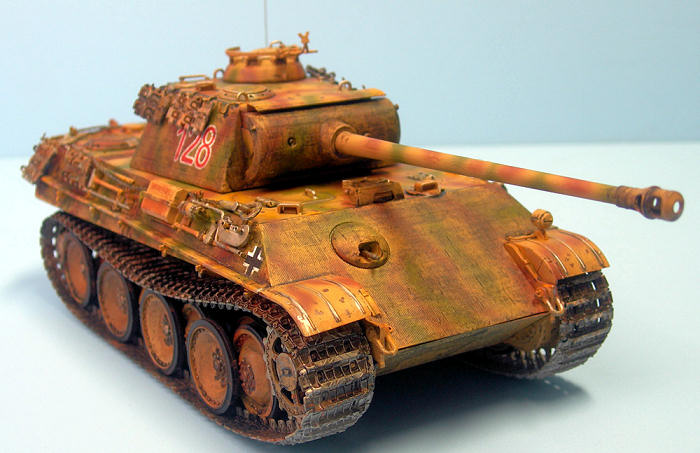
COLORS & MARKINGS |
Once everything was assembled, I headed
to the paint booth (aka my basement).
Since the marking options are all for late war
Panthers with a base Panzer Yellow finish, I covered the entire tank with Model
Masters Sand Gelb (close enough for me to Dunkelgelb), and when this was dry, I
began to create the camo pattern using light (15 psi) air pressure and a very
low nozzle
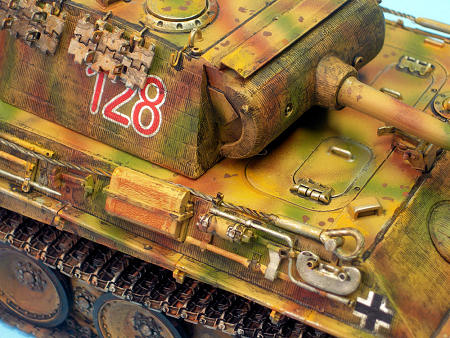 opening on my airbrush.
I used Model Masters Dark Green and Testors Dark Brown for the camo pattern.
opening on my airbrush.
I used Model Masters Dark Green and Testors Dark Brown for the camo pattern.
I glued the tracks together, and then
sprayed them with Model Masters Steel. I set them aside for later installation
on the model.
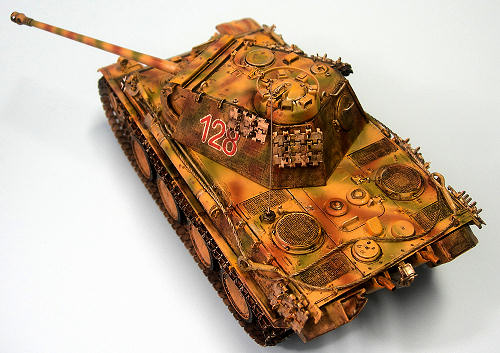
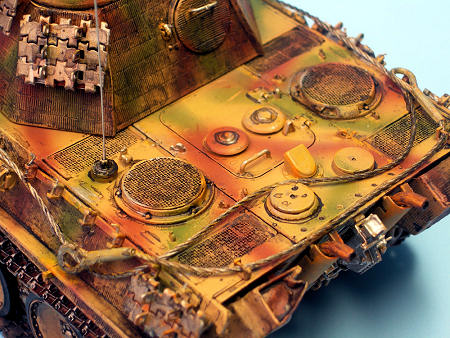
Once all was dry, I coated the entire model
with Testors Glosscote. I again set the tank aside to dry, and later covered the
entire tank with a wash of acrylic black. After letting the wash dry for an hour
or so, I used wet Q-tips to clean up the areas of excess wash on the tank. This
process really makes the zimmerit and other details pop. I then covered the flex
tracks with a reddish brown acrylic wash.
I also applied this wash to selected spots on the tank to simulate rust.
After this dried, I applied the acrylic black wash to the tracks.
I used Solvaset to soften and lay down
the decals, and once these were dry, I covered the tank with Testors Dullcote.
I then picked out various areas with Testors Steel to simulate bare metal
in strategic spots, including the road wheels and drive sprockets.
I also dry brushed Floquil Orange on various locations to simulate rust.
 Once again, one of the minor drawbacks
of the DS flex tracks is simulating the sag in German tank tracks, particularly
Tigers and Panthers. I reviewed numerous photos of Panthers at rest, and
determined that, when the tank is not moving, the track tends to sag from the
drive sprocket to the top of the second, outer road wheel. I then superglued the
tracks to this road wheel on both sides, and I think it produced realistic track
sag for the kit.
Once again, one of the minor drawbacks
of the DS flex tracks is simulating the sag in German tank tracks, particularly
Tigers and Panthers. I reviewed numerous photos of Panthers at rest, and
determined that, when the tank is not moving, the track tends to sag from the
drive sprocket to the top of the second, outer road wheel. I then superglued the
tracks to this road wheel on both sides, and I think it produced realistic track
sag for the kit.
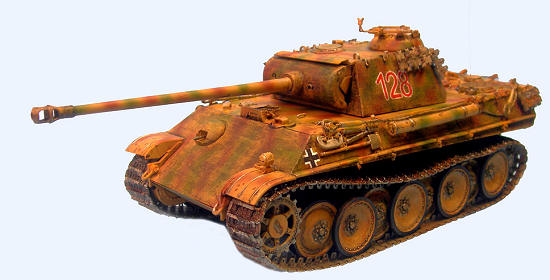
The final step in painting the model
was to brush paint the various tools and their wooden handles. Since I had
already mounted them to the turret, I also opted to hand-paint the spare tracks
on the turret and hull sides. The real wire tow cables add realism to the model,
but they are difficult to position and glue. I recommend superglue for this, and
using accelerator to secure the tow cables in a realistic manner to the kit’s
upper hull.
The final touch was to cut a length of guitar string for a radio antenna and superglue it to the antenna mount on the engine deck.
|
CONCLUSIONS |
Another homerun by Dragon! The molded zimmerit is outstanding, and certainly beats older methods of applying zimmerit with modeling putty, etc. The model is a great addition to any armor collection, and I highly recommend it to anyone wanting to model a late war Panther with zimmerit coating.
|
REFERENCES |