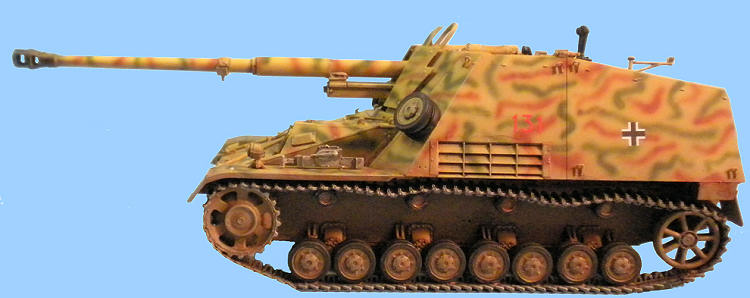
Dragon 1/35 Sd.Kfz.164 Nashorn
|
|
6386 |
|
PRICE: |
$57 MSRP |
|
DECALS: |
6 options |
|
REVIEWER: |
|
|
NOTES: |
Smart Kit |
|
HISTORY |
Nashorn (German
"rhinoceros"),
initially known as the Hornisse (German
"hornet"),
was a World War II
German
tank destroyer.
The Germans developed it as an interim solution in 1942 and armed it with the
PaK 43 anti-tank gun.
Though only lightly armored and having a high profile, it stayed in service
until the end of the war.
 After their
first experiences with the newer
Soviet
tanks like the
T-34
or the
KV-1 tank during
Operation Barbarossa, the Germans
clearly recognized they needed a
Panzerjäger
capable of destroying these heavily armored tanks.
After their
first experiences with the newer
Soviet
tanks like the
T-34
or the
KV-1 tank during
Operation Barbarossa, the Germans
clearly recognized they needed a
Panzerjäger
capable of destroying these heavily armored tanks.
In February 1942, the
Alkett
arms firm of
The Hornisse entered production in early 1943.
During the first half of 1943, a new model of the Hornisse was introduced. This
model altered the driver's front armor plate, along with other minor
differences. In 1944, Hitler renamed this version “Nashorn”. Total production of
the Hornisse/Nashorn was 494 vehicles, of which most were built in 1943. As a
Panzerjäger, it was soon replaced by the newer German tank destroyers like the
Jagdpanzer IV and the
Jagdpanther. However,
Nashorn production continued into 1945.
Six German Heavy Antitank
Battalions
were eventually equipped with the Nashorn. Each Battalion was equipped with 45
Nashorns.
 The
Nashorn carried one of the most effective anti-tank guns deployed during the
war. Its
tungsten
carbide–cored, sub-caliber round
could penetrate 190 mm of steel armor at a 30° impact angle and at 1,000 meters.
The gun's performance enabled a Nashorn to engage enemy tanks while they were
still out of range.
The
Nashorn carried one of the most effective anti-tank guns deployed during the
war. Its
tungsten
carbide–cored, sub-caliber round
could penetrate 190 mm of steel armor at a 30° impact angle and at 1,000 meters.
The gun's performance enabled a Nashorn to engage enemy tanks while they were
still out of range.
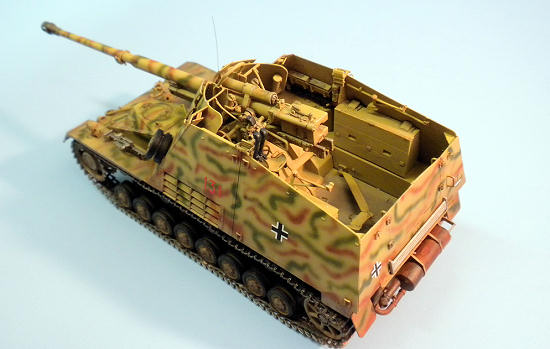
The relatively compact fighting compartment limited shell storage to
only 24 to 40 rounds. The Nashorn’s crew traveled in an open-top fighting
compartment with all its weather-related disadvantages. They could protect
themselves from the weather by using canvas covers to enclose the fighting
compartment. The Nashorn did not have a machine gun mounted in the hull, so a
single MG34 or MG42 was carried inside the fighting compartment for local
defense.
Nashorns made their debut during the
Battle
of Kursk, where they performed
well. The ability to engage the enemy at long distances negated the
disadvantages of light armor and a high profile and revealed the weapon was
suited to
|
THE
|
I have built a
lot of Dragon 1/35 military vehicle kits lately, and I continue to be impressed
by their level of detail. The Nashorn is no exception. With over 700 parts, this
is another Dragon kit that isn’t for the faint-hearted. According to Cookie
Sewell, well-known
 armor
expert and kit reviewer, this is not a modified version of Dragon’s 2006 Premium
version of the Nashorn; rather, it contains numerous reworked sprues from that
kit as well as several more new ones and sprues from the revised Hummel. There
are also common parts with Dragon Panzer IV kits. Needless to say, at the end of
the assembly process, you will once again have a boatload of spare parts to put
away for a rainy day.
armor
expert and kit reviewer, this is not a modified version of Dragon’s 2006 Premium
version of the Nashorn; rather, it contains numerous reworked sprues from that
kit as well as several more new ones and sprues from the revised Hummel. There
are also common parts with Dragon Panzer IV kits. Needless to say, at the end of
the assembly process, you will once again have a boatload of spare parts to put
away for a rainy day.
The kit comes with Dragon’s “Magic
Tracks,” which are tedious at best to assemble, but look good on the vehicle,
assuming you can assemble them in a manner that fits properly on all the running
gear. There are right and left tracks, distinguished by a dark and light gray
plastic and contained in separate plastic bags. There are just enough photo etch
(PE) parts to provide that added detail to set this kit apart.
Assembly of the gun alone requires 5 of the 17
instruction steps, and involves some 60 parts. The turned aluminum barrel is a
thing of beauty. A nice decal sheet provides markings for 6 vehicles, including
initial, early and initial-modified production vehicles.
|
CONSTRUCTION |
Based on my Dragon kit
experience, I actually studied the step-by-step assembly sequences in the Dragon
instructions prior to beginning the kit. Per all Dragon kits of late, one must
remain focused on the “version” or options you are including in your
 particular
model, as the numerous parts can throw you if you don’t do this. I cannot
emphasize this point enough to modelers who intend to build this kit: there are
some rather COMPLEX assembly steps included as part of the overall construction
process.
particular
model, as the numerous parts can throw you if you don’t do this. I cannot
emphasize this point enough to modelers who intend to build this kit: there are
some rather COMPLEX assembly steps included as part of the overall construction
process.
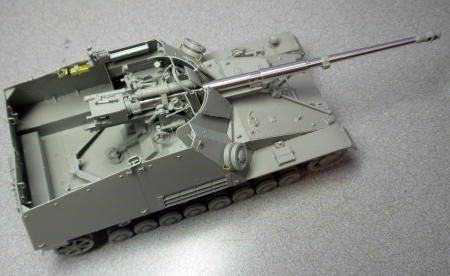
As with most armor kits, I finished
the lower hull, the suspension and all the running gear first. I then moved to
the rear hull and fighting compartment. I assembled the road wheels and bogies,
but left them off at this stage to facilitate painting later in the build
process.
Step 3 involves assembly of the top
of front glacis plate, and here one is forced to decide on a version. I opted
for the initial and modified early version, and there are separate steps to
complete for that version. I continued in Steps 4, 5 and 6with assembly of the
fenders, fighting compartment floor, and rear hull.
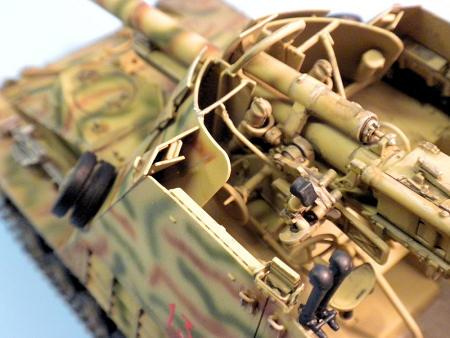
Steps 7 thru 11 involve the assembly
of the gun, and it includes some 60 plastic parts and the turned aluminum barrel
(incidentally, you also get parts to assemble two plastic barrels if one is so i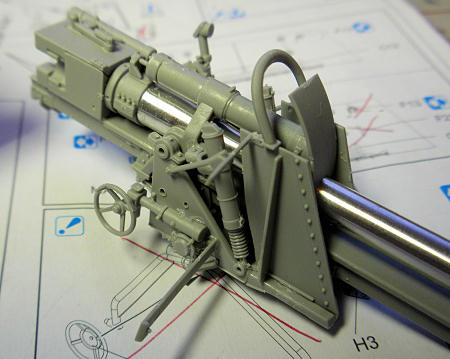 nclined).
I really had to study Step 10, as several locations for parts are not readily
apparent from the instruction illustrations. I recommend a lot of trial fitting
before gluing parts in this step. A nice touch here is the inclusion of very
small steel springs for the gunner’s seat (I took the lazy way out and used the
seat with the molded-in plastic springs).
nclined).
I really had to study Step 10, as several locations for parts are not readily
apparent from the instruction illustrations. I recommend a lot of trial fitting
before gluing parts in this step. A nice touch here is the inclusion of very
small steel springs for the gunner’s seat (I took the lazy way out and used the
seat with the molded-in plastic springs).
Moving on to Step
12, I assembled the sides of the fighting compartment, including several stowage
boxes. Step 13 involves assembly of the ammo boxes, and one can display these
open or closed. The open version involves numerous parts and will require
separate painting of the exposed shells. I opted for building one box open and
one closed. A note: the illustrations are reversed in the instructions, and
parts F6 and F7 in the open box illustration are reversed. This was the only
mistake I found in the instructions, which leads me to conclude that Dragon is
hearing those of us who have pointed out instruction mistakes on their other
kits, and is indeed working to minimize these occurrences.
Once I finished these, I set them aside
for later installation, as I knew I would be hand-painting the shells in the
open box.
In Step 14, I assembled the gun
travel lock that goes inside the fighting compartment, and then glued it to its
locaters on the vehicle. I also assembled the rear doors and glued them to the
fighting compartment rear wall. The final assembly items in this step include
gluing the fighting compartment side and rear walls to the vehicle’s chassis.
Step 15 includes more assembly of items that are mounted in or to the fighting
compartment. Step 16 completes the front of the compartment and also involves
the attachment of some nice PE mounting hangars for extra road wheels.
I then moved to Step 17 and
assembled the front gun travel lock. I chose to display it in the stowed
position (i.e., flush against the glacis plate). I glued the gun shield
together, mounted it to the gun, and then placed the gun into its locator hole
on the chassis. I did not glue this as I wanted the gun to traverse.
 Having put
off the assembly of the individual link tracks for as long as I could, I finally
decided to “man up” and get this out of the way. I must say that these tracks
went together easier than other individual link tracks, and when I used Super
Glue to attach them to the vehicle, I was pleasantly surprised at the realistic
track sag I was able to attain with them. As always, pre-planning is a must for
assembling these tracks, and one gets zero advice on this process from the
instructions, so either read up on assembling these or use your own experience.
For me, I have found that not gluing the boogies and road wheels on makes the
assembly process easier, in that one can use regular plastic tube cement to glue
a length of links together, and then form them over the boogie wheels, leaving
them to dry in that manner. The same is true for creating the proper angle of
the tracks as they leave the rear or forward road wheels to go up and around
either the idler wheels or the drive sprockets.
Having put
off the assembly of the individual link tracks for as long as I could, I finally
decided to “man up” and get this out of the way. I must say that these tracks
went together easier than other individual link tracks, and when I used Super
Glue to attach them to the vehicle, I was pleasantly surprised at the realistic
track sag I was able to attain with them. As always, pre-planning is a must for
assembling these tracks, and one gets zero advice on this process from the
instructions, so either read up on assembling these or use your own experience.
For me, I have found that not gluing the boogies and road wheels on makes the
assembly process easier, in that one can use regular plastic tube cement to glue
a length of links together, and then form them over the boogie wheels, leaving
them to dry in that manner. The same is true for creating the proper angle of
the tracks as they leave the rear or forward road wheels to go up and around
either the idler wheels or the drive sprockets.
There are right and left
tracks included in the kit, identified by being in separate plastic bags, and
with the left side links being molded in a darker gray plastic. While this was
not my most painful individual track link assembly experience, I must say I
personally prefer Dragon’s newer DS flexible tracks, as they require much less
time to assemble and mount.
|
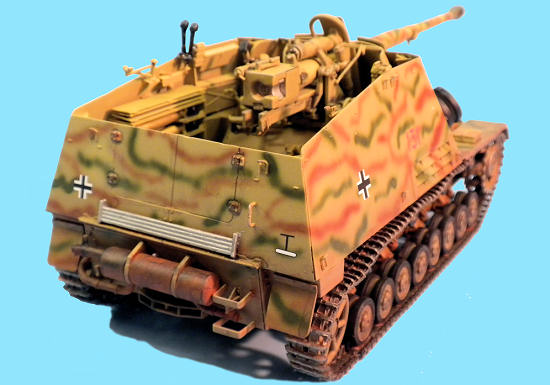
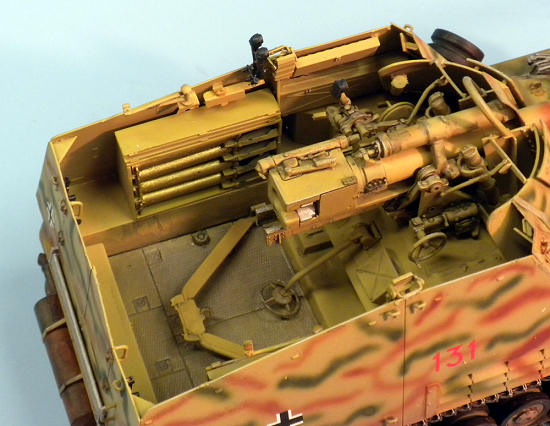
COLORS & MARKINGS |
Once everything
was assembled, I headed to my basement paint booth. I again chose the now boring
(to me) camo scheme of red brown and dark green camo splotches/lines over a dark
yellow base – illustrated in the instructions as an initial-early production
vehicle in action on the Eastern Front in 1943. As per my usual (as of late)
practice for this color scheme, I used Tamiya acrylics thinned 50-50 with
lacquer thinner. At this stage, I used white glue to mount the boogie and road
wheels to the chassis, as I
 wanted to
be able to remove them later to brush paint the rubber on the wheels.
wanted to
be able to remove them later to brush paint the rubber on the wheels.
I used the color
modulation approach that requires three main levels of color - light, medium,
and dark – to provide gradation in the vehicle’s color. I first applied an
overall coat of Tamiya XF-64 Red Brown lightened with a few drops of XF-60 Dark
Yellow with my trusty Paasche H airbrush. Once this dried, I airbrushed a coat
of XF-60, making sure to limit the amount of this paint on the darker, lower
areas. I then added XF-55 Deck Tan to XF-60 to further lighten the color, and
tried to again limit the spray to the upper areas of the model. The contrasts
between the dark and lighter areas were now starting to become noticeable. Once
the base coat dried, I switched to my Iwata HP-CS Eclipse airbrush to carefully
paint the thin brown and green camo stripes on the vehicle’s sides, upper hull,
and gun. The 0.35mm tip on this brush is ideal for painting small details, but
one has to be very careful about the proper paint to thinner ratios to avoid
drying in the nozzle. I used a very light air pressure setting to add small
stripes of dark green and brown to the vehicle’s exterior. I can only say this
takes practice, so don’t be disappointed if at first you mess up a line or two
with a sudden spurt of wet paint mixture that leaves an obvious solvent “hole”
in the painted area. Just let it dry, come back over it with the base coat, and
try again. After a while, one gets the hang of it.
I then coated the
entire model with Rustoleum’s clear gloss out of a rattle can (Wal-Mart is a
good, relatively cheap source for this, but be careful and go lightly with the
first few coats to avoid cracking and crinkling, as this stuff is lacquer-based
and is quite “hot” as paints go). Once this coat dried, I applied both dark
brown and black washes to the entire vehicle, including the tracks
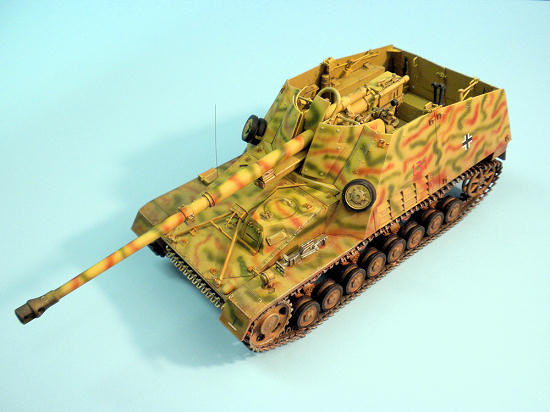 (which I
had sprayed with Testors Steel). I keep a Q-tip handy to quickly wipe away any
excess wash that gets on the model (this is much easier than waiting until it
dries!).
(which I
had sprayed with Testors Steel). I keep a Q-tip handy to quickly wipe away any
excess wash that gets on the model (this is much easier than waiting until it
dries!).
I then applied the
kit decals with Solvaset and let them dry. At this stage, I was ready to restore
the model’s matte finish, so I shot the entire model with Testors Dullcote.
The final step in
painting the model was to brush paint the tools on the fenders and the machine
guns inside the fighting compartment. Since I had already mounted them to the
turret, I also opted to hand-paint the spare track links. I then highlighted
prominent edges on the model with a silver artist’s pencil to simulate worn
metal, and dry brushed a rust colored acrylic paint over some selected exterior
surfaces.
The final touch
was to superglue the kit-supplied steel antenna – another nice touch - to the
antenna base on the fender.
|
CONCLUSIONS |
Here’s another great Dragon kit. While the assembly process is tedious, given the amount of parts and the somewhat complicated assembly instructions, it is well worth it the time and effort because it turns into a great looking model when finished. I highly recommend this kit to those with some armor vehicle assembly experience.
|
REFERENCES |
1.
“Nashorn,”
Wikipedia,
2010.
2.
“Panzerjager Hornisse / Nashorn
Sd. Kfz. 164,”
Achtung Panzer, 2010.
3. Thanks to www.dragonmodelsusa.com via your editor, for the review kit. Get yours at your local shop or on-line retailer
If you would like your product reviewed fairly and quickly, please contact me or see other details in the Note to Contributors.