| KIT #: | 82444 |
| PRICE: | $45.00 SRP |
| DECALS: | Generic crosses and numbers |
| REVIEWER: | Dale Rannals |
| NOTES: |
| HISTORY |
The
VK4502(P)V was the first design from the Porsche firm’s ill-fated entry into the
competition to produce what eventually emerged as the Tiger II.
It was based
on the earlier VK 45.01(P) design but mounting the 8.8cm L/71 gun on a much
modified hull.
 After the failure of the
VK4501(P), Ferdinand Porsche began work on an updated
version of its design. However, it
became clear that an up-armored version of the Porsche Tiger would not meet
future requirements. To this end, Dr. Porsche proposed designs with no fewer
than four different engines, two different drives (hydraulic and electric), and
two different hull configurations: one with the turret forward, the VK4502(P)V,
the other with the turret aft, the VK4502(P)H.
After the failure of the
VK4501(P), Ferdinand Porsche began work on an updated
version of its design. However, it
became clear that an up-armored version of the Porsche Tiger would not meet
future requirements. To this end, Dr. Porsche proposed designs with no fewer
than four different engines, two different drives (hydraulic and electric), and
two different hull configurations: one with the turret forward, the VK4502(P)V,
the other with the turret aft, the VK4502(P)H.
An overly ambitious design, the
VK4502(P)V used the same drive train as the Tiger P, that is, two engines
driving two electric generators to power electric motors driving the tracks.
It was overly complicated and was a heavy user of copper, which was
needed elsewhere in wartime
 The
turret of the VK 4502(P) was developed after it was discovered that the 8.8cm
Flak 41 could not be installed in the turret of the VK4501(P). It had a graceful
rounded front that was developed to reduce frontal target area. A large armored
lip ran around the turret on the hull roof, this was designed to protect the
turret ring and eliminate the shot trap produced by the curved portion of the
turret front. So confident was Dr.
Porsche of his design winning the competition that he had Krupp build 50 turrets
for it. After the Henschel design
won these were
eventually modified and fitted to the first Henschel Tiger IIs.
The
turret of the VK 4502(P) was developed after it was discovered that the 8.8cm
Flak 41 could not be installed in the turret of the VK4501(P). It had a graceful
rounded front that was developed to reduce frontal target area. A large armored
lip ran around the turret on the hull roof, this was designed to protect the
turret ring and eliminate the shot trap produced by the curved portion of the
turret front. So confident was Dr.
Porsche of his design winning the competition that he had Krupp build 50 turrets
for it. After the Henschel design
won these were
eventually modified and fitted to the first Henschel Tiger IIs.
Just to
make more sense of it all:
VK:
“Vollketten” or fully tracked
45: the ton class of
the design
02: the design number
P: Porsche
V: “Vorrne” or forward
H: “Hintern” or rear
| THE KIT |
Hobby
Boss’s kit comes in a big sturdy cardboard box and contains a bit over 600
parts, superbly molded in their normal tan plastic.
Even if you subtract the 240 or so in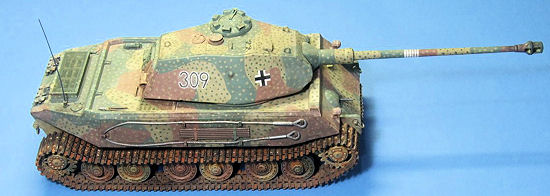 dividual track links, that’s still a
lot of plastic. A good majority of
what’s left goes into the turret interior, and the detail here is just amazing.
A single PE fret contains engine intake screens, and some brass wire is
included for the tow cables.
dividual track links, that’s still a
lot of plastic. A good majority of
what’s left goes into the turret interior, and the detail here is just amazing.
A single PE fret contains engine intake screens, and some brass wire is
included for the tow cables.
Instructions consist of an A4 booklet with 8 well drawn steps and a sprue layout diagram. A full page glossy 3 view painting guide is included, this being normal in the Hobby Boss kits I have seen. The color call-outs are for a bland Panzer Grey machine, but as these were not put into production, you can use your imagination with the paint scheme if you so desire. A single smallish decal sheet is provided; these consist of German crosses and a supply of number codes.
| CONSTRUCTION |
Construction
started with the running gear. The
torsion bar and wheel assemblies were all constructed and set aside to dry.
Having just completed a Dragon VK4501(P) and VK4502(P)H, I am somewhat
familiar with these assemblies, and there is little to choose between the Dragon
and Hobby Boss parts. All are well
detailed, fit well, and present no construction issues.
The hull is a pretty simple affair.
A one piece top and bottom mate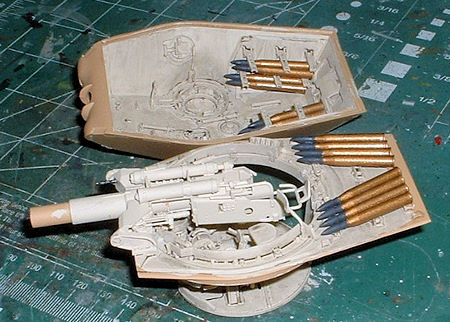 d together.
Once again I pressed the road wheels onto the axles and glued the torsion
bar bogies to the hull; lightly setting it onto the table to make sure
everything was level. I then removed the wheels for painting later.
A few pieces added for the bow mounted machine gun and the drivers port,
and that’s about it. Pretty simple,
but then again it’s a pretty simple structure.
d together.
Once again I pressed the road wheels onto the axles and glued the torsion
bar bogies to the hull; lightly setting it onto the table to make sure
everything was level. I then removed the wheels for painting later.
A few pieces added for the bow mounted machine gun and the drivers port,
and that’s about it. Pretty simple,
but then again it’s a pretty simple structure.
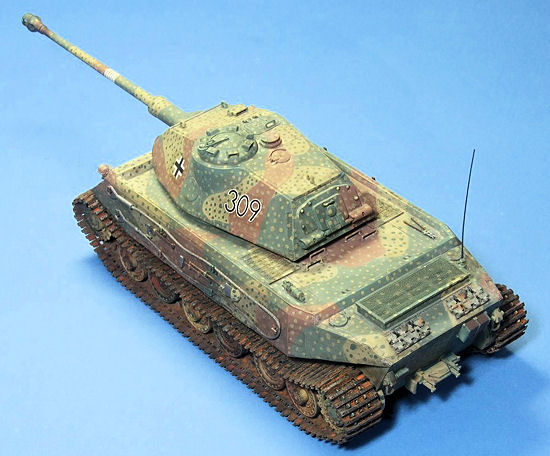
I then turned my attention to the turret. This is usually a simple construct ….
cannon and mantlet, some hatches and visors and that’s pretty much it.
Well, not this kit. You see,
included here is a full and very detailed turret interior.
As I mentioned previously, the majority of the kit parts (if one doesn’t
count the individual track links) find a home inside.
At first I wasn’t going to bother with any of it, for none of it will be
seen once the kit is complete. But
I changed my mind........... I may as well build it all.
This took a couple of weeks off and on.
Lots of little parts and some ambiguous instruction locations, but it
went together well enough.
Assembled it all then went back and slathered on a suitable “Interior Buff”
beige color. Went over that with a
black oil wash and moved on. It was
quite a learning experience as I knew little of the workings in here.
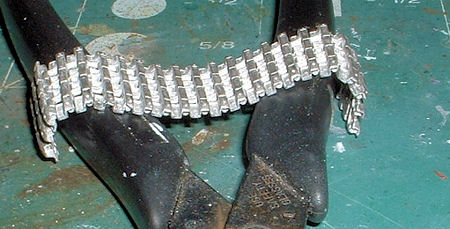 I took a look at the kit tracks next.
These are individual track links, injection molded in black plastic.
They look decent enough, but looking at them and visualizing myself
trying to glue them all together with the proper curves and sag …… hhhhhmmmmmm…….
There’s gotta be another way. I
finally bought a set of Friulmodel tracks from
I took a look at the kit tracks next.
These are individual track links, injection molded in black plastic.
They look decent enough, but looking at them and visualizing myself
trying to glue them all together with the proper curves and sag …… hhhhhmmmmmm…….
There’s gotta be another way. I
finally bought a set of Friulmodel tracks from
 While I was thinking about buying the Fruil tracks I stumbled upon a site online
that showed a neat way to do this, with a product called “Blacken-It”.
Since the tracks are metal, this product … an acid …. weathers it in a
matter of minutes. I simply put the
tracks in a small container and poured in a few ounces of the product.
Close the lid and gently swish it around for about 5 minutes.
Pull out the tracks and let them dry on a paper towel for 24 hours and
rinse with water. It had turned the
silver-grey metal a nice dark brown color, with better color variations than I
could ever get with paint. I added
a few black and brown washes to pop out the detail further and I was a happy
camper. I really wish I could buy
these tracks for every armor kit I build, but they are rather pricey……. I paid
as much for the tracks as I did for the kit.
But the experience was worth it for sure!
While I was thinking about buying the Fruil tracks I stumbled upon a site online
that showed a neat way to do this, with a product called “Blacken-It”.
Since the tracks are metal, this product … an acid …. weathers it in a
matter of minutes. I simply put the
tracks in a small container and poured in a few ounces of the product.
Close the lid and gently swish it around for about 5 minutes.
Pull out the tracks and let them dry on a paper towel for 24 hours and
rinse with water. It had turned the
silver-grey metal a nice dark brown color, with better color variations than I
could ever get with paint. I added
a few black and brown washes to pop out the detail further and I was a happy
camper. I really wish I could buy
these tracks for every armor kit I build, but they are rather pricey……. I paid
as much for the tracks as I did for the kit.
But the experience was worth it for sure!
| COLORS & MARKINGS |
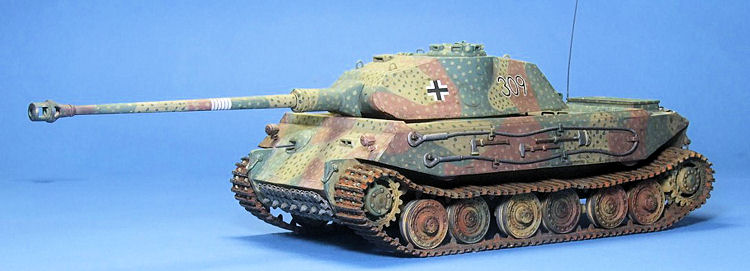
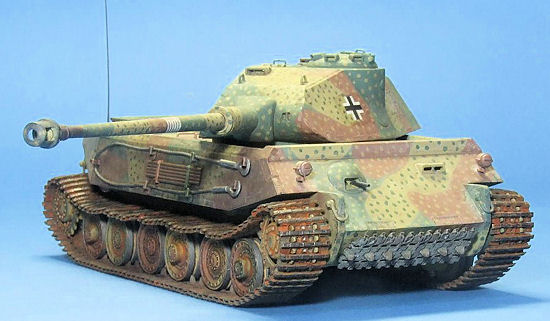
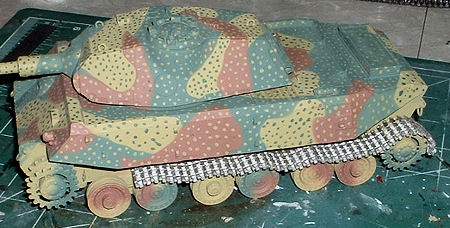
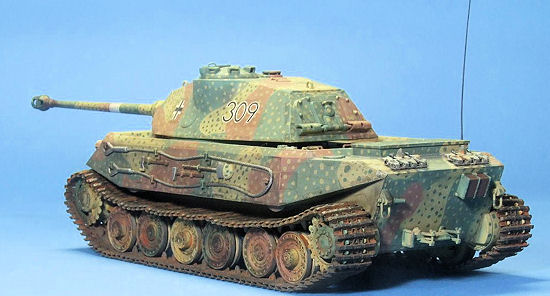
 I am a fan of the classic German “ambush” scheme, so that’s the direction I went
here. An overall coat of Panzer
Yellow was applied to pretty much everything.
I then masked off areas and sprayed Panzer Green and then repeated this
for Panzer Red. I then took the
green and applied many, many little dots on the yellow areas, and even more
little dots of yellow on the green and red areas.
This took a while and was tedious at best.
But I did it all in small sessions so I wouldn’t go batty …. and it
worked …….. maybe………
I am a fan of the classic German “ambush” scheme, so that’s the direction I went
here. An overall coat of Panzer
Yellow was applied to pretty much everything.
I then masked off areas and sprayed Panzer Green and then repeated this
for Panzer Red. I then took the
green and applied many, many little dots on the yellow areas, and even more
little dots of yellow on the green and red areas.
This took a while and was tedious at best.
But I did it all in small sessions so I wouldn’t go batty …. and it
worked …….. maybe………
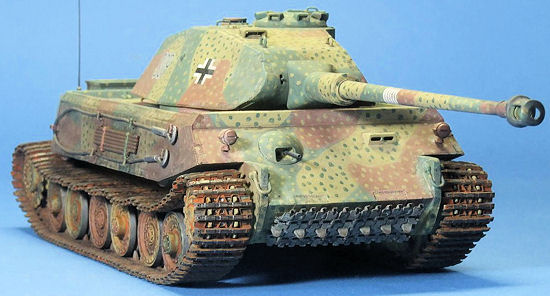
Anyway, after this was done I slathered thin black and brown washes on
everything. Decals were added,
followed by another session of washes.
I grabbed the road wheels, sprayed the three colors randomly on them and
then brush painted some Metalizer Magnesium on the outside rims.
I glued these on and after letting them dry, applied the tracks and
inserted the final track link pin on each side.
I used the left over tracks from the Friul set to make some spares, a
pair sitting on the arse end and a larger section glued onto the lower front
glacis for some extra protection.
And she was done.
| CONCLUSIONS |
 I really find Dr. Porsche’s tank designs fascinating in both looks and
engineering aspects. The suspension
seems neater and simpler than the interleaved road wheels of the Henschel
designs. And the drive train was
definitely advanced, but just too complex for the realities of war.
I really find Dr. Porsche’s tank designs fascinating in both looks and
engineering aspects. The suspension
seems neater and simpler than the interleaved road wheels of the Henschel
designs. And the drive train was
definitely advanced, but just too complex for the realities of war.
I thoroughly enjoyed building this.
The kit is molded superbly, with good detail through-out.
It assembles easy and fits well.
The turret interior shows to good effect just how busy things were inside
(would be very interesting with a clear turret option).
It looks pretty cool sitting next to Porsche’s other designs (VK4501 and
VK4502(P)H) in my growing collection of tracks.
Recommended to anybody with an interest in armor prototypes.
| REFERENCES |
October 2012
If you would like your product reviewed fairly and fairly quickly, please contact the editor or see other details in the Note to Contributors.