Dragon 1/35 Pz.Kpfw I ausf B 'DAK version'
| KIT #: | 6207 |
| PRICE: | about $50.00 or so |
| DECALS: | Two options |
| REVIEWER: | Scott Lyle |
| NOTES: |
| HISTORY |
In February 1930 the German Army began laying out specifications for a basic, light, tracked fighting vehicle that could fulfill the roles of scouting, weapons carrying, light towing, and general “enemy molestation”. At that time Germany still had to comply with the Treaty of Versailles, thus developing the vehicle had to be done in secret. The project was deceptively named the “Kleintraktor”, or small agricultural tractor – apparently when the Germans announced they were building farm tractors with turrets and machine guns everyone just shrugged and figured farming in Germany was really tough. By June 1931 Krupp had built a wooden mockup of the vehicle’s chassis, superstructure, and turret. Development continued such that by the end of July 1932 a single chassis was ready for testing.
By the spring of 1934 the Ausf A
version was ready for production and the Wehrmacht soon placed an order for
1,000. Powered by a Krupp 59 hp four cylinder engine, the tank was equipped with
a short w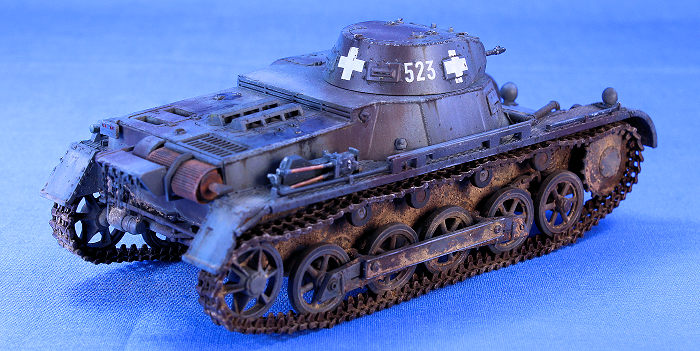 ave radio and a turret armed with two MG.14 machine guns. Testing
revealed that the tank was underpowered for cross country work, resulting in the
need for a larger engine. The Maybach NL 38 Tr six-cylinder engine was chosen,
but the larger size of the engine and transmission forced the vehicle to grow in
length, resulting in a fifth bogie wheel and the elevation of the idler wheel.
Plates were welded to the rear to make up housings that could mount the new
idler and the tank was given the Ausf. B. designation.
ave radio and a turret armed with two MG.14 machine guns. Testing
revealed that the tank was underpowered for cross country work, resulting in the
need for a larger engine. The Maybach NL 38 Tr six-cylinder engine was chosen,
but the larger size of the engine and transmission forced the vehicle to grow in
length, resulting in a fifth bogie wheel and the elevation of the idler wheel.
Plates were welded to the rear to make up housings that could mount the new
idler and the tank was given the Ausf. B. designation.
The Panzer I evolved into the Wehrmacht’s first mass-produced tank. It was first used in combat in the Spanish Civil War by the Nationalists where it was found to be poorly armored – it soon fell out of favor when captured Soviet T-26s became available. When World War II broke out however it and the Panzer II formed the backbone of German armored units and both tanks were heavily committed in the Polish and French campaigns. It was retired from front-line units soon after, but its chassis would soldier on in several other forms including a 4.7cm gun-armed tank destroyer, a self-propelled howitzer, flakpanzer anti-aircraft vehicles, and various supply and tank-driver training vehicles.
| THE KIT |
The Panzer I family was somewhat forgotten by the mainstream
manufacturers until Tristar brought out their Ausf. A series in the early 2000s.
I understand that Hobby Boss now owns those molds and the kits’ availability is
spotty, but never fear, Dragon is here, and they’re here in a big way. Virtually
every varia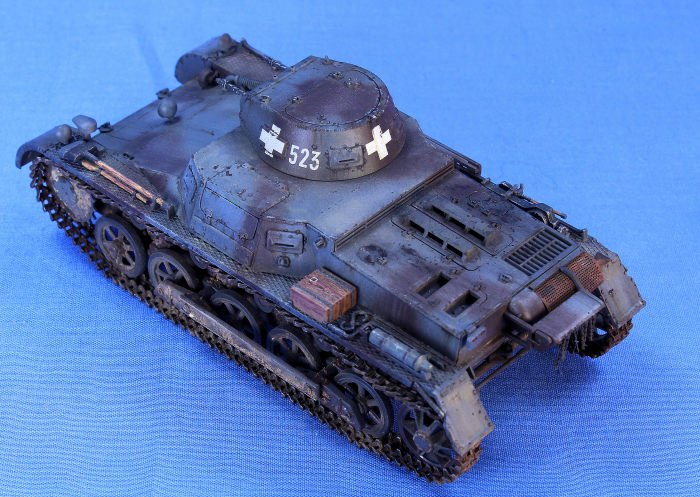 nt of the Panzer I including the tanks, command vehicles,
anti-aircraft vehicles, and self-propelled guns have been issued, some even with
full interiors.
nt of the Panzer I including the tanks, command vehicles,
anti-aircraft vehicles, and self-propelled guns have been issued, some even with
full interiors.
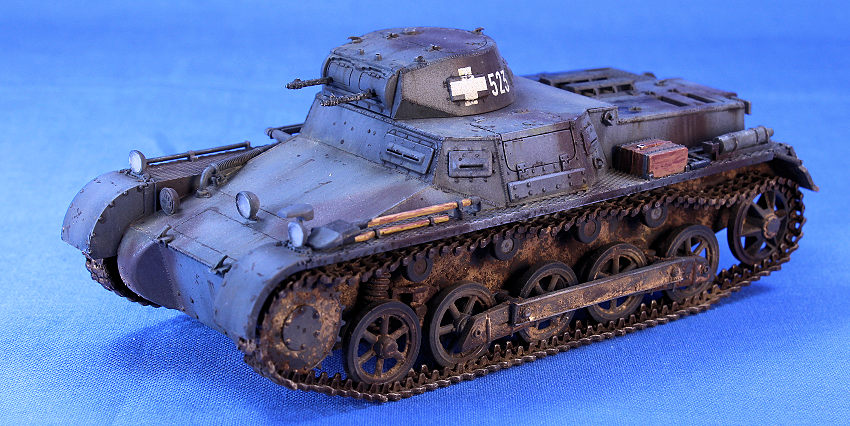
Wanting to build the Ausf. B version, I picked up this DAK version on ebay and it includes not only the parts for the tank but also the Dragon figure set “Deutsche Afrika Korps” (#6063) and a set of Jerry Cans, complete with the photo etch inserts. Along with the kit’s parts you get separate track links, a comprehensive clear plastic sprue featuring parts for the turret’s viewports, a photo etch fret containing engine screens and the muffler cover, and decals for two DAK tanks.
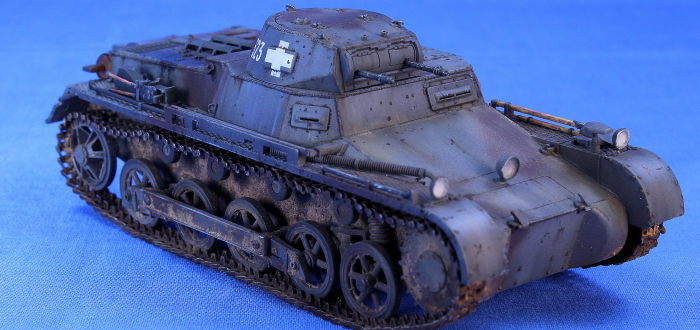
Online reviews point out the kit’s only real flaw is the rear idler wheels – in short they are completely wrong. In reality they consisted of two steel rims spaced apart from each other, but Dragon represents them as a having a solid rubber rim. That flaw aside, I decided to build the kit as a non-DAK tank that saw action in the Battle of Poland and dove in.
| CONSTRUCTION |
As usual with tanks, construction began with the suspension. You first assemble the road wheel carriages, which consist of two road wheels trapped between two leaf spring assemblies. You make two such assemblies per side, and I glued them, the drive sprockets, the wrongly shaped idler wheels, and the return rollers to the hull. Once that was dry I moved onto the upper hull.
The hull
superstructure features many small view ports and Dragon gives you the clear
parts to assemble said viewports open to show off the small glass windows and
their supporting brackets inside. I decided to close all of mine off, so all of
the in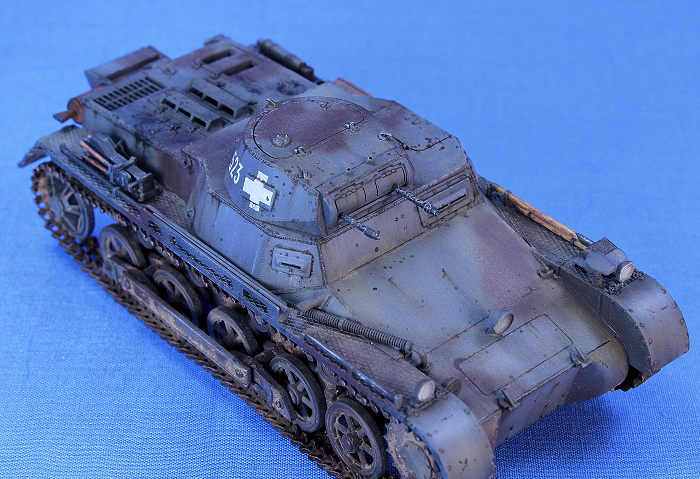 terior parts were left in the box. The superstructure plates have very
nice welds seams molded into them, and I needed just a tiny amount of filler in
a few spots to close up some gaps. The superstructure assembly then attached to
the lower hull perfectly.
terior parts were left in the box. The superstructure plates have very
nice welds seams molded into them, and I needed just a tiny amount of filler in
a few spots to close up some gaps. The superstructure assembly then attached to
the lower hull perfectly.
The nice thing about building a small tank is that it moves along fairly quickly. On the rear plate, you have to decide if you want to install the smoke candle rack to the back of the muffler. Doing a little research it appears that those racks were first installed in 1937 and most of the pictures of the Ausf. B versions I found revealed them to be present. I decided to add it but left off the tiny photo etch chains until the end of the build, knowing there’s no way they’d survive. Dragon gives you many options for what kind of tail light you want to add, so you’ll need to consult your references. Various engine ventilation parts attach to the hull next, followed by the usual tools mounted on the fenders. I added the fragile head lights and antenna, and then turned to the turret, which consisted of a single large hatch and a small gun mantlet assembly that holds the twin machine guns.
At this point everything was assembled except for the tracks. It was now time to start the painting process.
| COLORS & MARKINGS |
My first painting step was to prime everything with Tamiya’s Liquid Surface Primer. That was followed with some preshading using Tamiya XF-69 NATO Black, and then the panzer gray base coat was sprayed on using a mixture of a little bit of Tamiya XF-2 Flat White and Tamiya XF-69 NATO Black. The early war brown splotches were sprayed on using Tamiya XF-10 Flat Brown, and then the tools and muffler were picked out by hand. Decals were sourced from my spares box, and I sealed them with a coat of Vallejo Model Air Satin Varnish.
Since the tank
was supposed to be from the initial Polish Campaign, I wanted to keep the
weathering on the light side – no twisted metal or battle damage here. My first
step was to apply dabs of White, Raw Umber, and Raw Sienna oil paint onto all of
the surfaces and use White Spirit to blend the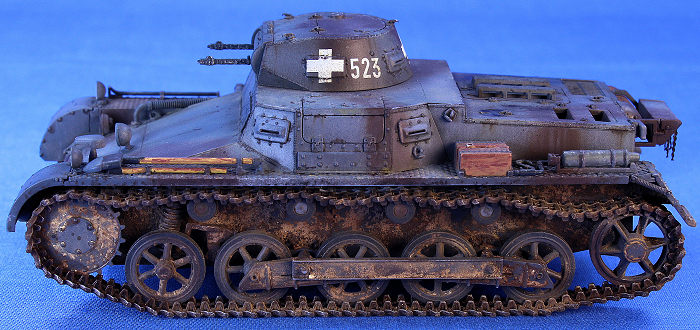 m in. I used a downward motion on
the angled and vertical surfaces to create a subtle streaking effect. This
effect was followed by pin washes of MIG Productions’ Brown Wash, and then some
paint chipping first using Testors Neutral Gray, followed by AK Interactive
Chipping Color to give the chips more depth. I was going for some restraint
here, again presuming that the tank was relatively “young”, or at least well
kept.
m in. I used a downward motion on
the angled and vertical surfaces to create a subtle streaking effect. This
effect was followed by pin washes of MIG Productions’ Brown Wash, and then some
paint chipping first using Testors Neutral Gray, followed by AK Interactive
Chipping Color to give the chips more depth. I was going for some restraint
here, again presuming that the tank was relatively “young”, or at least well
kept.
The next weathering step was to add some pigments. Turning the tank on its side, I laid some MIG Pigments’ Dark Mud and Europe Dirt on the hull around the suspension and under the fenders. I then applied MIG Pigments Pigment Fixer with an eye dropper to fix them in place and create a dirty hull effect.
Once the pigments were dry I used my oil paints to add a little more dirt and dust into the crevices of the hull. I also added some random “splattering” and stains by tapping a brush loaded with MIG Productions’ Brown Wash here and there over the tank. It was then time to move on to the tracks.
Individual
track links are on the menu with this one, so I began by gluing together two
long sets of links for the lower, flat runs the tank sits on. I then glued
together much smaller runs and formed them around the drive sprockets and idler
wheels, making sure not to glue them to the actual wheels so they could be
removed for painting. To paint what I had assembled thus far I coated them with
Vallejo’s Panzer Aces Track Primer, a nice gray-purple base shade. I then
slathered some AK Interactive Track Rust wash over that, and by slather I really
mean accidentally knock the Track Rust container over and watch it spill out all
over everything in front of me. Springing into action, I furiously used my brush
to mop the wash back into the jar, one paint brush-full at a time. Twenty
minutes later
 I had recovered at least an ounce of the stuff. The rest I sponged
up with paper towels and threw into the kitchen trash, which promptly stank up
the kitchen. So you know, good times.
I had recovered at least an ounce of the stuff. The rest I sponged
up with paper towels and threw into the kitchen trash, which promptly stank up
the kitchen. So you know, good times.
My experiment in “action painting” over, I glued the lower run of tracks in place and started on the upper run that spans between the sprockets and idlers. With liquid cement holding the links together I put the run in place and wedged balled-up pieces of tissue paper between the track and the fenders to create a healthy amount of sag. Once the upper run had set I had to paint it in place, which was a bit of a pain, but at least I didn’t dump anymore Track Rust on the model or myself. A dry-brushing of Testors Steel and some more pigments and the tracks were finished.
The final steps included attaching the clear lenses to the front headlights as well as the very fragile photo etch chains to the smoke candle rack in the rear. And with that it was done.
| CONCLUSIONS |
Assembling without a hitch and packing lots of goodies for the spares box, Dragon’s Panzer I Ausf. B is a fine kit. Possessing all of the traits we have come to expect from the company, you can buy this kit with confidence and start your own collection of early war farm tractors.
| REFERENCES |
- Osprey Publications, New Vanguard #26, “German Light Panzers 1932-42”
6 February 2017
Copyright Modeling Madness.com.
If you would like your product reviewed fairly and fairly quickly, please contact the editor or see other details in the Note to Contributors.