| KIT #: | 35233 |
| PRICE: | $44.00 SRP |
| DECALS: | Two options |
| REVIEWER: | Dan Lee |
| NOTES: |
| HISTORY |
The Wirbelwind Self Propelled AA Gun was based on the Panzer IV chassis. Developed by SS HauptSturmFuhrer Karl Wilhelm Krauss of the 12th SS HitlerJugend division, who was at one time was Hitler's valet/bodyguard before being dismissed in 1939 because Adolph found out Krauss was giving him Polish tap water and not German mineral water as he demanded.
 Early in the war, the
German military didn't bother much with SPAAGs because of the effectiveness of
the Luftwaffe, but Allied air power wore down the Luftwaffe and gave the
Wehrmacht and SS a harsh taste of being on the receiving end of airpower. They
soon realized that they needed mobile AA guns to deal with increasing Allied air
superiority. The Wirbelwind was designed in the spring of 1944 as Allied
Tactical airpower hit German formations really hard during the run up to the
D-Day invasion.
Early in the war, the
German military didn't bother much with SPAAGs because of the effectiveness of
the Luftwaffe, but Allied air power wore down the Luftwaffe and gave the
Wehrmacht and SS a harsh taste of being on the receiving end of airpower. They
soon realized that they needed mobile AA guns to deal with increasing Allied air
superiority. The Wirbelwind was designed in the spring of 1944 as Allied
Tactical airpower hit German formations really hard during the run up to the
D-Day invasion.
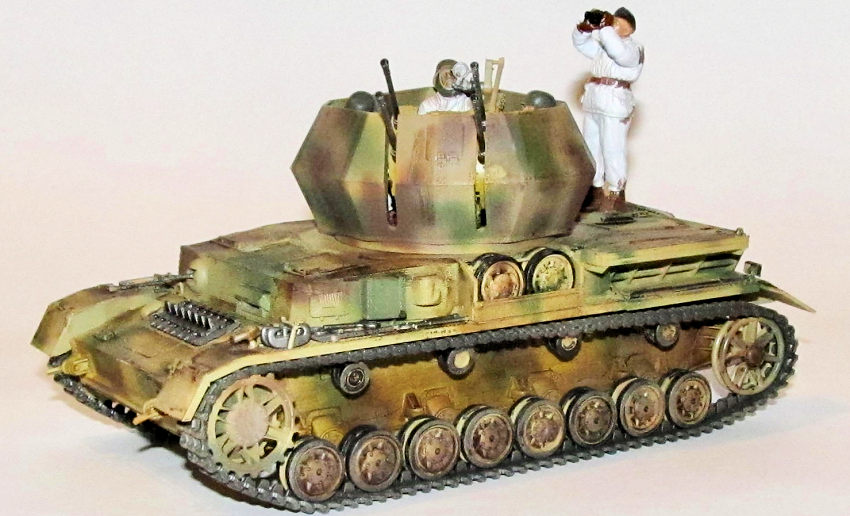
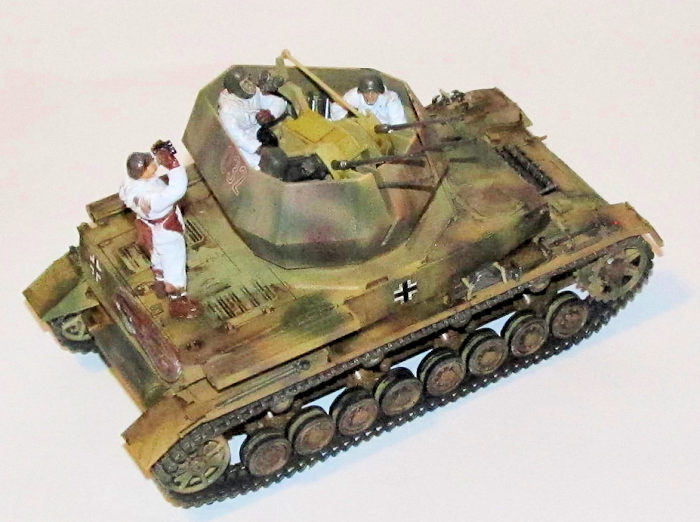
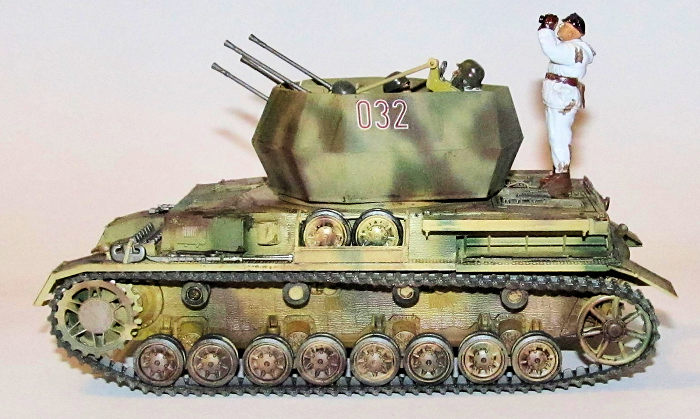
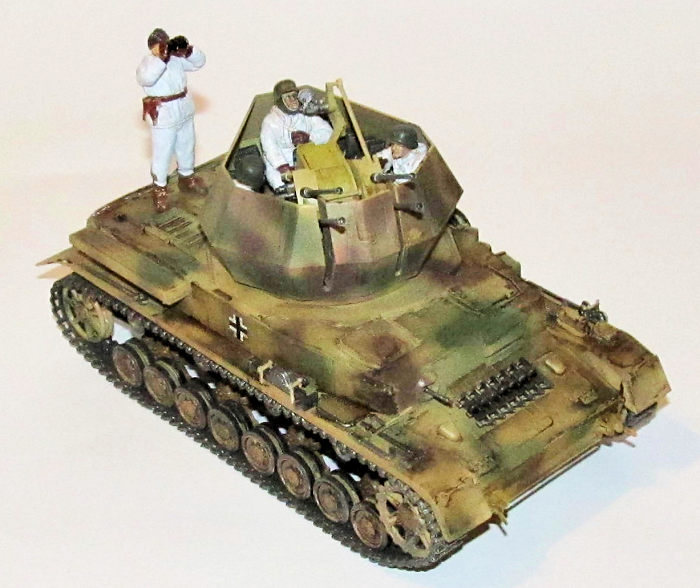
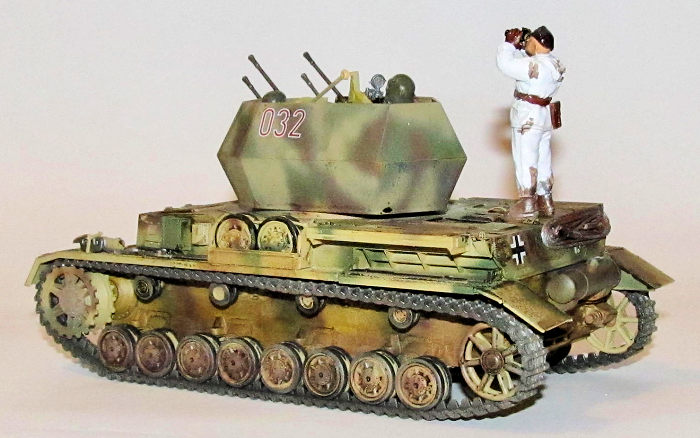
The Wirbelwind turret was based around a nine sided turret containing four 20mm rapid fire cannon and had a crew of five. Only 87 or 105 were made by the end of the war as no one is sure how many actually were built. It turned out that the Wirbelwind was better as a fire support vehicle than as a SPAAG due to the limited hitting power/range of the 20mm cannon against aircraft. Against infantry, buildings and soft skinned vehicles, the quad 20mm cannons was quite useful (see the climax of Saving Private Ryan for a cinematic approximation.) Another version (the Ostwind) was made based around the more deadly 37mm cannon.
| THE KIT |
The Wirblewind kit contains sprues common with their 1994 Panzer IV kit as they have the same chassis. The A, B C and D sprues contain all the parts common to both the Panzer IV and the Wirbelwind chassis. There will be quite a few extra parts as the A, B, C and D sprues contain parts for the various marks of Panzer IV that are not needed here.
 Sprues E, F and G contain
the parts for the turret, crew and 20mm guns. There are a number of common parts
for the Tamiya towed 20mm Flak gun so many parts are also unused. The gun
barrels and flash hiders are solid which means a lot of careful drilling or what
I did, purchase metal gun barrels to replace the plastic ones.
Sprues E, F and G contain
the parts for the turret, crew and 20mm guns. There are a number of common parts
for the Tamiya towed 20mm Flak gun so many parts are also unused. The gun
barrels and flash hiders are solid which means a lot of careful drilling or what
I did, purchase metal gun barrels to replace the plastic ones.
The orangey brown plastic is typical Tamiya with no sink holes and ejection pin markings in visible areas aside from mold markings. Meanwhile the tracks are rubber band tracks that can be glued together with Tamiya Glue.
Colors are based on Tamiya paint callouts which can be annoying at times if you don't have access to Tamiya colors, but they do list out the name of the colors for those who don't/won't use Tamiya paints. One thing that is lacking with this kit is any Zimmerit, the anti magnetic coating on late war German vehicles. At least Tamiya tells you the locations on the hull where the Zimmerit is to be added. To improve the extremely weak detail on the gun barrels and the lack of Zimmerit, I purchased a set of four brass 20mm cannon barrels from Aber and an Eduard PE set for Zimmerit.
| CONSTRUCTION |
I first started off by assembling and gluing together the Aber set of four 20mm brass cannon barrels with extremely detailed flash hiders. I used a thin smear of CA glue to assemble these and they went together without any issues. Next I cut off the plastic barrels off the cannon parts then I drilled out holes that were deep and wide enough to accept the Aber brass cannon barrels and secured them in place with a drop of CA glue.
The lower hull was next. I
first removed each patch of Eduard Zimmerit from the brass fret and used CA glue
to attach each patch on to the area of the lower hull it was supposed to go.
Afterwards, I glued on the suspension and other lower parts as per Tamiya's
instructions (Eduard designed holes in
 the patches to expose the plastic detail
or attachment points.) Next I cut off the front portion of the fenders on the
upper hull as per Eduard's instructions and replaced the parts with their PE
replacements. This was very easy to do. Next the various Zimmerit patches for
the upper hull were glued on. The plastic parts that would have been glued to
the Zimmerit surface were glued on using CA glue. One thing of note is there are
exposed gaps between the the upper hull and the treads which are noticeable. I
covered these gaps with cut strips of plasticard. I added many of the small
details minus the tools to the upper hull, but I did not glue the hull together. Next up the road wheels and
drive sprockets were sanded smooth to remove any mold markings and sprue nubs
then glued together. The Panzer IV has a lot of them so I found the task to be
tedious.
the patches to expose the plastic detail
or attachment points.) Next I cut off the front portion of the fenders on the
upper hull as per Eduard's instructions and replaced the parts with their PE
replacements. This was very easy to do. Next the various Zimmerit patches for
the upper hull were glued on. The plastic parts that would have been glued to
the Zimmerit surface were glued on using CA glue. One thing of note is there are
exposed gaps between the the upper hull and the treads which are noticeable. I
covered these gaps with cut strips of plasticard. I added many of the small
details minus the tools to the upper hull, but I did not glue the hull together. Next up the road wheels and
drive sprockets were sanded smooth to remove any mold markings and sprue nubs
then glued together. The Panzer IV has a lot of them so I found the task to be
tedious.
The gun assembly was glued together minus the guns and the turret hull. No issues here although some might feel that the detail could be improved using PE (such as the gun sight), but I didn't buy that set as the turret is quite cramped and most of the detail would either be hard to see or a pain in the butt to install. I added parts to the lower turret hull and portions of the gun shields, but left off the upper turret hull till final assembly. Lastly the four figures were glued together and then the seams were filled in using Vallejo plastic putty.
| COLORS & MARKINGS |
The various Wirbelwind hull parts and wheels were sprayed with an initial coat of Tamiya Panzer Yellow XF-60. Next I sprayed on XF-58 Olive Green and XF-64 Red Brown free hand. It isn't as sharp as using masks, but I can be lazy at times and would rather spend the time weathering the model than worry about masks. The interior of the turret was sprayed with XF-60, but then I post shaded it with an extra thinned coat of XF-59 Desert Yellow to make the shadows and corners stand out if you can see it in the cramped turret.
The guns were painted using Tamiya XF-56 Metallic Grey with a few drops of Tamiya X-10 Gunmetal. Same mix was applied to the gunsight. Meanwhile the tracks were sprayed with straight XF-56 then weathered with a mix of watercolor and Vallejo paints applied with various brushes I use specifically for weathering.
I chose the winter camo uniforms for the crew and sprayed flat white on the figures. The faces were brush painted with Tamiya Flesh, the helmets and caps brush painted with German Grey while the boots and gloves were painted burnt sienna.
 The gloss coat wasn't
sprayed on till the hull was assembled and the lower hull was weathered. Once
dry, the few decals were added and Solvaset was used to get them to settle over
the Zimmermit details. The excess decal solution was wiped away.
The gloss coat wasn't
sprayed on till the hull was assembled and the lower hull was weathered. Once
dry, the few decals were added and Solvaset was used to get them to settle over
the Zimmermit details. The excess decal solution was wiped away.
I weathered the lower hull first. I used Raw Umber water color for the lower hull. I gently removed the excess with damp Q-Tips. This was sealed after the gloss coat as mentioned above. The rubber portion of the road wheels were hand painted Tamiya XF-1 Flat Black then weathered using various shades of brown and watercolor. I then threw on a thinned brush coat of Vallejo Dark Earth to make the wheels look more muddied.
Afterwards, the upperworks had a generous amount of raw umber watercolor brushed on then when dry, wiped gently away with damp Q-tips. I then put watercolor dots of blue, green and white all over the topside areas then gently wiped them downwards with a damp wide brush for an okay approximation of the dot filter effect.
The figures were muddied up with a wet and dry brushing of Vallejo Dark Earth and then when dry, pin washes of Tamiya Brown Enamel wash to make the detail pop out. When finally assembled, the model was sealed up with two coats of Tamiya Clear Flat.
| CONSTRUCTION CONTINUES |
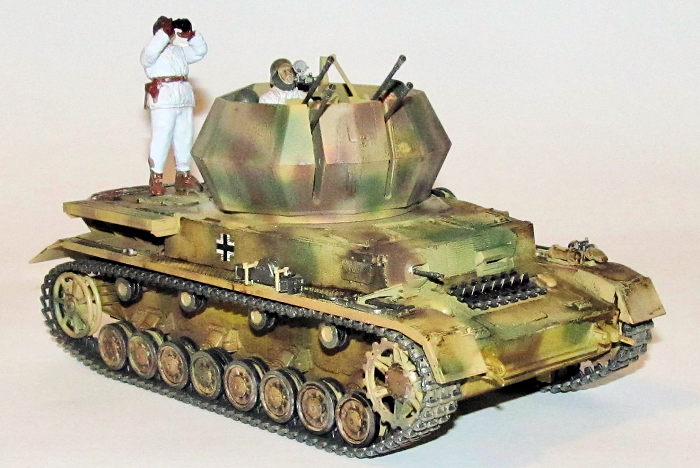 First off the three gunner
and loader figures were glued in place before the turret halves were glued
together. Next I glued the weathered
tracks onto the wheels with Tamiya Extra thin glue. As an aside: I don't mind
Tamiya's tracks because at least they stick together with their glue without too
many issues. I know that armor purists poo poo these tracks and I get it, but
when I build armor it is usually a relaxing build so I am not going to cry too
much about accuracy or deal with click link tracks. Once the tracks were dry, I
glued the top and bottom hull together.
First off the three gunner
and loader figures were glued in place before the turret halves were glued
together. Next I glued the weathered
tracks onto the wheels with Tamiya Extra thin glue. As an aside: I don't mind
Tamiya's tracks because at least they stick together with their glue without too
many issues. I know that armor purists poo poo these tracks and I get it, but
when I build armor it is usually a relaxing build so I am not going to cry too
much about accuracy or deal with click link tracks. Once the tracks were dry, I
glued the top and bottom hull together.
The various tools and other tiny details are added to the hull. Lastly, I glued the observer on the back of the Wirbelwind to complete the model.
| CONCLUSIONS |
I must say that I liked the ease of build and I like esoteric armor so win win for me. The Tamiya Wirbelwind SPAAG was a fairly straight forward easy build plus the aftermarket gun barrels and Zimmermit armor gave the model more depth/detail without adding too much complexity. Adding the figures made up for the lack of certain details in the turret and it makes it feel more used.
I highly recommend this kit if you want an easy armor build or change of pace from other subjects.
Dan Lee
December 2017
Copyright ModelingMadness.com
If you would like your product reviewed fairly and fairly quickly, please contact the editor or see other details in the Note to Contributors.
Back to the Main Page Back to the Review Index Page Back to the Previews Index Page