Hobby Boss 1/35th Sd.Kfz.223 Leichter Panzerspähwagen Funk
| KIT #: | 82433 |
| PRICE: | $49.00 MSRP |
| DECALS: | For as many WW2 German vehicles as you can imagine. |
| REVIEWER: | Greg Ewald |
| NOTES: | Fairly complicated, not for the beginner. You almost think you could turn the ignition and drive it around. |
| HISTORY |
One thing the Germans like to do is build a lot of various types of
different vehicles that really aren’t any better than the next.
Adapting the “venerable” 222 armored car for radio duty was a fill in
until someone came up with the much better idea to use the halftrack 250.
The large rail antennae kind of gave it away to spotters, and a
dismountable series of straight rods were later installed. I am sure this
bummed out the fellows in the Afrika Korps, as they often mounted
netting/sunshades on the railing.
The cross country performance of the 222 was less than stellar, and having a radio car in the city doesn’t really make a whole lot of sense. You would be blocked in by buildings, able to see very little, and unable to cross any rough terrain at all in a very, very lightly armored truck.
 (Allow
me to hijack Greg's background info for a paragraph or two. What many may
not realize is that most of the radios in use during this time period
operated at much lower frequencies than we use today. LF and HF were the
main frequency ranges used at the time (hence the rather large antennas) and
these are not bothered by problems with line of sight as is the case with
higher VHF frequencies and all UHF radios that came into use later in the
war.
(Allow
me to hijack Greg's background info for a paragraph or two. What many may
not realize is that most of the radios in use during this time period
operated at much lower frequencies than we use today. LF and HF were the
main frequency ranges used at the time (hence the rather large antennas) and
these are not bothered by problems with line of sight as is the case with
higher VHF frequencies and all UHF radios that came into use later in the
war.
These 1939/40 radios were used in both voice and CW (continuous wave as in Morse code key) modes with CW having a range of about 40Km and voice about 10Km when using the main radio of the day, the FuG 10. radio cars also carried the FuG Spr Ger a radio that had a voice radius of about 1 Km. This radio was carried by almost all tanks and was the main vehicle to vehicle radio. These radio cars were not in the forefront of the advance for the most part. The unit commanders often rode in these so they could stay in touch with their units. It was not anticipated that they would be involved in combat and compared to even cars of the day, they were plenty fast enough to get out of harms way. And now, back to your regularly scheduled review. Ed)
Enemy snipers must have loved this new piece of…junk in ‘39.
At least it had angled armor, so maybe some of the stuff bounced off.
It also came with state of the art screens to keep out those pesky grenades.
I am sure that having a solid turret would have used too much metal,
and the added air noise would make more sense in a radio car. Right?
Armed with a 7.92 machine gun and a lot of determination, the 223’s
soldiered on in North Africa in the heat, and the frozen tundra of the
Eastern theatre. With a top speed of just 50 miles per hour (and that would
be really pushing it, maybe going downhill on skis) this thing was a sitting
duck. Cross country was even worse, can you imagine being in this tin can
bouncing over rough ground under enemy fire at the blistering speed of a
mere 25 mph ? The eight cylinder engine was just not powerful enough to move
this thing, especially when loaded up. By the bye, those are top speeds.
Going in a straight line. With no obstacles. In wartime, it would have been
a nightmare.
I can’t imagine trying to use the 223 as any sort of command car. Why would you put your radio operators in such a deathtrap? Guess yet another reason why the Nazis lost the war.
| THE KIT |
Scott did a nice preview of the kit, far be it for me to try to do better. Here is the link.
On a side note, be ready to handle a lot of small fiddly bits, for such a
small model ( 5 “ long) this
thing has a million pieces. O.K. I am exaggerating. But just a bit. The
entire interior is complex and complete, and you can’t see most of it when
you are done…but hey, YOU will know it’s there !
The PE is flawless, and in a nice way, they packaged it with a slightly sticky surface tape, so you can keep the carpet monster at bay. A very nice touch. It also does not need to be annealed at all, and folds easily.
| CONSTRUCTION |
 As
Scott noted, the moldings are just about perfect. Nary a sinkhole on the
horizon ! You start off with building the frame of the car, and this will
take some patience. The
location marks are dubious, and it is easy enough to get the parts in the
wrong place, which will come back to haunt you later. It is quite intricate,
and if you have the space to make a small jig, I would recommend it.
The gear housings fit in nicely, and require little filler. I still
don’t understand why the whole frame wasn’t just a one piece molding.
As
Scott noted, the moldings are just about perfect. Nary a sinkhole on the
horizon ! You start off with building the frame of the car, and this will
take some patience. The
location marks are dubious, and it is easy enough to get the parts in the
wrong place, which will come back to haunt you later. It is quite intricate,
and if you have the space to make a small jig, I would recommend it.
The gear housings fit in nicely, and require little filler. I still
don’t understand why the whole frame wasn’t just a one piece molding.
I was surprised, at first, at how simplistic the engine is. No worries, you
will never see it once the model is together. Be aware that the directions
use the same ¾ perspective of the model assembly, but switch from front to
back often, this can be confusing.
It took me a while to understand how the springs were mounted to the
axles, but then, I am a blonde.
The tires are remarkable, which is nice, because the wheels and mounts are
not. The joining of the wheels to the axles is an exercise in patience and
C/A glue, as the attachment points are incredibly weak.
The Hull: Oh boy ! Now that you
have gotten the rail car of the thing built, you get to start on the
interior. This model was designed for JMN’s at conventions, as they have
every single bell and whistle that goes into the hull. The only way you will
ever see the nicely molded gas/clutch pedals is with one of those
super-duper sneakerscopes the judges use at a competition. Make sure you put
in the side supports (C60) prior to installing anything else, then start
gluing in all of the doo-dads. Of course, it goes without saying that you
will want to paint as you go.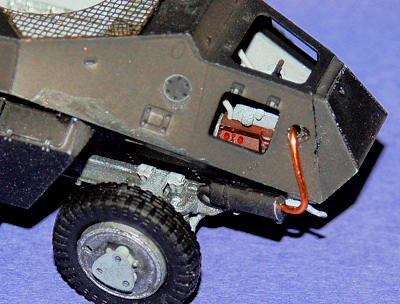
If you thought the seat was hard to put together, and it was, just wait
until you get to the upper hull and its windshields.
The dashboard is simplistic, which
actually makes sense, as it is invisible to the eye once the two halves of
the hull are attached.
Attaching the upper hull and the lower hull made me nervous, and I was
pleasantly surprised by the near perfect mating of the two !
It took just a little bit of sanding and a smidge of filler to have
the seat well together. Then, I ran into a PE nightmare.
If you don’t have a photo etch bender, you are going to want to use
some stretched sprue or styrene rod for the little rails that go about the
hull. I finally folded (sorry for the pun) and purchased a bender after
getting frustrated trying to manipulate these tiny bits of metal into shape.
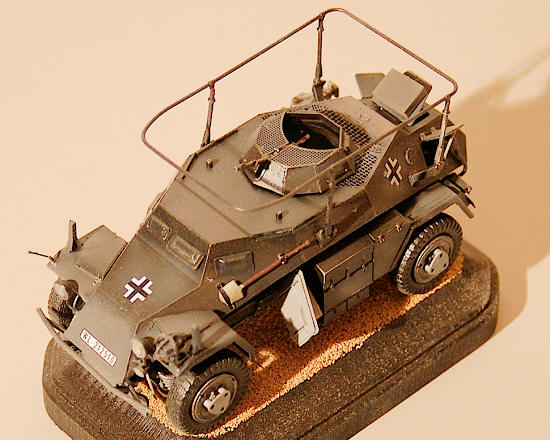
Once the mufflers are on, you need to attach the exhaust pipes from
the engine to them…mine did not fit at all, and I made copies that did with
copper wire.
The Turret: Sitting in this
after eating rations must have been a hell of
a treat for all of the three man crew. Bouncy bouncy !
I hope the LT. didn’t eat beans. The seat and the machine gun mount
seem flimsy, but go together well. You will definitely need C/A glue for
this one, and probably accelerant, unless you have the patience of Job. I
don’t.
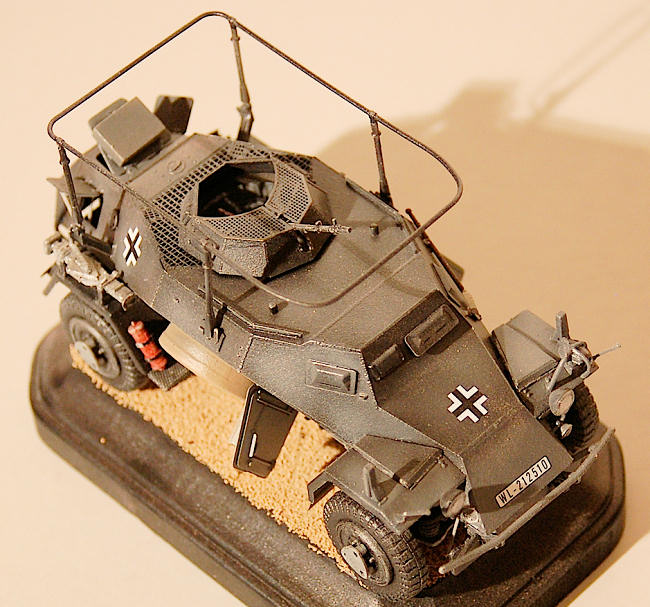
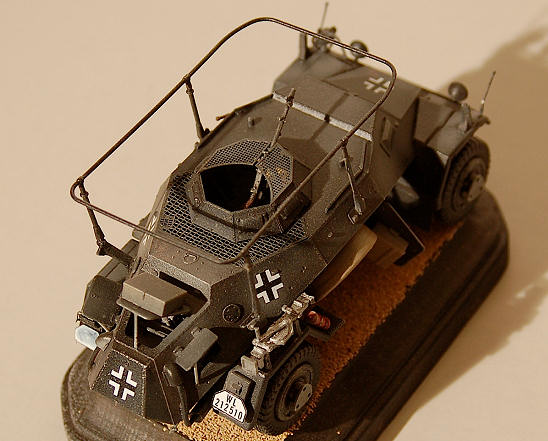
Wait to put on the railing mounts until the very end, as the location points are hard to, hard to…well, locate. The PE screens go on without a hitch, and cover up all of that detail you just spent fifteen hours on. Smile ! Now that you have all of the fiddly bits on the outside, get ready for:
| COLORS & MARKINGS |
 As
with most AFV’s, you have to paint as you go…in this sense, this is an easy
one. Most of the armored cars were factory grey on the outside, and an off
white inside. The desert versions were painted the typical sand, but
camouflage seems to have been rarely used. Reading a book on German armored
vehicles, I was happy to see that the Germans regularly used captured enemy
stockpiles of paint on their vehicles once on the front lines, so any of you
who moan about the colour of a tank or whatnot can go jump in a lake.
As
with most AFV’s, you have to paint as you go…in this sense, this is an easy
one. Most of the armored cars were factory grey on the outside, and an off
white inside. The desert versions were painted the typical sand, but
camouflage seems to have been rarely used. Reading a book on German armored
vehicles, I was happy to see that the Germans regularly used captured enemy
stockpiles of paint on their vehicles once on the front lines, so any of you
who moan about the colour of a tank or whatnot can go jump in a lake.
I started by painting everything primer black whilst still on the sprue. The
interior of the hull halves were sprayed with a light gray, even though the
instructions call out for white, as I didn’t want mine to be a show car just
off the rack. I did not use any of the interior decals, as no one would ever
see them in a million years.
After the whole project was assembled, sans clear parts and the spare tyre,
I airbrushed a medium grey over the panels, then a lighter grey to accent. I
only did a little bit of weathering with pastels, as I like the menacing way
the dark grey looked overall.
I painted the spare tyre covering with a leather sort of colour, and
installed the clear headlights. I did get mine wrongly oriented, check on
the left right, up down molding. I installed them side to side, and the
grooves should be up and down. Ah well, such is life.
| CONCLUSIONS |
Not a kit for the beginner, this is a fabulous representation of a mediocre
vehicle that served in every theatre of the war.
With patience and a lot of deep breaths, you can really build a show
stopper with this model from Hobby Boss. It
blows the Tamiya kit out of the water. Or mud, I suppose.
| REFERENCES |
 http://www.warwheels.net/sdkfz223fuINDEX.html
November 2010
Thanks to Squadron Products via Modeling Madness for the review kit.
If you would like your product reviewed fairly and quickly, please contact me or see other details in the Note to Contributors.