Tasca PzKpfw II ausf F "Luchs"
| KIT #: | 35-001 |
| PRICE: | £33.95 |
| DECALS: | Four options |
| REVIEWER: | Steve Budd |
| NOTES: |
| HISTORY |
The Luchs (Lynx) evolved from the Panzer II development lineage, after Experimental Design number VK1303 was commissioned in 1939 and grew out of the German Army’s need for a nimble reconnaissance tank with a slick turn of speed to make up for its lightly armoured construction.
Weighing in at some thirteen tons,
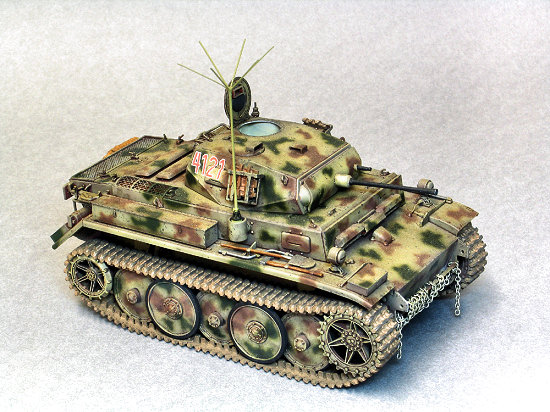
the little Luchs resembles a tiny Tiger with its interleaved road wheels (the
only series two panzer to feature this) and housed a four man crew (commander,
driver, gunner and radio operator). The main armament was a turret mounted 20mm
KwK L/55 (the ‘L/55’ denoting the barrel’s length being equal to 55 times the
calibre) automatic cannon with some 330 rounds available, backed by an MG34 in a
coaxial fitting with 2,250 rounds of 7.92mm ammo for close defence. Turret
 traverse was by hand wheel,
rather than electric driven (presumably as a weight saver) and there must have
been some very focussed and frantic use of the same while in combat.
traverse was by hand wheel,
rather than electric driven (presumably as a weight saver) and there must have
been some very focussed and frantic use of the same while in combat.
With both the driver’s feet hard down on the accelerator the Luchs could whistle up to 60km/h through its six speed transmission (plus a reverse) and range, at a more economical cruise, along roads some 290km before spluttering to a halt; reducing to around 175km on the rough.
Initial production was set at around 800 units but was reduced to only 104 (some sources claim 133). Although Henschel produced a small number most were built by MAN – who dealt with the chassis, while Daimler-Benz supplied the superstructure and turret assemblies.
Armoured recon units in both the Wehrmacht and Waffen-SS made use of the Luchs and reports list the 116th Panzer Division on the Western Front and the 3rd, 4th and 6th Panzer Divisions on the Eastern Front. The 3rd SS Panzer Division “Totenkopf” and 5th Panzer Division “Wiking” also took delivery of vehicles that were operated in Russia – these being fitted with heavier frontal armour.
Today it seems only two examples of the Luchs survive – one at Bovington Tank Museum in England, the other at Saumur in France.
| THE KIT |
Although the serial number on the box gives this away as Tasca’s first kit the company previously existed under the Bego label and released a very nice Kubelwagon in 35th scale that was later boxed by Hasegawa and Dragon.
Take a careful tour around the
sprues of this kit and you’ll be amazed by the razor sharp detail. Look again
and you'll notice thin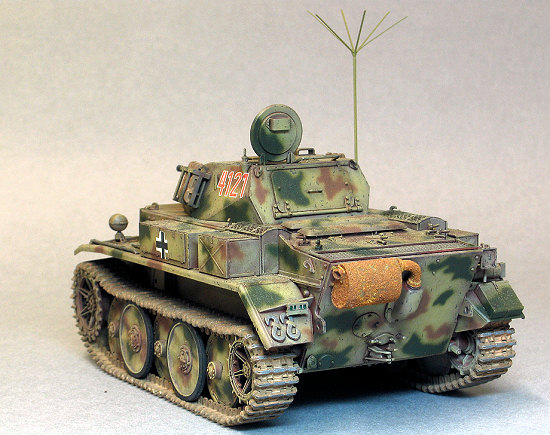 gs the
second time around that you missed first time out – the perfectly moulded wing
nut on the aerial mount is a great example. This little Luchs must have made the
directors at Tamiya and Dragon take in some sharp intakes of breath when it
first appeared. No Tamiya unboxed sponsons here. No Dragon fit issues either.
The price may say ‘ouch’ but this is pure plastic pleasure in a box.
gs the
second time around that you missed first time out – the perfectly moulded wing
nut on the aerial mount is a great example. This little Luchs must have made the
directors at Tamiya and Dragon take in some sharp intakes of breath when it
first appeared. No Tamiya unboxed sponsons here. No Dragon fit issues either.
The price may say ‘ouch’ but this is pure plastic pleasure in a box.
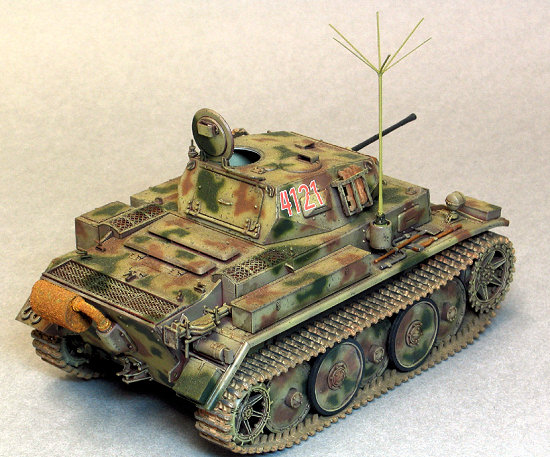
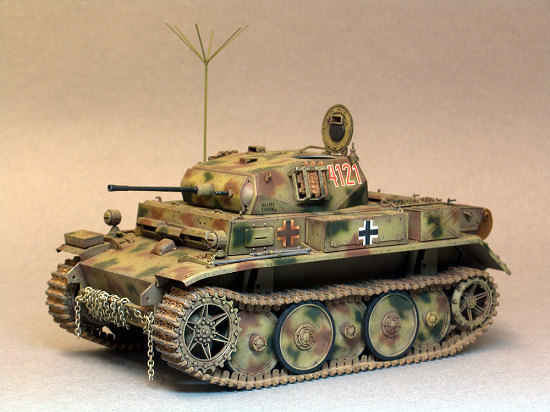
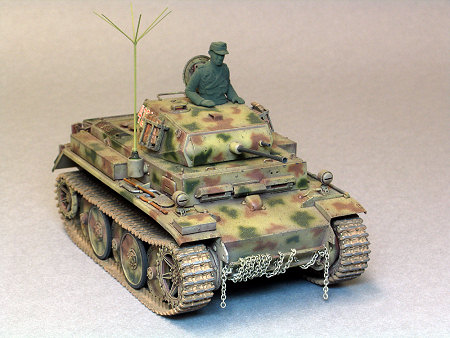
The love poured into this model by Tasca’s design crew is reflected in the real (and operating!) torsion bar suspension. Not content with even this level of realism the kit has adjustable rear idler wheels for correct track tension – just like the real thing. A figure (as I’m some way through a Normandy ambush diorama he’s just in primer at this stage but I’ve included a shot of him to give an indication of quality), top class decals and a small brass fret with engine screens and sundry other parts, including an etched ‘crows foot’ for the top of the 2 metre tall, long range, send and receive aerial, proper to a recon tank, round out the presentation. Those lovely people at Tasca couldn’t do enough to ease the modeller’s path and include a pair of injection moulded conical formers for the ‘crows foot’ giving a simple (and perfect) result every time.
The 20mm cannon and co-axial MG34 both have their barrels moulded with hollow ends, the lifting lugs are separate (and have a tiny hole moulded into them – amazing!), as are the Bosch headlight mounts. All of which gives a level of fidelity that exceeded that of other manufacturers at the point of original release..
| CONSTRUCTION |
Kicks off with the lower hull – as predictable as beginning with the cockpit in a hairy plane. With 19 parts nailed together the foundation of your little panzer is off and running. Be as careful with alignment as you can here as it affects the relationship with the upper hull later – I must have been slightly lax as the final fit of the upper to lower hull, where it passes over the drive sprocket housings, was a little gappy. This disappeared to nearly nothing with a bit of light adjustment filing. I applied Tenax 7R to the inside of the join (hull front and sides) back to where the hull top starts to run horizontally. This was left to dry for half an hour while other sub-assemblies were nailed together (storage boxes and so on). Once the front section had set up I applied appropriate pressure on the remaining 60% of upper hull to be joined and glued from the inside as far back as I was able.
The basic turret unit is best
assembled by gluing one turret side to the base (take your pick). Before this
sets up (I used Micro-Weld, a gentler, slow acting solvent) add the turret rear
armour to accurately set the angles of these three pieces. The other turret side
follows and then the roof. All of these can be glued from the inside for
neatness. Whether you paint the interior is dependent on your choice of
commander’s hatch open or closed. If it’s the former you can assemble the whole
turret minus the black leather pad on the rear access door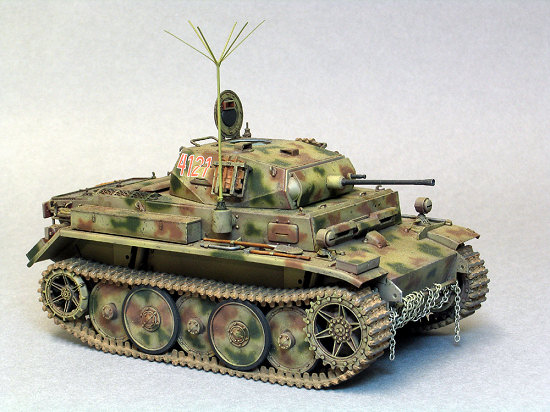 and spray the interior cream through the turret ring and commander’s hatch. The
pad can be painted and installed last. Being a klutz I installed the pad in the
assembled turret, before painting and left myself an ‘interesting’ little
masking job.
and spray the interior cream through the turret ring and commander’s hatch. The
pad can be painted and installed last. Being a klutz I installed the pad in the
assembled turret, before painting and left myself an ‘interesting’ little
masking job.
The tracks are the ‘rubber band’ type – very good detail nonetheless and fine from the box but….I had a set of metal Fruilmodellismo replacements to try out. These are the newer style Fruil tracks – each link is joined by an individual track pin sourced from a coil of wire included with the set. I made up 90 links each side and used the adjustable rear idler feature on the kit to later achieve the right level of sag. These tracks really are absolutely beautiful - but pricey. Having said that, nothing sags better than a set of articulating metal tracks and the weight certainly helps to anchor the little Panzer.
The Fruil tracks come with their own white metal drive sprockets, as the injection ones in the kit won’t fit. Unsurprisingly, the locating pins moulded on the lower hull final drive housings are too narrow for the holes in the metal sprockets. Not a major problem. My sprockets had pieces of plastic tube super glued into them to ‘sleeve down’ the hole. This reduced the mounting holes a little too far, so a drill bit was used to open them out to the correct diameter. The benefit of all this is that the sprockets can be cemented to the hull using conventional plastic solvent. Before things can move to this happy state of affairs though there's one final task to sort out. A brief test fit revealed that the Fruil sprockets sat noticeably outboard of the road wheels. Left untreated the tracks wouldn’t line up. Bringing them all into line required some machining of the inner sprocket mounting faces (i.e. the bit that butts up against the final drive housing) until all was hunky-dory. The metal was ground out using a motor tool and cylindrical cutter mounted in a drill stand.
The two brass engine screens supplied by Tasca are handed so make sure you keep tabs on this. Mine were given the appropriate curve by pressing them over a suitable diameter of brass tube (Tasca provide a mini illustration of the curve necessary in the instructions). You need to apply solid, even pressure over the whole part simultaneously in order to get a smooth result. My easy solution is to use a common rectangular rubber pencil eraser for the job. The size of the etched bit dictates whether you use the end or the side of the eraser. Either way, the rubber grips the part and then the former and makes a slip very unlikely. Just press down firmly and the rubber curves around the former taking the part with it. With the right curvature set in you’ll need to alter the angle of the screen’s mounting frame. I resorted to my Hold ‘n Fold which makes this very easy. This device is a very worthwhile ‘must have’ and does exactly what it says on the tin.
 It’s
a little perplexing that Tasca supply screens for the two side engine vents but
not the big one at the back. Time for a little low level scratch building then.
A piece of Eduard generic rhomboid mesh was cut to size, together with four
lengths of plastic strip for the frame. Some light touches of thin super glue
fixed it in short order.
It’s
a little perplexing that Tasca supply screens for the two side engine vents but
not the big one at the back. Time for a little low level scratch building then.
A piece of Eduard generic rhomboid mesh was cut to size, together with four
lengths of plastic strip for the frame. Some light touches of thin super glue
fixed it in short order.
Last up is the need for a couple of short, pre-shaped sections of fuse wire for the connections between the Bosch headlamps and the conical ‘roses’ on the hull. Again Tasca show consideration for the modeller, including two views of the headlight, with cable added in both plan and elevation views in Section 10 of the instructions. Lovely stuff. I drilled receiving holes in the light’s base and ‘rose’ to make the bonds positive.
I can’t recall anything else that warrants special mention here; it’s all pretty straightforward stuff (even if it’s your first armour model) and as such, means the fun factor remains intact throughout.
The road wheels attach via Polycaps and while I generally don’t favour this system (which in other kits has left part movement a little too sloppy for my OCD to deal with) the Tasca caps are so snug in their receivers they locate perfectly and all main wheels can be happily added before main painting. Their freedom to rotate eases spraying later on, as you only need to hose what you can see, then turn them to reveal bare plastic until sorted. The other bonus of rotating wheels of course is track attachment after assembly and painting, so it’s win, win all the way.
I fitted all the wheels, drive sprockets, tools, spare track rack and links at the front of the hull, stowage boxes, wing nuts and levers until it was complete, bar the tracks and exhaust collector box.
| COLORS & MARKINGS |
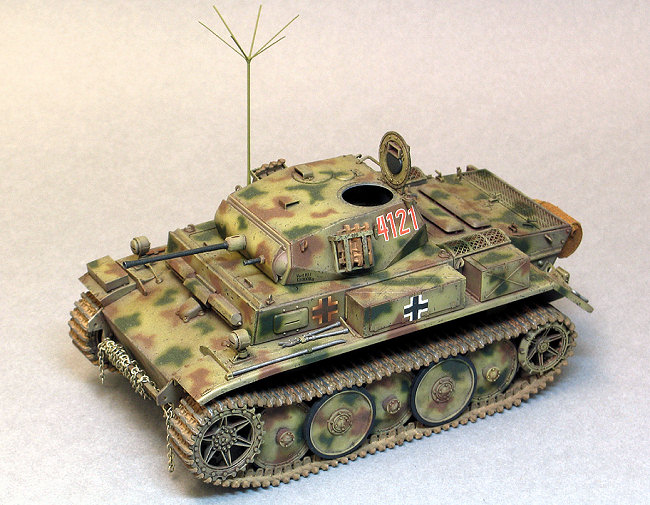
No shocks to your socks here – It’s all dark yellow bases with differing over-sprays of green and red-brown. All pretty normal fare for a tank based in Northern Europe during 1944.
I chose ‘4121’ for no better reason than I thought the camo scheme was a goody. First up was to spray the whole thing with Tamiya Red Brown. This imitates the primer used on the full size machine and is a suitable tone if, like me, you’re looking to pre-shade. Tamiya Dark Yellow was misted on leaving shadows along edges, in recesses etc. The turret was sprayed separately to the hull by the way.
 The
patches of brown and green camo are Tamiya Dark Green and Red Brown
respectively. The real paint was mixed from drums of paste concentrate and
dilution in the field would range from a relatively little to loads, with most
possibilities in between. The net result was shades of colour that were pale on
some vehicles, through dark on others (green could vary from a light pea green
to black green for instance). The pay off for modellers is a very generous
freedom of choice – pick any reasonable green or brown that’ll give you the
final result you’re aiming at and you can’t really go wrong.
The
patches of brown and green camo are Tamiya Dark Green and Red Brown
respectively. The real paint was mixed from drums of paste concentrate and
dilution in the field would range from a relatively little to loads, with most
possibilities in between. The net result was shades of colour that were pale on
some vehicles, through dark on others (green could vary from a light pea green
to black green for instance). The pay off for modellers is a very generous
freedom of choice – pick any reasonable green or brown that’ll give you the
final result you’re aiming at and you can’t really go wrong.
I remember my reaction, on reading that classic AFV modeller phrase for the first time: “I assembled the whole kit, tools, tracks and all before painting”. Eek! As a mainly aircraft modeller used to pre-painting I baulked at the prospect of trying to paint tools and other mini items in situ, especially as the main camo would, by then, be on and ripe for the capture of any errant brush slips. The reality was quite different however and I quickly realised that the tools (already primed with camo) took detail paint with ease. The metal bits are Xtracolour Gunmetal which was thoroughly stirred and gently thinned with white spirit to a consistency that would flow along edges (like the moulded clasps) but not run like water under the parts in little pools. It helped to first dip the bristles of the brush in white spirit and ‘wick’ the liquid away (mostly) by touching it to absorbent kitchen paper before taking up paint. I cleaned the brush of paint after every second or third application; this kept the whole plot running smoothly. The wooden tool handles were finished with Burnt Sienna artist’s oil paint mixed 50:50 with Liquin (Japan Dryer in the USA I understand). The Liquin transforms the paint from a thick paste to a clingy cream that can be applied in surprisingly small quantities as a colour glaze. This translucent quality makes use of the camo shades already applied and gives some variation in tonal appearance. Even better, it shortens the drying time from the usual weeks to a couple of days. Groovy!
Those lovely Fruil tracks were
sprayed off the tank using Tamiya Flat Earth and immediately covered with
Xtracolour matt varnish. The normal practice is to leave the application of top
coats like varnish until after the base has dried (a day or so). However, I read
that dissimilar paints (e.g. acrylic and enamel) can be sprayed over each other
without delay as their differing chemical construction allows them to dry
‘through’ each other. I’ve been doing this for ages now with no ill effects, as
was the case here. The following day ground pastel chalks were larruped (English
for: ‘applied enthusiastically) on with an old brush. More matt varnish was
misted on to seal the chalk. This ‘kills’ the effect by some 60-80% so I
re-applied the chalk / varnish combo until I was as happy as the happiest man in
Happy Land.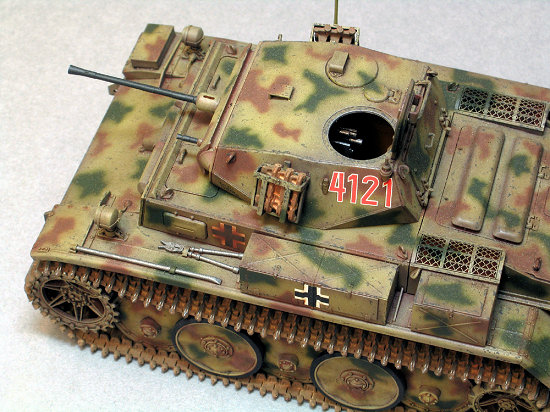
This was my first soirée into the realm of paint chipping on armour – so de rigour these days. Humbrol Matt White was wheeled out and darkened with straight black until it looked dark enough. I rapidly discovered (by less trial and way more error) that a very light touch with a fine brush carrying a little paint was the right way to go.
I agonised over painting the rubber tyres on the road wheels. These are not moulded separately and I wanted to avoid a less than even result. The solution was cribbed from an article by the very talented Steve Palffy who recommended thinning black paint down to a point where it will flow (like a dense wash) around the raised rims of the wheels. Again, it needed a light hand but worked as predicted – thanks Steve (your place in Plastic Heaven is now secure but not to be taken up for many, many longs years yet).
The exhaust collector box was sprayed Humbrol Matt Black and later hand painted with an acrylic paint containing metal filings (from a purpose made rusting set). Once dry the antiquing solution was run over it, promptly inducing real rust that grows, develops and ages until sealed with any matt varnish, giving a variety of finishes.
Decals are limited to the turret numbers, a couple of data stencils and three national insignia, one of which needs an overspray (when dry of course…) of Red Brown to match photos of the real vehicle. These were faultless over the usual gloss coat and sank into the detail with a few baths of Micro Sol. Matting down left not a trace of silvering. The instructions list my chosen vehicle as part of 1 Kp. Pz.Afkl.Abt.9 in Normandy, 1944.
Last to come under the brush were the 20mm cannon and MG34. Humbrol Matt Black was wheeled out and when dry over coated with Xtracolour Satin Varnish for a ‘gunmetal’ sheen. The extreme ends of the barrels were tickled with a very light, subtle dry brush with Xtracolour Oily Steel. Solidly in the home straight, the tracks were fitted, the exhaust box and the aerial (intended to depict a new replacement fitting on my grimy, war weary Luchs), before declaring victory and the end of modelling hostilities.
| CONCLUSIONS |
 It costs
more than a current Dragon Tiger 1 and is significantly smaller…but…it is such a
profoundly class act and so thoughtfully produced that for this plastic addict,
it was too much to resist. I loved it so much I snapped up Tasca’s later release
35006, 4th Panzer Division version to feed my hunger for this
delightful kit a little longer.
It costs
more than a current Dragon Tiger 1 and is significantly smaller…but…it is such a
profoundly class act and so thoughtfully produced that for this plastic addict,
it was too much to resist. I loved it so much I snapped up Tasca’s later release
35006, 4th Panzer Division version to feed my hunger for this
delightful kit a little longer.
So now you know what to do – first thing tomorrow, ring in sick, flick on the answering machine, grab a fistful of beer vouchers and go hot foot to your nearest stockist for the cure to terminal AMS – even if you don’t ‘do’ armour models.
| REFERENCES |
Bits and pieces here and there on the web.
September 2007
If you would like your product reviewed fairly and fairly quickly, please contact the editor or see other details in the Note to Contributors.