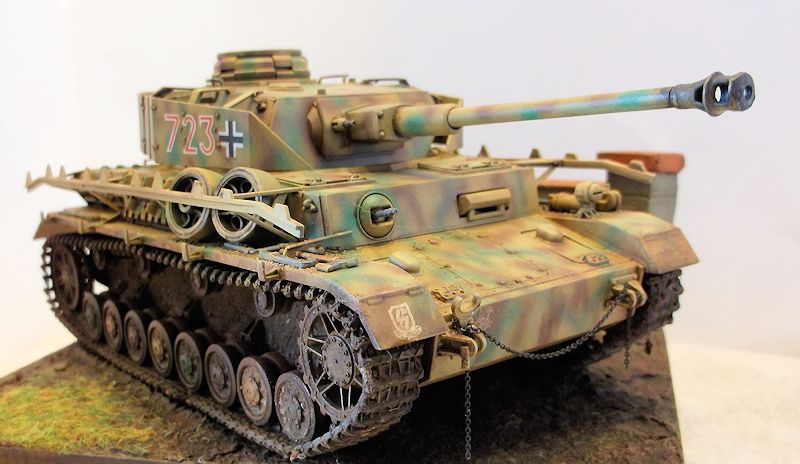
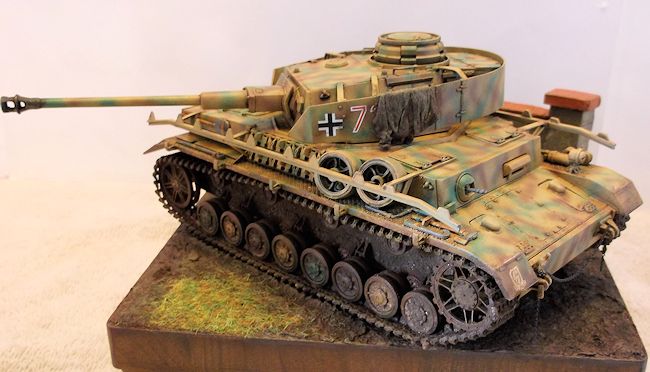
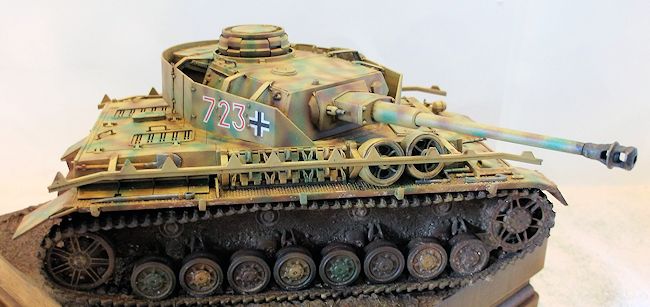
Tamiya 1/35 Panzer IV ausf J
Kit 35181, $49.95 SRP
I'm not bored at all
being retired. I've got plenty to do and keep learning more and more about
the silliness of this hobby. I needed a blaster. In Jack-Speak, that's a
very fast two or three day slammer out of the box. I decided to bring out a
kit that most armor builders have in their stash, but rarely seen on show
tables. The Tamiya Panzer IV Ausf. J (early) is a very nice kit. Well
engineered and the kit that I was
 looking
for.
looking
for.
The early Panzer IV Ausf. J was the beginning of some subtle changes
to a simplified production run from the Ausf. H. The addition of Pilson to
the turret roof and removal of the electric motor for rotating the turret
were prominant to the early Ausf. J. Subsiquant variations would follow in
the mid and Final Ausf. J tanks. Most notably the steel return rollers that
would be downsized to three units per side (final version) and the exhaust
would be changed to straight piped dampners. Pistol ports were removed in
the turret rear and added armor was introduced for the turret roof in
addition to a close support (grenade throwing) hatch. in all, over 1,750
Ausf. J's were produced from March 1944 till the end of the war. It
remained a vitale unit in the Panzer Divisions which were suffering from
attrition while trying desperatly to convert to the Panther.
A Chicago Cub loss was all the time it took to sand road wheels and
complete the entire chassis. If you've ever built a Tamiya kit you'll know
how smooth it is. I build my armor in three stages. Chassis, Hull and
Turret. Before I started the Hull I elected to go with the kit tracks since
it was going to be out of the box. However, a trick I learned years ago. I
ran HOT water on the track and got them good and loose but careful not to
stretch them out. Then I slipped them on and over the running gear like the
instructions say, but I wanted a wee bit of sag. I took four clothes pins
(with the springs) and clamped them over the return rollers and bottom of
the road wheels and lower track run. Before clamping I put Tamiya Glue
(Orange Cap) on the track that would be on the upper return rollers. I got
the sag I wanted and let this dry till I was ready for paint.
On to the Hull which was a breeze to build. No surprises here but
the kit did not include the shurtzen side shields but rather included
just the mounts for them. Using a new #11 blade I hollowed out the bow
machine gun and while I was at it did the same to the turret coaxial
mount. Before I mounted the muffler on the rear plate I made sure to apply
liquid glue and used a stipple brush to give it pre-rusted look. After i
 mounted
the side skirt rack I applied a little green putty in the joining area's to
resemble weld marks. It's the little things that add up. Before you could
say, "That's the third out and the Cubs lose a heartbreaker" I had
everything finished but the turret.
mounted
the side skirt rack I applied a little green putty in the joining area's to
resemble weld marks. It's the little things that add up. Before you could
say, "That's the third out and the Cubs lose a heartbreaker" I had
everything finished but the turret.
Sometimes when you have turret shields involved it's a bit rough
trying to get everything to line up correctly. This time, because of
experience, I did one side at a time and let it dry before doing the other
side. Patience payed off and I just needed a little tweaking when I
finished. The gun barrel was a breeze and the seam was removed with my new
tool bought at the Indy Show. Actually, I was a little perplexed on how
smooth everything was going. On to the paint shop.
As always I gave the tank a rattle can coat of Tamiya flat black.
Then came out the books. I decided on the scheme, not the Unit and went
with a cool vehicle from Normandy and belonging to the 12th SS, Hitlerjugend.
It was a German yellow base coat with green and brown stripes put on
hap-hazard. I started with Tamiya/Vallejo dark yellow colors and then
refilled my Grex from God with red brown then the green. It came out really
well and I gave it a Future coat to prepare for the decals and oil washes.
The decals went on GREAT. I used the kit supplied sheet and settled them
down with Solvaset. It took three applications but they snuggled down
nice. The 12th SS shield was off of another separate Tamiya sheet that they
issued separately. After the decals dried I gave them a gloss spray of
Future and I started my oil washes with the usual Windsor-Newton Dick Van
Dyke brown. I cut the oil with turpentine. When the film was left after
the wash I started to blend in with brushes and removed some of the fiIm
with a pair of
 cotton
panties (shut up) and Q-tips. Works for me. I painted the muffler hull red
and the wooden tool handles Tamiya buff. When the buff color was dry I took
out my Burnt Sienna oil and using just a bit, brushed it over the buff until
I started to get that very cool wood grain effect. Smells good too. Reminds
me of when I was just a young lad, another story that is. The rest of the
time i started touching up and applying different colors to the machine
guns, canvas and drivers armored glass. More dry brushing with oils and
paint were done and I was ready for pigments. Using Mig products, I applied
it on the trucks, lower hull, bottom hull and a touch on the fenders and
muzzle. Don't over do it! I used my eye dropper, generously given to me by
Dave Schemel of Just Plane Stuff, to put a drop of Tamiya Thinner to make
the pigment stick and really look like road grim and natural build up. Be
careful about the drop of thinner as the capilary action makes it travel
very fast, hence the one drop at a time. The last thing was pigments of rust
and dirty brown on the muffler and another few drops of thinner to really
stand out.
cotton
panties (shut up) and Q-tips. Works for me. I painted the muffler hull red
and the wooden tool handles Tamiya buff. When the buff color was dry I took
out my Burnt Sienna oil and using just a bit, brushed it over the buff until
I started to get that very cool wood grain effect. Smells good too. Reminds
me of when I was just a young lad, another story that is. The rest of the
time i started touching up and applying different colors to the machine
guns, canvas and drivers armored glass. More dry brushing with oils and
paint were done and I was ready for pigments. Using Mig products, I applied
it on the trucks, lower hull, bottom hull and a touch on the fenders and
muzzle. Don't over do it! I used my eye dropper, generously given to me by
Dave Schemel of Just Plane Stuff, to put a drop of Tamiya Thinner to make
the pigment stick and really look like road grim and natural build up. Be
careful about the drop of thinner as the capilary action makes it travel
very fast, hence the one drop at a time. The last thing was pigments of rust
and dirty brown on the muffler and another few drops of thinner to really
stand out.
I had pre-made the Base when things on the Tank were drying and
using Celluclay mixed with water and white glue, i spread it over some
Styrofoam and added curb trash for the ground work. the French wall was
something I had from a Show. Before the Celluclay was dry I pressed the tank
into it so i could get some illusion of weight and where to place the Panzer
in relation to how I wanted it viewed. When the base
 dried
I painted it earth tones and added some pigment here and there. I Futured it
and did an oil wash on this too. After some clean up it was flatcoated and
it did come out purdy. The tank was dry at this time too and was shot with
the same flat coat. The result was really eye catching! The final task was
adding some black pastel to the gun barrel. There you have it.
dried
I painted it earth tones and added some pigment here and there. I Futured it
and did an oil wash on this too. After some clean up it was flatcoated and
it did come out purdy. The tank was dry at this time too and was shot with
the same flat coat. The result was really eye catching! The final task was
adding some black pastel to the gun barrel. There you have it.
Pre-planned this took only 22 hours over a three day period. Gotta
love it. It never saw the contest arena as it now belongs to a private
collector. I was so taken with
this kit that i bought two on the cheap and want to do that famous pic of
two Das Riech Ausf. J's (early) during Operation Cobra. these will be a
little more involved with Zimmerit and battle damage. That's it for now
because i hear a few kits calling my name. It's a sickness.
Jack Bruno
July 2014