Tamiya 1/35 Sturmpanzer 'Brumbar'
|
KIT #: |
35077 |
|
PRICE: |
Cheap at a swap meet |
|
DECALS: |
? |
|
REVIEWER: |
Jack Bruno |
|
NOTES: |
Many additions |
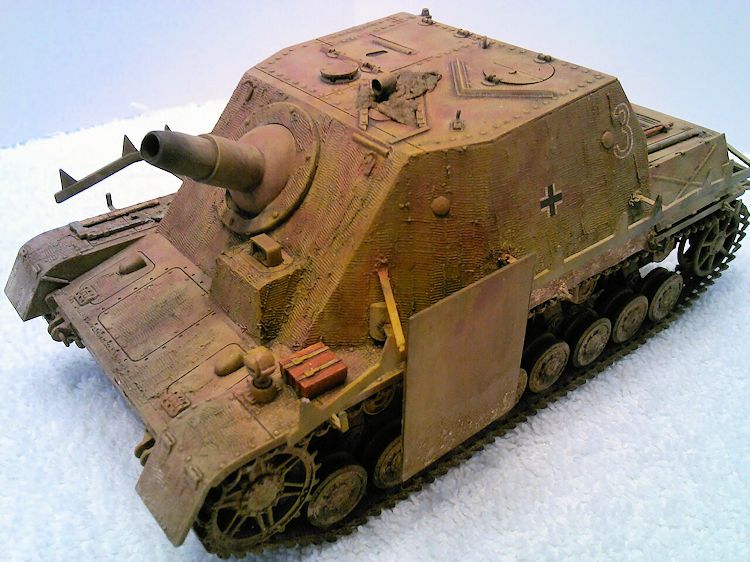
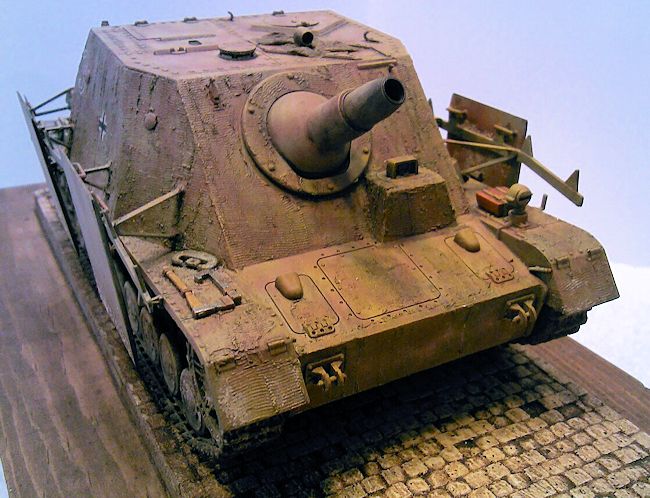
The Sturmpanzer was one of those funky things the Germans came up
with to destroy strong points and level city blocks. It was very cool
looking but they lost the War, ya know? Built on the Panzer IV chassis it
carried a crew of five and between Early/Mid/Late Productions topped out at
305 vehicles built. It saw action in Italy, France and Russia. It suffered
from weight problems and gave way to the newer Panzer Jagers that were in
development as the War turned into a defensive one for the Reich.
No information supplied
 Wondering what to build one day, I perused my stash and came across the
shelf full of the old Tamiya kits that were introduced in the 1970's.
I alwayzz was intrigued by the Brumbar ever since building the 1/32 Kit from
Monogram that featured the artful Diorama work of Shep Paine. Looking thru
the parts, it went on the top of the build pile (yup, I've got one too) and
I came across a few boxes of extra parts and it just hit me...........First
I spied a Panzer IV set of Drive Wheels and then got out my bag of spare
Magic Track........On Vehicle Tools too and I was in..................
Wondering what to build one day, I perused my stash and came across the
shelf full of the old Tamiya kits that were introduced in the 1970's.
I alwayzz was intrigued by the Brumbar ever since building the 1/32 Kit from
Monogram that featured the artful Diorama work of Shep Paine. Looking thru
the parts, it went on the top of the build pile (yup, I've got one too) and
I came across a few boxes of extra parts and it just hit me...........First
I spied a Panzer IV set of Drive Wheels and then got out my bag of spare
Magic Track........On Vehicle Tools too and I was in..................
I went according to the instructions
and built this chassis first. I had to drill out out the mounting peg of
the new Dragon drive wheel but that is very easy and not much trouble. Just
make sure everything was lined up right. Getting together all of the Bogie
Wheels was fun and only the sanding of each was tedious, but watching the
Cubs lose another one was much more tear jerking. With all that out of the
way I started to make the Dragon "Magic Track." The Dark Gray was for the
left and light gray for the right.....a simple, glue-snap-next and before an
Episode of watching Sheldon converse with Amy Farrah Fowler, I had almost
the whole thing finished.. The only thing that you need to pay attention to
is that I do a two thirds run and before the glue dries, wrap the track
around the drive sprocket and return roller.......on German Tanks, add the
appropriate sag. With the tracks done, complete with sag and the whole nine
yards and did the rear (stop it) exhaust and mounted the large hull that was
like a blockhouse on wheels. The Muffler got special attention from liquid
glue and a stiff bristled brush to give it a Future rust look. I took a
pencil out and drew lines where and where not I wanted the home made
Zimmerit to be. I look at pictures off the net and decided on the pattern
and unit (Italy, late 1943)..........For my zimmerit I use Tamiya polyester
putty, the tube with the little green tube of hardener with it. I swear by
the 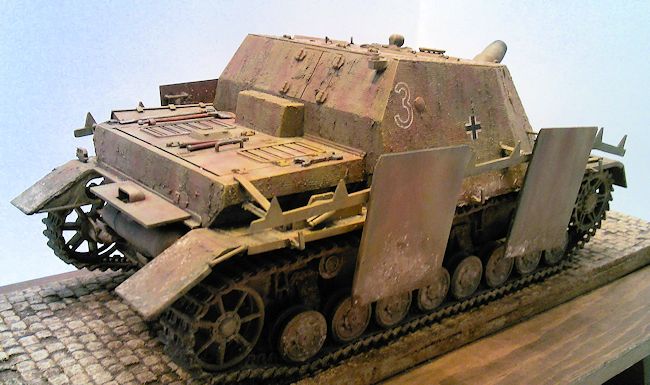 stuff.
Using a toothpick I applied it, smoothed it out and when I was pleased with
it I trolled the area with the Tamiya Zimmerit tool applicators. Within an
hour it was done. I set this aside for a few days to dry and started
something else. Modelers do that. A few days later , unfortunately during
another Cub loss, I started putting all of the small fittings on the Tank
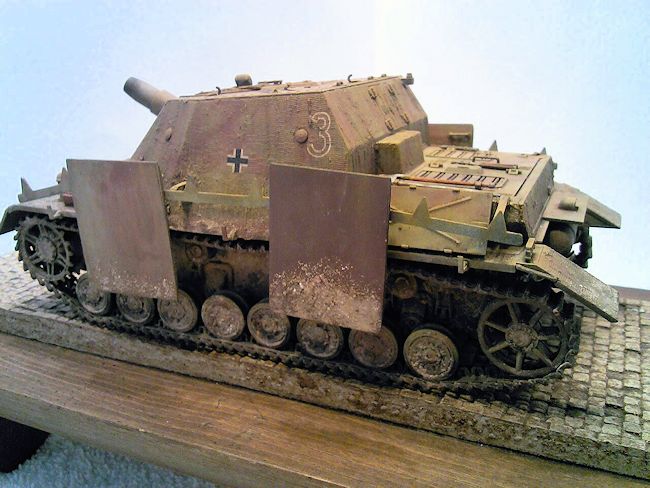
and took this time to decide the colors and sawed the schurtzen into five
separate sections on each side. I did not want the zimmerit job to be hidden
behind shields. I kept stowage and other things to a minimum and opted to
go with the Dragon tools that were molded much mo' betta than the old Tamiya
stuff and mounted them where they should go. The hardest part of the build,
and not very hard at all, was the mounting of the skirt hangers on the hull.
A little patience and thought will get you by this easy. During your
zimmerit process, keep in mind the mounting bars.....thus the pencil.
Within a weeks time I was ready for paint.
stuff.
Using a toothpick I applied it, smoothed it out and when I was pleased with
it I trolled the area with the Tamiya Zimmerit tool applicators. Within an
hour it was done. I set this aside for a few days to dry and started
something else. Modelers do that. A few days later , unfortunately during
another Cub loss, I started putting all of the small fittings on the Tank
and took this time to decide the colors and sawed the schurtzen into five
separate sections on each side. I did not want the zimmerit job to be hidden
behind shields. I kept stowage and other things to a minimum and opted to
go with the Dragon tools that were molded much mo' betta than the old Tamiya
stuff and mounted them where they should go. The hardest part of the build,
and not very hard at all, was the mounting of the skirt hangers on the hull.
A little patience and thought will get you by this easy. During your
zimmerit process, keep in mind the mounting bars.....thus the pencil.
Within a weeks time I was ready for paint.
Truly, my favorite part of any build is the paint job.......God
created GREX just for that reason. A full coat of Tamiya Flat Black out of
the rattle can gave me a good base to start and filled in the nooks and
crannies for the shadow effect I wanted. I over sprayed a Dark Yellow and
went to a lighter shade and yet
 another.
Time for the Kitty's strips and I used Vallejo Red Brown. As per the
pictures the red brown camo did NOT go all the way down the sides of the
Brumbar. It stopped right at the point the schurtzen would be covering up
the hull, roughly half way down/up the sides. When this dried I gave it a
coat of Future to get it ready for the oil washes and decals. The decals
came from a Dragon kit (spares) and was a simple one digit number and a
Balkencrauze. I gave these several applications of Solvaset and really
melted them on so well people think I painted them. After these dried for a
day I brushed some Future over the dried decals and started a Oil Wash just
after that. I use Turpentine to cut the Windsor-Newton with. I like using
Dick Van Dyke Brown and just start off light and build it up to to your
liking. I wanted a very employed Vehicle so I used several applications. I
got the LOOK I wanted and waited for it all to dry , then Flat coated it all
with Vallejo Matte Flat. Your close, but not there yet...........alwayzz
wanting a little more I started to dry brush are's with yellow/white oil
paint. I had drilled out the top scope prior and now filled it with some
Elmers Glue. When that dried it looked like glass. Time for Mig Pigments
and I had a ball with several tints and a big brush. Using an eye-dropper I
sealed the Pigments with Tamiya Thinner and there you have it. I did not
mount the schurtzen and can put them on or off at my desgretion.
another.
Time for the Kitty's strips and I used Vallejo Red Brown. As per the
pictures the red brown camo did NOT go all the way down the sides of the
Brumbar. It stopped right at the point the schurtzen would be covering up
the hull, roughly half way down/up the sides. When this dried I gave it a
coat of Future to get it ready for the oil washes and decals. The decals
came from a Dragon kit (spares) and was a simple one digit number and a
Balkencrauze. I gave these several applications of Solvaset and really
melted them on so well people think I painted them. After these dried for a
day I brushed some Future over the dried decals and started a Oil Wash just
after that. I use Turpentine to cut the Windsor-Newton with. I like using
Dick Van Dyke Brown and just start off light and build it up to to your
liking. I wanted a very employed Vehicle so I used several applications. I
got the LOOK I wanted and waited for it all to dry , then Flat coated it all
with Vallejo Matte Flat. Your close, but not there yet...........alwayzz
wanting a little more I started to dry brush are's with yellow/white oil
paint. I had drilled out the top scope prior and now filled it with some
Elmers Glue. When that dried it looked like glass. Time for Mig Pigments
and I had a ball with several tints and a big brush. Using an eye-dropper I
sealed the Pigments with Tamiya Thinner and there you have it. I did not
mount the schurtzen and can put them on or off at my desgretion.
I'm really pleased with the way it turned out and if this build
taught me anything it is that there is life for those old kits you have in
your stash that YOU think are no longer good. Using your head and having fun
can prompt you to put spare parts and do substitutions where you
can............this Sturmpanzer has done very well for me in the Contest
Arena and now resides with a Collector.......and now, that
Chi-Ha...................See Ya Next Time!!!!!!!
Jack Bruno
March 2014
If you would like your product reviewed fairly and fairly quickly, please
contact
the editor or see other details in the
Note to
Contributors.
Back to the Main Page
Back to the Review
Index Page