The very First thing that I did was collect all of the pieces that I
would need for the rebuild.............The Hull and chassis were already
separated and I replaced two of the Road wheels that were missing with a
Stug III kit that I had in the stash. (th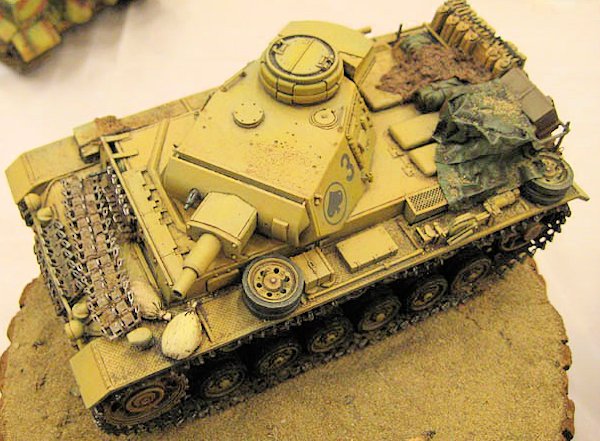 ose
wheels were replaced anyway using the resin set that had wear/tear on
them). On a previous project I had used the FRUIL "Witterketten" set
and had an extra set of MAGIC TRACK that fit perfectly and after about
the time it took for the Chicago Cubs to lose a Game, I had those
assembled. While the glue on the track was just about cured I slide it
over the wheels and return rollers and wrapped it around drive sproket,
making sure it was snug/tight and the teeth pressed into the holes.....shutup..........TAKE
YOUR TIME........the proper PANZER SAG was done at this time using a
pencil to shape the track into place......make sure you have proper
alignment and all the wheels are touching the ground......This was put
off to the side to dry
ose
wheels were replaced anyway using the resin set that had wear/tear on
them). On a previous project I had used the FRUIL "Witterketten" set
and had an extra set of MAGIC TRACK that fit perfectly and after about
the time it took for the Chicago Cubs to lose a Game, I had those
assembled. While the glue on the track was just about cured I slide it
over the wheels and return rollers and wrapped it around drive sproket,
making sure it was snug/tight and the teeth pressed into the holes.....shutup..........TAKE
YOUR TIME........the proper PANZER SAG was done at this time using a
pencil to shape the track into place......make sure you have proper
alignment and all the wheels are touching the ground......This was put
off to the side to dry
Next came the upper hull where some of the tools were replaced. The
wooden handles were rejuvenated using TAMIYA Buff and after that was
dry, raw sienna oil was used to bring out the sexy wood grain effect.
Dark Grey was used for the metal area and then given a small application
of pencil lead for a used look. After this dried a lil flat coat was
brushed on to seal it. The extra FRUIL track was originally used as
extra Armor protection and I left that in place..........Elmers Glue was
applied FROM THE INSIDE to seal the Drivers viewing port and will appear
as armored glass when it dried.
I was looking at some pics from books in my collection and was going for
a War Weary Tank that looked like the Desert took it's toll. I took out
my GREX and started to spray high points with a flat brown.......from
there I went to a darker middlestone shade and my Panzer started looking
like new again, only much mo' betta! I was careful to get close enough
to the turret markings without botching that up because I really did
like this Division. I kept the chassis and hull separated and then my
attention turned to the lower half of the tank. The tracks were given
the same treatment as the hull only darker shades. I s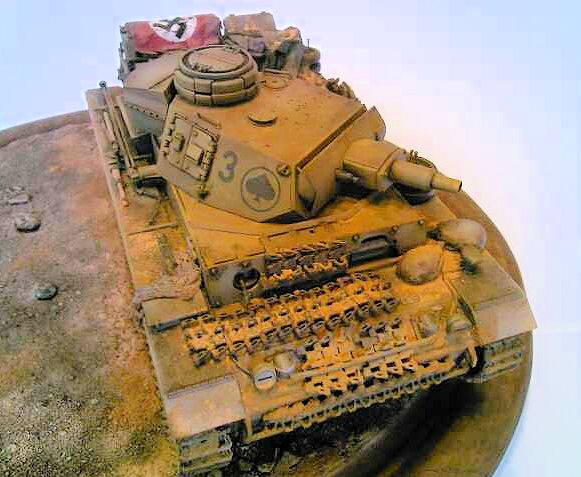 elected
the pigments I would use and gave both half's a FUTURE treatment and
prepared for the oil wash. I use WINDSOR-NEWTON Oil's and pre-made a
batch of Turpentine with a long sliver of Dick Van-Dyke Brown. A light
application is what I started with and after three more treatments I
liked THE LOOK and let the Turpentine evaporate before a sealing coat of
Clear Flat, by VALLEJO. I really needed something new, so I opted for
an air recognition flag, draped over the storage boxes on the rear
hull. I should have mentioned that the scratch built stowage rack
survived that original mishap and was still used in this project. It was
constructed by Plastic Strip, Super Glue and Green Putty to simulate
weld beads. BALLZZ!!! The Flag was made from foil and using a template,
I cut a stencil for the circle. VERY CAREFULLY the foil was shaped by
pressing it into the area where it was to be located.......First the
white paint, applied the stencil, then sprayed red..........this was
FUTURED and after it dried a Decal was stolen from a SUPERSCALE set that
I use for Armor. Again, this was sealed with a Flat Coat. I started to
carefully dry brush using yellows and a hint of white in some
area's......pigments were then used along the track area and I used an
eye dropper and taking TAMIYA THINNER, carefully applied it to the
pigments a small drop at a time to keep them in place. Further
applications of pigment may be needed to build up the amount of grunge
your looking for ;) DO NOT saturate the pigment...use just enough to
let it spread on it's own. it dry's very nicely and you'll be surprised
at how well it works.........you'll be sold on them. I used MIG for this
and the Europeaon dirt and Africa Sand....some Track brown color pigment
was used in the track area.
elected
the pigments I would use and gave both half's a FUTURE treatment and
prepared for the oil wash. I use WINDSOR-NEWTON Oil's and pre-made a
batch of Turpentine with a long sliver of Dick Van-Dyke Brown. A light
application is what I started with and after three more treatments I
liked THE LOOK and let the Turpentine evaporate before a sealing coat of
Clear Flat, by VALLEJO. I really needed something new, so I opted for
an air recognition flag, draped over the storage boxes on the rear
hull. I should have mentioned that the scratch built stowage rack
survived that original mishap and was still used in this project. It was
constructed by Plastic Strip, Super Glue and Green Putty to simulate
weld beads. BALLZZ!!! The Flag was made from foil and using a template,
I cut a stencil for the circle. VERY CAREFULLY the foil was shaped by
pressing it into the area where it was to be located.......First the
white paint, applied the stencil, then sprayed red..........this was
FUTURED and after it dried a Decal was stolen from a SUPERSCALE set that
I use for Armor. Again, this was sealed with a Flat Coat. I started to
carefully dry brush using yellows and a hint of white in some
area's......pigments were then used along the track area and I used an
eye dropper and taking TAMIYA THINNER, carefully applied it to the
pigments a small drop at a time to keep them in place. Further
applications of pigment may be needed to build up the amount of grunge
your looking for ;) DO NOT saturate the pigment...use just enough to
let it spread on it's own. it dry's very nicely and you'll be surprised
at how well it works.........you'll be sold on them. I used MIG for this
and the Europeaon dirt and Africa Sand....some Track brown color pigment
was used in the track area.

 Many,
Many years ago, when I did a review of this on a modeling site, I was sent
THIS new TAMIYA Panzer III Ausf. N. I built it up and did a review on it
and even entered it in a Show. I had FRUIL Tracks on it and it just didn't
seem right. So, I was removing a few links on each side, when I dropped the
kit and it exploded all over the place. Well, the remains went into a
plastic bucket (ice cream container) with an old Pepsi shirt on the top of
it and it remained there for over 5 years. Last week I was finishing up a
few projects and FOUND this kit in the storage area and decided that it
would be a HOOT if I could salvage what I could (bitch kit).....( I found
The Panther Ausf. D too).......I started removing the track and really
thought that the damage was not as bad as I thought it was............I
started to work. It got a repaint/weathering/pigments/new MAGIC track/oil
wash/oil dry brushing and a new Base.
Many,
Many years ago, when I did a review of this on a modeling site, I was sent
THIS new TAMIYA Panzer III Ausf. N. I built it up and did a review on it
and even entered it in a Show. I had FRUIL Tracks on it and it just didn't
seem right. So, I was removing a few links on each side, when I dropped the
kit and it exploded all over the place. Well, the remains went into a
plastic bucket (ice cream container) with an old Pepsi shirt on the top of
it and it remained there for over 5 years. Last week I was finishing up a
few projects and FOUND this kit in the storage area and decided that it
would be a HOOT if I could salvage what I could (bitch kit).....( I found
The Panther Ausf. D too).......I started removing the track and really
thought that the damage was not as bad as I thought it was............I
started to work. It got a repaint/weathering/pigments/new MAGIC track/oil
wash/oil dry brushing and a new Base. 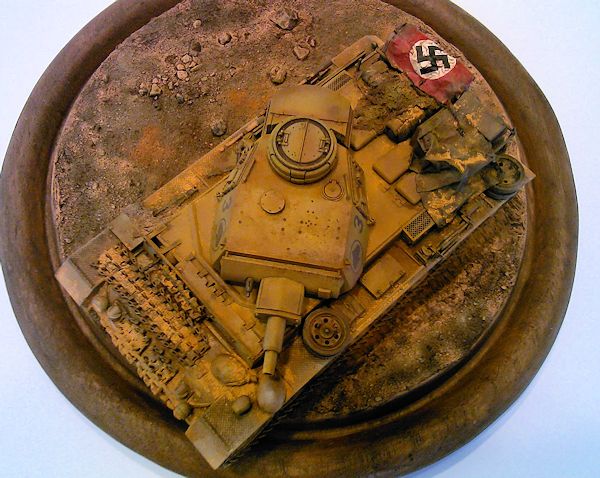 pictured
a moving column of Tanks in the Desert....single file to hide their
numbers in the sand......and laid out my base using CELLUCLAY mixed with
water and white glue. I spread it out over the selected area and
pressed some curb side stones into it and even had some sand left from
Mike's dayz at the COOLIDGE SCHOOL Sandbox. It looked great and I
pressed PANZER IV track into the road to give some route for my
completed Tank. When this was all dry I painted it by air brush using
the same colors and washes used on the Chassis. Looks GREAT!!! Now,
all I needed was to put everything together.
pictured
a moving column of Tanks in the Desert....single file to hide their
numbers in the sand......and laid out my base using CELLUCLAY mixed with
water and white glue. I spread it out over the selected area and
pressed some curb side stones into it and even had some sand left from
Mike's dayz at the COOLIDGE SCHOOL Sandbox. It looked great and I
pressed PANZER IV track into the road to give some route for my
completed Tank. When this was all dry I painted it by air brush using
the same colors and washes used on the Chassis. Looks GREAT!!! Now,
all I needed was to put everything together.