I painted, as always, the entire model Flat Black.....I removed and sprayed
the turret first and then the Chassis. Remember to treat the bottom of the
Tank just like the rest of it. After a good 24 hours I gave it a real nice
"misting" spray of German Dark Gray. I used the Tamiya color for this. Then
in just a few minutes I shot a Vallejo medium Gray and just covered the
inside panels. In the same sitting I took a lighter Vallejo Gray and hit the
top of the turret and chassis to give it a faded look. The stowage was
painted at this time and only a few what I call "Buffer" colors were used.
My theory is that I want to add some kind of color to enhance the overall
scene. When this was all dry I Futured the kit for decals and wash. My
usual wash is Windsor-Newton Dick Van Dyke Brown. Love the stuff, and the
show..........taking a larger brush I had fun applying it over the kit and
letting capillary action do it's deed. Smells great too. As it dried I
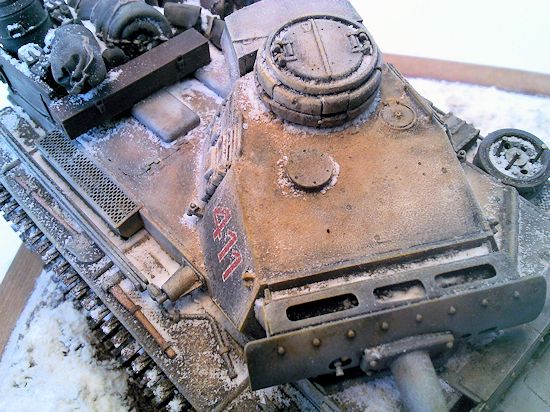
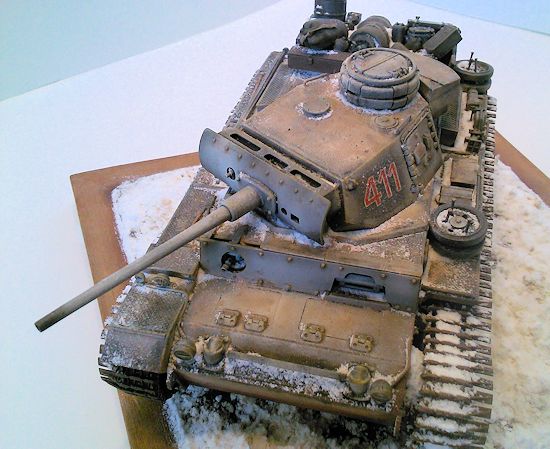
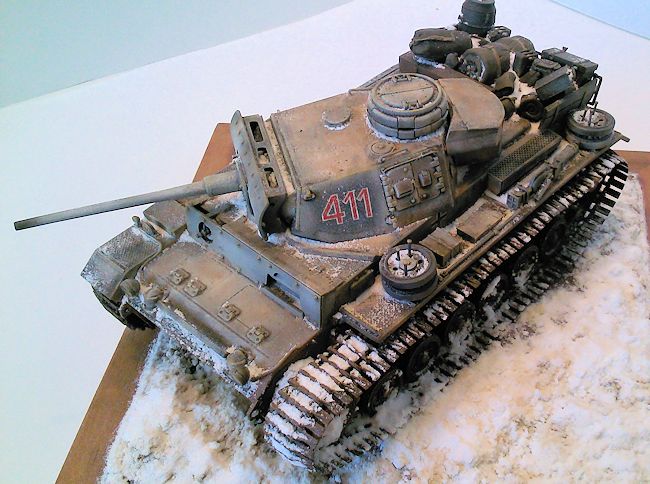
started to work on the base that would consist of groundwork with three
layers of Baking Soda added to give the illusion of several snowfalls. When
the primary wash was was dry I painted the tools with a buff color and after
that dried a bit took a small amount of Oil Paint, raw umber, and streaked
the tools giving them a real wood look. These would be sealed under the flat
coat so you do have plenty of time to make adjustments. I like to use burnt
umber on a separate tool just to mix up a bit for the sake of being
different. I did use more wash around the tread plate/fender/tool areas and
on the area where feet would be walking over. After a few dayz of working
on the base and letting "ELLE" dry, I started other projects that I'll show
you soon.
When I was satisfied with the overall look, I flat coated the
kit and started the second round of weathering.
I had a lot of fun with this kit and enjoy a
Winter Scene more and more. Next time I'll utilize a white-wash and work
that in but this was to portray a First Snowfall and it did come out better
than I thought it would. I was very pleased when it took a Gold Medal and
Best Armor at the November Butch O'Hare Show in Chicago. It placed in
Murfreesboro too. So use your imagination and have FUN for crissakes!!!!!
Until next time............................
 side (in between the tracks) were removed as
were the turret side ports and loaders vision port. Also it was the first of
the Panzer III series to see the inclusion of a machine gun mount for
anti-aircraft use. This was also included on further Panzer III's and Panzer
IV's. Other internal revisions were made and according to my research 653
units were made. The Panzer III Ausf. L was used on all fronts and earned
respect from Africa to the Steppes.
side (in between the tracks) were removed as
were the turret side ports and loaders vision port. Also it was the first of
the Panzer III series to see the inclusion of a machine gun mount for
anti-aircraft use. This was also included on further Panzer III's and Panzer
IV's. Other internal revisions were made and according to my research 653
units were made. The Panzer III Ausf. L was used on all fronts and earned
respect from Africa to the Steppes.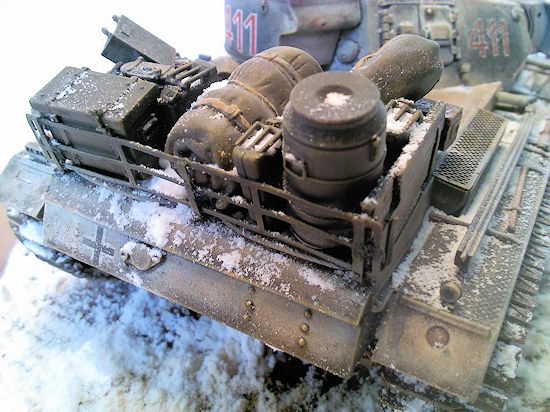 During your construction of the hull never forget the wire electrical leads
that go to the lights/horn and siren.....most people forget those but if
your building a contest kit, you better . I use small gauge solder wire. It
bends really well and mounts with no problem. I've dated girls like that
too. Deviating from the instruction I added a couple of steps that are
optional, yet were almost alwayz used in the Field, a Stowage Rack. I made
this one different from others that I've done in the past. I secured seven
small strips of photo-etched brass that were actually the holding strips
that held parts from other sets. Normally you would toss this away, but we
Armor guys never throw stuff away. I cut them in equal lengths and bent the
end portion to be used as the mount to the rear deck. I super glued these in
place and I added green putty around the posts and tapered it with a tooth
pick to look as if it was welded on. Then, I took six cut pieces of bass
wood and secured in place........simple as that. There were thousands of
ways to do this and feel free to experiment with it. Nothing you do is
wrong. I got most all of my ideas from pictures....such as the welded fuel
drums on T-34's ;) (all off the Internet)
During your construction of the hull never forget the wire electrical leads
that go to the lights/horn and siren.....most people forget those but if
your building a contest kit, you better . I use small gauge solder wire. It
bends really well and mounts with no problem. I've dated girls like that
too. Deviating from the instruction I added a couple of steps that are
optional, yet were almost alwayz used in the Field, a Stowage Rack. I made
this one different from others that I've done in the past. I secured seven
small strips of photo-etched brass that were actually the holding strips
that held parts from other sets. Normally you would toss this away, but we
Armor guys never throw stuff away. I cut them in equal lengths and bent the
end portion to be used as the mount to the rear deck. I super glued these in
place and I added green putty around the posts and tapered it with a tooth
pick to look as if it was welded on. Then, I took six cut pieces of bass
wood and secured in place........simple as that. There were thousands of
ways to do this and feel free to experiment with it. Nothing you do is
wrong. I got most all of my ideas from pictures....such as the welded fuel
drums on T-34's ;) (all off the Internet) 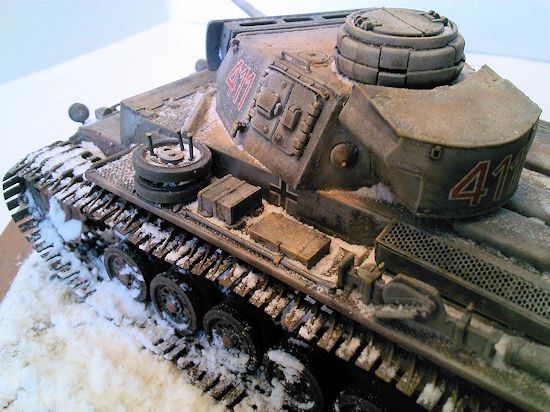 e most
fantastic thing ever produced for an armor model. These two runs took me
only three episodes of The Big Bang Theory to complete and test fit with
that panzer sag. Again, search the net for a picture to get your sag right.
Conditions and vehicles were always different. I use the Model Master glue
in the Black bottle and long neck for this. It allows enough set up time to
have a great session. Again, I knew some awwwwwnevermind....but I did. I
put the lower hull with the mounted tracks off to the side to dry and
started the turret.
e most
fantastic thing ever produced for an armor model. These two runs took me
only three episodes of The Big Bang Theory to complete and test fit with
that panzer sag. Again, search the net for a picture to get your sag right.
Conditions and vehicles were always different. I use the Model Master glue
in the Black bottle and long neck for this. It allows enough set up time to
have a great session. Again, I knew some awwwwwnevermind....but I did. I
put the lower hull with the mounted tracks off to the side to dry and
started the turret.