| KIT: | Tamiya 1/35 King Tiger w/ Porsche turret |
| KIT #: | 35169 |
| PRICE: | $ 44.00 MSRP |
| DECALS: | Several options |
| REVIEWER: | Jeff Brundt |
| NOTES: | Used Cavalier resin Zimmerit set |
| HISTORY |
The German King Tiger Tank was introduced in early 1944 and was the most powerful tank during World War 2. With its powerful 88mm gun and an almost impenetrable front armor, it was one of the most feared weapons of the war. Up to the end of the war, the allies had not introduced any effective means to counter the threat. The Tiger II combined the heavy armor of the Tiger I with the sloped armor of the Panther. The design followed the same concept as the Tiger I, but was intended to be even more formidable. The very heavy armor and powerful long-range gun gave the Tiger II the advantage against virtually all opposing tanks.
 Development
began as early as 1937 with the German Armaments Ministry issuing a
specification for a new heavy tank to Daimler-Benz, Henschel, MAN and Porsche.
The project however was ignored as the Panzer III and IV had so far proved
effective tanks and served well in combat. It was not until spring 1941 that the
project was revived after Hitler was impressed with heavy allied tanks, such as
the French Char B1 and British Matilda 1 during the campaign in the west
Development
began as early as 1937 with the German Armaments Ministry issuing a
specification for a new heavy tank to Daimler-Benz, Henschel, MAN and Porsche.
The project however was ignored as the Panzer III and IV had so far proved
effective tanks and served well in combat. It was not until spring 1941 that the
project was revived after Hitler was impressed with heavy allied tanks, such as
the French Char B1 and British Matilda 1 during the campaign in the west
Although the designation implies that the Tiger II is a succession of the Tiger 1, it is in effect a completely different tank. The main gun specification of the King Tiger was to be a variation of the 88mm anti-aircraft gun. Although the 88mm was initially designed for an anti aircraft role, it proved to be an excellent tank killer. Originally, the intention was to mount an 88mm Flak 41 into a turret for the Porsche VK4501 (P) chassis. The turret had been originally designed by Krupp to hold the 56 caliber 88mm KwK 36 gun of the Tiger 1. After much experimentation and debate, it was decided in early 1943 that it was not possible to mount the 88mm Flak 41. Krupp had then been contracted to design a new turret that could mount their own version of a 71 caliber 88mm Kwk 43 gun that could fit in both the chassis for Henschel and Porsche. The length of the barrel itself is over 20 feet long while the rounds weighed almost 20kgs. It is in effect a much more powerful gun than the Tiger 1.
For the development of the chassis, two firms were contracted to come up with the designs; Henschel and Sohn of Kassel and Porsche of Stuttgart. Both firms were responsible for only the chassis and automotive designs. Turret design was awarded to Krupp of Essen.
The Henschel version used a conventional hull design with sloped armor resembling the layout of the Panther tank. It had a rear mounted engine and standard interleaved road wheels mounted on transverse torsion bars in a similar manner to the original Tiger. To simplify maintenance, however, the wheels were overlapping rather than interleaved as in the Tiger I.
 The
Porsche hull design had a rear-mounted turret and a mid mounted engine. The
suspension was the same as on the Jagdpanzer Elefant. This suspension had six
road wheels per side mounted in paired bogies sprung with short longitudinal
torsion bars that were integral to the wheel pair; this saved internal space and
facilitated repairs. The Porsche version had a series-hybrid power system where
the gasoline engines powered electrical generators which in turned powered
electric motors which turned the sprockets. This method of propulsion had been
attempted before on the Ferdinand prototypes and in some
The
Porsche hull design had a rear-mounted turret and a mid mounted engine. The
suspension was the same as on the Jagdpanzer Elefant. This suspension had six
road wheels per side mounted in paired bogies sprung with short longitudinal
torsion bars that were integral to the wheel pair; this saved internal space and
facilitated repairs. The Porsche version had a series-hybrid power system where
the gasoline engines powered electrical generators which in turned powered
electric motors which turned the sprockets. This method of propulsion had been
attempted before on the Ferdinand prototypes and in some
Henschel won the contract, and all Tiger IIs were produced by the firm. Two turret designs were used in production vehicles. The initial design is sometimes misleadingly called the "Porsche turret" due to the belief that it was designed by Porsche for their prototype. In fact this turret was simply the initial Krupp design for both prototypes. This turret had a rounded front and steeply sloped sides, with a difficult-to-manufacture curved bulge on the turret's left side, to accommodate the commander's cupola. Fifty early turrets were mounted to Henschel's hull and used in action. The more common "production" turret, sometimes called the "Henschel" turret, was simplified with a flat face, no shot trap (created by the curved face of the initial-type turret), less-steeply sloped sides, and no bulge for the commander's cupola.
The track system used on the Tiger II chassis was a unique one, which used alternating "contact shoe" and "connector" links—the contact shoe link had a pair of transverse metal bars that contacted the ground, while the connector links had no contact with the ground.
 The Tiger
II was developed late in the war and made in relatively small numbers. Like all
German tanks, it had a gasoline engine. However, this same engine powered the
much lighter Panther and Tiger I tanks. The Tiger II was under-powered, like
many heavy tanks of WW2, and consumed a lot of fuel which was already in short
supply.
The Tiger
II was developed late in the war and made in relatively small numbers. Like all
German tanks, it had a gasoline engine. However, this same engine powered the
much lighter Panther and Tiger I tanks. The Tiger II was under-powered, like
many heavy tanks of WW2, and consumed a lot of fuel which was already in short
supply.
Officially designated Panzerkampfwagen VI
Sd.Kfz 182, the King Tiger was placed into service early 1944. It served in the
western and eastern front notably in the battle of
However, the great firepower and armor of the King Tiger created the impression
of a powerful armored force with almost invulnerable tanks. Able to destroy
enemy tanks at extreme ranges and impervious to those same tanks made the King
Tiger more than a match for any allied tank. Indeed for the allied forces, the
sight of a King Tiger on the battlefield was terrifying and did great physical
and morale damage to the enemy. This fame and almost mystical fascination helped
it earn its reputation as the most feared weapon of World War 2. For the German
forces, it was the hallmark of German armored might and restored morale even in
the last days of the war. Due to the havoc it wreaked during the
| THE KIT |
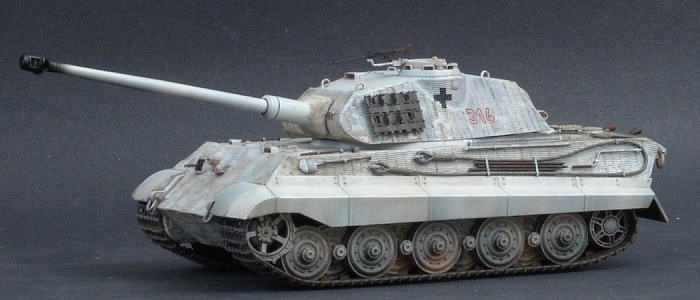
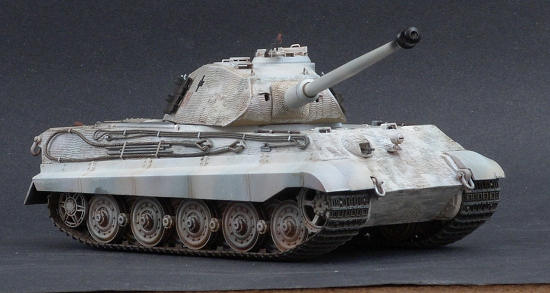
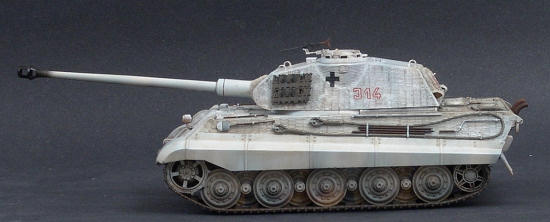
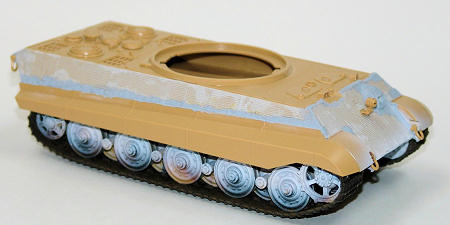
Tamiya’s King Tiger is of early 90’s vintage and has crisp
molding, no flash and very few ejector pin marks. This particular boxing has the
‘Porsche’ turret. It comes in the standard Tamiya tray and lid style box with
the sprues molded in the tan coloring. Two sprues are molded in black for the
spare track links. The tracks themselves are vinyl but can be cemented together
rather than using the clumsy ‘heat riveted’ method. Tamiya also makes an
individual track link set that is basically 8 or nine of the spare track
 sprues
included in the kit. If you plan on building the model without the fenders the
flexible track can be glued to the road wheels for the proper sag without any
trouble. The separate links really aren’t needed unless you’re a die hard. There
is only one figure included; the tank commander. Even though you can pose the
separate hatches open or closed there is no internal detail. If you want that
then you’ll have to scratch build it or find an aftermarket set. This model
wasn’t motorized so there are no holes in the lower hull that need filling. You
also get a piece of mesh material for the intake screens on the lower hull along
with some double sticky tape to attach the screen with. Poly caps are included
for the main drive sprokets and return wheels.
sprues
included in the kit. If you plan on building the model without the fenders the
flexible track can be glued to the road wheels for the proper sag without any
trouble. The separate links really aren’t needed unless you’re a die hard. There
is only one figure included; the tank commander. Even though you can pose the
separate hatches open or closed there is no internal detail. If you want that
then you’ll have to scratch build it or find an aftermarket set. This model
wasn’t motorized so there are no holes in the lower hull that need filling. You
also get a piece of mesh material for the intake screens on the lower hull along
with some double sticky tape to attach the screen with. Poly caps are included
for the main drive sprokets and return wheels.
| CONSTRUCTION |
 Construction
begins with the turret and gun barrel. I had thought of using a turned aluminum
barrel but the kit one cleans up nicely. You need to trim the attachment stub on
the breech to fit the replacement resin mantlet since the hole for it isn’t as
deep as the kit one. I left this off anyway until final assembly after painting.
The zimmerit resin is attached with thin CA. I did one section at a time; taking
special care with the curved section of the commander’s cupola. The seams were
touched up with Mr. Surfacer 500 brush applied. The resin rear hatch replaced
the kit furnished one. It had some pinholes and voids that needed a bit of
touch-up with putty.
Construction
begins with the turret and gun barrel. I had thought of using a turned aluminum
barrel but the kit one cleans up nicely. You need to trim the attachment stub on
the breech to fit the replacement resin mantlet since the hole for it isn’t as
deep as the kit one. I left this off anyway until final assembly after painting.
The zimmerit resin is attached with thin CA. I did one section at a time; taking
special care with the curved section of the commander’s cupola. The seams were
touched up with Mr. Surfacer 500 brush applied. The resin rear hatch replaced
the kit furnished one. It had some pinholes and voids that needed a bit of
touch-up with putty.
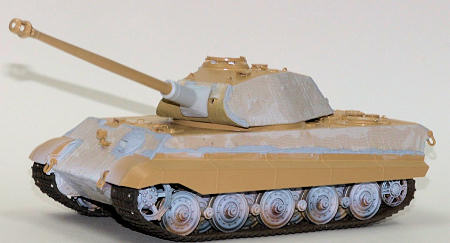 plate has
to have some of the molded detail removed to accommodate the resin zimmerit
piece. This removed detail is duplicated on the resin.
plate has
to have some of the molded detail removed to accommodate the resin zimmerit
piece. This removed detail is duplicated on the resin.
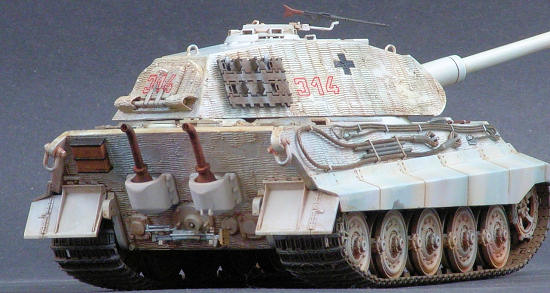
| COLORS & MARKINGS |
 shame it
won’t be seen with the fenders on but that’s how it goes sometimes. The fenders
were then attached completing the lower hull and making it ready for paint. I
purposely left off the tools, tow cables, cleaning rods, etc. I usually paint
those separately and glue them on later.
shame it
won’t be seen with the fenders on but that’s how it goes sometimes. The fenders
were then attached completing the lower hull and making it ready for paint. I
purposely left off the tools, tow cables, cleaning rods, etc. I usually paint
those separately and glue them on later.
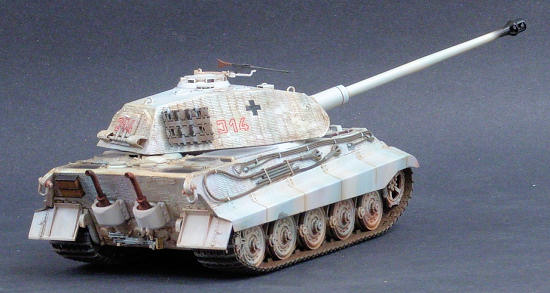
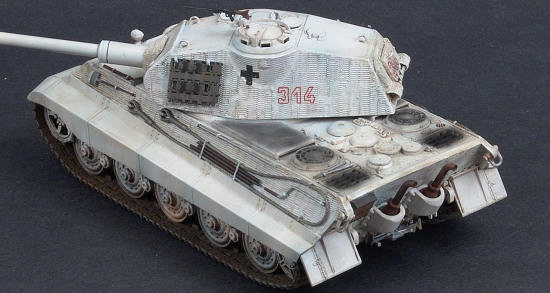 sprue
also provides brackets for hanging the links on the turret but for some reason
the instructions never mention how to assemble or install them. The textured
zimmerit was cut/scraped away from where the brackets were to be mounted and
they were CA’d in place. There’s no need to be that accurate on placing the
brackets as these were applied in the field where convenient. The spare tracks
were used to supplant the armor as well. Once everything is in place I hit the
entire model with some more wash. I mix up some Grumbacher burnt sienna and
night black oil washes and started applying. These washes really make the
zimmerit texture pop out. The road wheels were hit very heavy and the wash
brings out the molded details nicely.
sprue
also provides brackets for hanging the links on the turret but for some reason
the instructions never mention how to assemble or install them. The textured
zimmerit was cut/scraped away from where the brackets were to be mounted and
they were CA’d in place. There’s no need to be that accurate on placing the
brackets as these were applied in the field where convenient. The spare tracks
were used to supplant the armor as well. Once everything is in place I hit the
entire model with some more wash. I mix up some Grumbacher burnt sienna and
night black oil washes and started applying. These washes really make the
zimmerit texture pop out. The road wheels were hit very heavy and the wash
brings out the molded details nicely.
| CONCLUSIONS |
June 2008
Copyright ModelingMadness.com
If you would like your product reviewed fairly and quickly, please contact the editor or see other details in the Note to Contributors.
Back to the Review Index Page2018