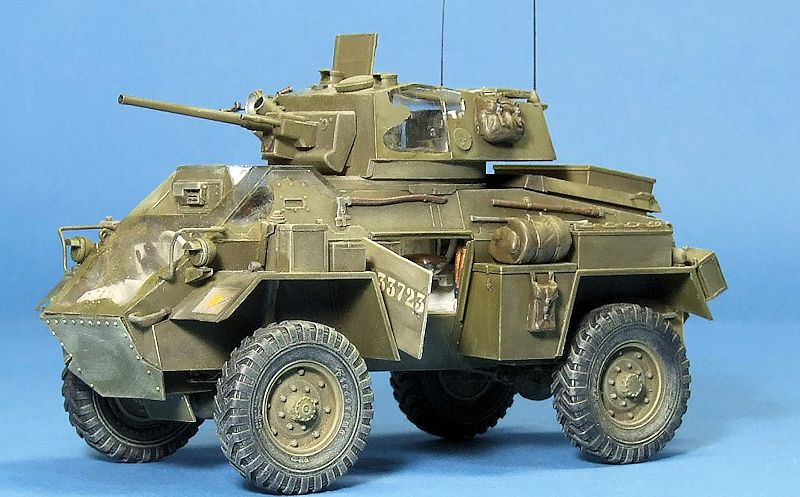
Bronco 1/35 Humber Armored Car
| KIT #: | 3CB35081SP |
| PRICE: | $67.00 SRP |
| DECALS: | Several vehicles |
| REVIEWER: | Dale Rannals |
| NOTES: |
| HISTORY |
The
Humber Armoured Car was one of the most widely produced British armoured cars of
the Second World War. It supplemented the Humber Light Reconnaissance Car and
remained in service until the end of the war.
Made by the Rootes Group, the Humber was essentially a combination of the
Karrier KT 4 artillery tractor chassis and the armoured body of the Guy Armoured
Car. The KT4 was already in production for the Indian Army, and Guy were having
problems with the production levels required. The Karrier name was dropped to
avoid confusion.
 The first
order for 500 was placed in 1940. The first Humbers were more or less identical
to the Guy down to the faults in armour but this was rectified. Production
started in 1941.
The first
order for 500 was placed in 1940. The first Humbers were more or less identical
to the Guy down to the faults in armour but this was rectified. Production
started in 1941.
The Mark III improved upon the Mark II by providing a three-man turret. Mark III
production ended in 1942 after 1,650 had been built. With a possible
replacement, the 2-pounder armed Coventry armoured car, on its way, the Mark IV
was designed. This put the US 37 mm gun in the turret but at the cost of one
crewman. The Coventry was not ordered as a replacement and so production of Mark
IV continued, for a total of 2,000, despite its flaws.
The vehicle was used in the North African Campaign from late 1941 by the 11th
Hussars and other units. It was also widely used in the European theatre by
reconnaissance regiments of British and Canadian infantry divisions. A few
vehicles were used for patrol duty along the Iran supply route. The Humber
armoured car was also used in Burma.
A captured vehicle (a Mk IV) was used by the
Aufklärungs Abt of the 9th SS Panzer
Division Hohenstaufen at Arnhem.
After the Second World War, the Humber was employed by Egypt in 1948–49 as well
as by Burma, Ceylon, Cyprus, Denmark, Mexico, the Netherlands, Portugal.
| THE KIT |
The kit consists of around 650 parts in light gray plastic, a dozen in clear
plastic, 91 etched parts, 2 short vinyl BESA ammo belts, a decal sheet and an
incredible instruction book of 38 pages.
The standard of molding is simply amazing, with no
flash that I found and only very fine mold seams to be removed. The
detail of the parts is superb and I have never seen such tiny, tiny parts molded
so well. I
 was
intimidated by many of the parts........so tiny and delicate........ had me
wondering if I would be able to remove them from the sprue without breaking
them.
was
intimidated by many of the parts........so tiny and delicate........ had me
wondering if I would be able to remove them from the sprue without breaking
them.
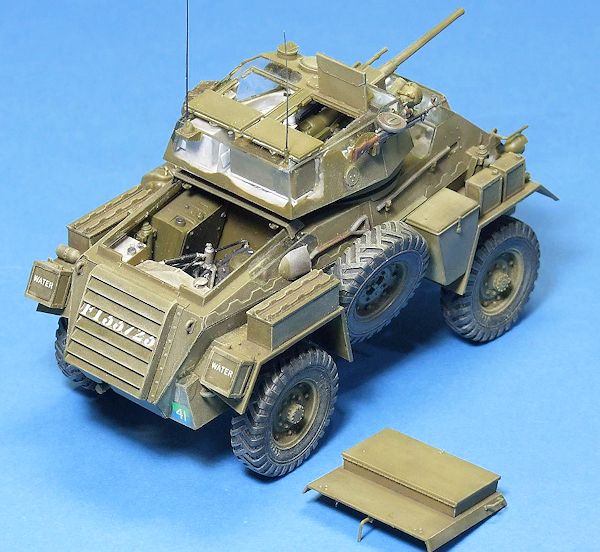
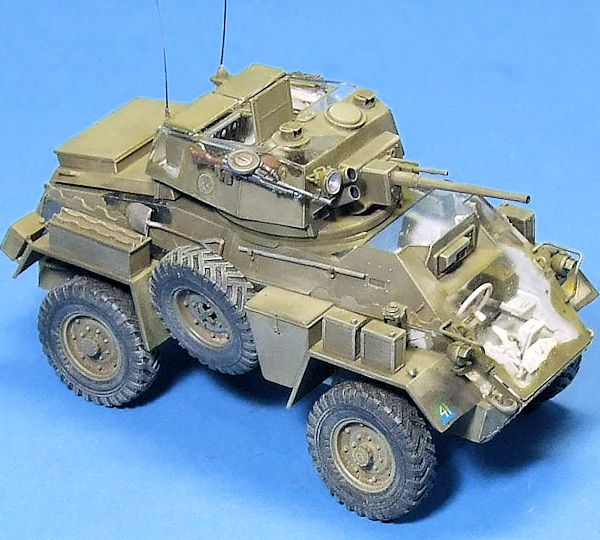
This is a special release of the kit, a clear edition with full interior detail.
So there are pretty substantial clear sprues, as all the hull and turret
pieces are clear. The really nice
thing is that you also get all the standard gray hull bits too, so one can do a
normal kit (don't know why you would buy this edition though!) or do any
combination of clear and gray.
The instructions come as a full size glossy 38 page booklet. Included therein
are a short history of the type, a color reference page (including Mr. Hobby,
Hobby Color, Humbrol, and Tamiya paints) and
50 very well drawn assembly steps.
3D cad-type drawings are included in some steps to assist in parts
placement and help subdue any confusion, a very nice addition.
Also inside is a full sprue layout and a full page, full color painting
and decal placement drawings of each of the five vehicles options.
| CONSTRUCTION |
 itself
many times. I do wish I would have
kept a build log....... Didn't start one as I didn't foresee the need.
itself
many times. I do wish I would have
kept a build log....... Didn't start one as I didn't foresee the need.
Anyway, the build starts with the engine.
This is definitely not a curbside.
The engine is incredibly detailed, but that can, and will, be said about
every portion of this build. The
engine's generator, for instance, contains 7 pieces, and it is barely 1/4" long
when complete. I looked for and assembled same-color sub-assemblies, then brush
painted ...... I realized right off that there wasn't going to be a whole lot of
airbrush duty here. (I also
realized there was not much for locating pins or holes with this kit .... Many
of the pieces are smaller than the locating pins on most kits.)
Soon I had a quite small, beautifully detailed power plant built up.
The engine/transmission and radiator assembly comprise of 50 pieces and
when done is just gorgeous.
The transfer case and its associated chassis sub-frame, about 25 parts here,
build up next. Great care needs to
be taken with many of the parts ..... Just getting some of the long control rods
off the sprue without breakage takes planning and a delicate hand.
Again, build into sub-assemblies and paint.
Very small attachment divots means you need to carefully position each
part. Any misplaced pieces,
especially this early in the build, on the chassis, could mean fit issues of
parts down the line. Don't ask how
I know. :)
Steps 3 and 4 build up the main chassis and position the engine and transfer
case assemblies into it. Some of
the cross member locations were a bit vague and I did have trouble placing one
...... I had placed the transfer case a bit too low in its sub-frame
earlier. Mind you it wasn't much
.... a 1/16" or so, but it was enough to cause problems.
I had to sand off a bit of plastic from the cross-member and the transfer
case to get it to fit correctly.
I used the main floor piece to help position the chassis frames and get
everything square and level.
The next few steps would have you starting on the interior, but I jumped ahead a
few steps and worked on the running gear ..... axles, suspension, drive-shafts.
Pretty straightforward area.
I let it dry thoroughly and got ready to start on all that interior detail.
I found and assembled more sub-assemblies, worked on firewall detail, and
painted the numerous individual 37mm shell cartridges.
 It was
the firewall, or more specifically a tank attached to the firewall, that I got
my first "You're kidding me, right?" moment with this kit.
At the tank's top attachment brackets, the instructions have you attach
two very, very tiny 1/35 scale wing-nuts. Yes, separately molded wing-nuts.
The assembly step has an exploded view of the sprue section, apparently
to show you what they are. I
grabbed the sprue and a magnifying glass and sure enough, little tiny wing-nuts
at the end of little tiny sprue.
Amazing. Simply impressive finesse of molding.
But since I was sure 1) I would lose them the moment I removed them from
sprue (there are bigger plastic shavings on the bench) and 2) they would
disappear in any blob of glue I used to attach them ..... I just moved on.
It was
the firewall, or more specifically a tank attached to the firewall, that I got
my first "You're kidding me, right?" moment with this kit.
At the tank's top attachment brackets, the instructions have you attach
two very, very tiny 1/35 scale wing-nuts. Yes, separately molded wing-nuts.
The assembly step has an exploded view of the sprue section, apparently
to show you what they are. I
grabbed the sprue and a magnifying glass and sure enough, little tiny wing-nuts
at the end of little tiny sprue.
Amazing. Simply impressive finesse of molding.
But since I was sure 1) I would lose them the moment I removed them from
sprue (there are bigger plastic shavings on the bench) and 2) they would
disappear in any blob of glue I used to attach them ..... I just moved on.
It was here that I sorta lost interest and took a break.
It wasn't intentional but it just got moved to the back of the bench
while I worked on other projects. I
do have a theory on this though, looking back on it.
Most kits you work on start to "take shape" after a while.
Here, I already had over a hundred tiny parts assembled, with a lot of
detail and effort, but really all I had to show was a chassis, not even a
complete one yet. Granted, a very
nice chassis mind you and one with an extraordinary amount of detail.
But it still wasn't taking shape yet.
So I put it aside, for now.
Fast forward several weeks: I got it back out and continued work on the main
floor detail. I assembled storage
boxes, linkage cases, instruments, steering wheel assembly, etc.
Adding individual tiny 37mm shell cartridges to racks was not my idea of
fun, but was to be repeated many times.
And then there was the drivers seat.
Very nicely rendered, and very, very delicate.
Not much at all for decent gluable surfaces though.
This seat was to be a major source of frustration.
I should have kept track of how many times I broke off the seat back.
A light bump, heck, even a sideways glance would break it free.
I swear a couple times it fell apart on its own just out of spite.
I finally left it off; figured I'd glue it back on right before I fixed
the body top.
Speaking of breaking things, I was already at the point in the build where I
really had to be careful of how I picked it up.
A whole lot of levers and pedals and other doodads were all sticking up
at various angles just waiting to be snapped off.
I did good though ....... mostly.
After another break of a few weeks I started looking through the next few
assembly steps to see what was next:
Interior side-wall detail.
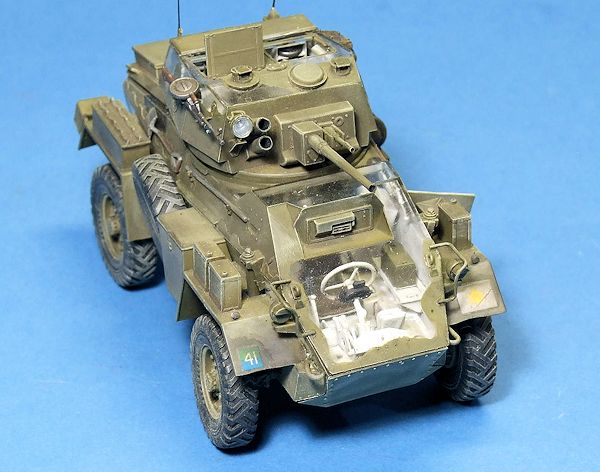
So really for the first time I had to think about how I wanted this to look when
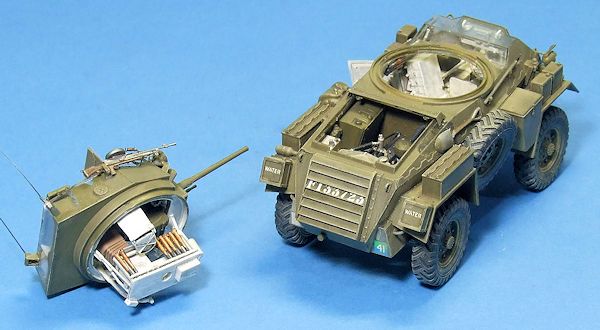
finished. I thought about using all
the clear bits but in the end decided to go half and half.
Use the normal parts for one side and the clear pieces for the other and
the top.........the thought being that from
 one side
it will look like a normal kit but from the other more like a cut-away museum
piece to show off the detail. The
turret will also be clear. So with
this in mind, I started on the sidewalls.
To the gray left side I added as much detail as I could then painted it
all white. To the right clear side
I assembled the various bits, painted them, and then attached them using Testors
clear parts cement. So this is what
I did for the next few weeks, assemble and add interior detail.
one side
it will look like a normal kit but from the other more like a cut-away museum
piece to show off the detail. The
turret will also be clear. So with
this in mind, I started on the sidewalls.
To the gray left side I added as much detail as I could then painted it
all white. To the right clear side
I assembled the various bits, painted them, and then attached them using Testors
clear parts cement. So this is what
I did for the next few weeks, assemble and add interior detail.
And detail
there is. An ammo rack of 13 shells
will consist of 13 individual shells plus 3 or 4 pieces of the rack itself.
Storage boxes are multi-piece ... the simple ones might be 4, most are
double that, with separate mounting brackets, handles, and supports.
Even the main battery has separate battery clamps on top .... again very
minute pieces. Once again these are
not complaints. My point here
is that the detail is simply stunning.
Just amazing. So, onward.
More ammo
racks, a very nice front view-port, multi-piece of course. :)
You can position this open or closed ... I closed mine up.
And here again I moved the kit aside and took a needed break from it.
A month or
two later and I'm ready for another session.
I grabbed the clear top body piece and, studying the instructions, opened
up the many holes dictated.
There are a couple options for the front deck, so pay close attention to which
holes you open up. Drum roll please
...... It is finally time to close this little beast up.
Somewhat over a year here and it still doesn't really look like anything.
That will change soon! Dry
fitting the side panels showed some misalignment ....
somehow I got the firewall position a bit off.
It was easy enough to fix, but again be very careful of part location, it
can bite you down the line.
With that
addressed I was able to glue the left side panel on.
After test fitting the other body panels too ensure everything lined up,
I set it aside to dry thoroughly. I
went to work on the wheels in the meantime.
Fairly simple constructs ..... odd for this kit.
Back to the body, I glued, one last time, the driver's seat backrest back
on. Then I carefully attached the
clear top and right side panels, along with the lower front plate.
Okay, closed up finally .... still doesn't look like much though.
At this point it was a very odd looking structure.
I left this odd looking structure dry completely while I moved on to
other things.
These other
things were the fenders. Four
separate fenders with lots of boxes and crates on them.
The boxes/crates are all multi-piece, and most have PE detail additions.
Since myself and PE don't see eye-to-eye most of the time, after a couple
of bad attempts to form these brackets or hold-downs, I let things be and moved
on. If one has the ability to work
well with photo-etch parts, the detail would be superb.
BUT ....... I have to admit the PE saved my derriere here too.
Looking at the body, I saw some ugly top/side panels seams.
Nothing that some sanding wouldn't take care of but these were on clear
parts. I really didn't want to do
any sanding here. Luckily (or
possibly intentionally designed this way), there are saw-toothed strips of PE
that go right along these seams, covering things up nicely.
 Time to
look at the turret. Two main
groupings here, the turret shell and the turret cage.
I worked on whatever sub-assemblies I could find, painted anything that
goes inside white. Again, the
detail here is stunning. Little
tiny grenades fit into plastic/PE racks on the turret sides.
The sighting periscopes, normally one or two pieces, are here made up of
no less than seven each. The radio
is very well done, good detail, connection cables, and a gorgeous PE front
cage/guard. The fidelity of the
parts and therefore the tiny, or complete lack of, attachment points were the
only problems here. I could not
keep the gunners seat together until I drilled tiny holes in the parts and added
small pins to help give it some strength.
For the same reason, I had to be very conscious of how I picked up,
handled, and set the assembly down as to keep various bits from breaking off.
I glued the gun assembly, and then to my surprise found later that the
casing chute was too long, which prevented the turret cage from mating up to the
turret top. I gingerly broke of the
chute and cut it shorter until everything fit proper.
Time to
look at the turret. Two main
groupings here, the turret shell and the turret cage.
I worked on whatever sub-assemblies I could find, painted anything that
goes inside white. Again, the
detail here is stunning. Little
tiny grenades fit into plastic/PE racks on the turret sides.
The sighting periscopes, normally one or two pieces, are here made up of
no less than seven each. The radio
is very well done, good detail, connection cables, and a gorgeous PE front
cage/guard. The fidelity of the
parts and therefore the tiny, or complete lack of, attachment points were the
only problems here. I could not
keep the gunners seat together until I drilled tiny holes in the parts and added
small pins to help give it some strength.
For the same reason, I had to be very conscious of how I picked up,
handled, and set the assembly down as to keep various bits from breaking off.
I glued the gun assembly, and then to my surprise found later that the
casing chute was too long, which prevented the turret cage from mating up to the
turret top. I gingerly broke of the
chute and cut it shorter until everything fit proper.
| COLORS & MARKINGS |
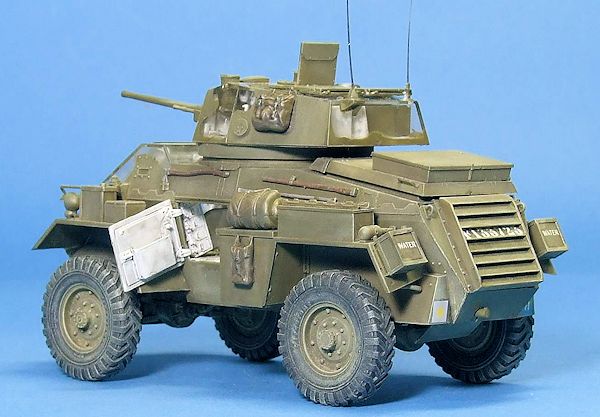
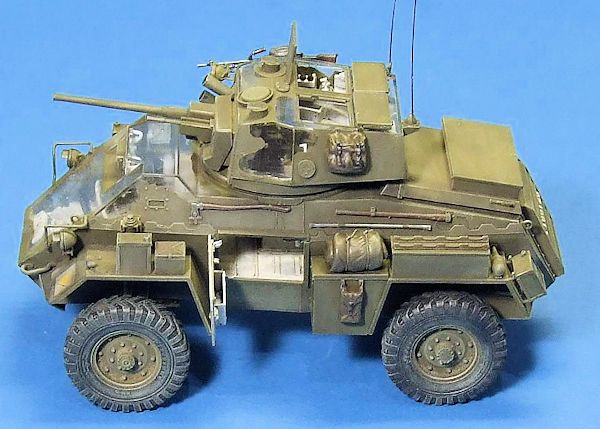
Time for some paint. Olive Drab
overall ..... mostly. This took
some thought, and some time. I had
wheels and fenders, neither of which posed any problems.
But the body and turret were going to be interesting.
Lots of open hatches and we don't need any stray spray getting inside on
the clear bits. So soft foam was
cut into squares and fit in the openings.
I applied a liquid mask thickly to the areas I wanted to keep clear and
let this dry, then took it all to the spray booth and blasted away.
I let this dry overnight, narrowly avoiding the temptation to pull the
mask off right away.
The apprehension meter was pegged the next morning as I removed the mask ....
but for naught.... all went well and I was a very happy camper.
I brush painted some areas, mostly corners and joint lines to
 hide the
glue, but overall it looked good. I
attached the fenders, brush painted the tires a very dark gray (almost black)
and attached all five (spare included).
Unfortunately, the front tires had very small attachment points and did
not hold the weight. The next
morning it was sitting on it's axle with a front wheel askew.
I re-glued but the result was the same.
In the end I sanded flat the join area, drilled small holes in the axle
and wheel, then inserted a metal pin (from a small paper clip) and super-glued
it together. Much better.
The few decals went on without incident, and with that out of the way, I
gave the painted areas a thin black wash to bring out the details, being careful
to keep it away from the clear bits.
I dry-brushed then with a tan/sand color from a Tamiya weathering set to
highlight edges and such. I kept
weathering to a minimum for no other reason than being afraid of marring the
clear areas irreparably. A few
final bits were added, along with antenna made from stretched sprue.
I looked things over, gingerly set the model at the back of the table and
thought "Wow, I did it. I'm done."
hide the
glue, but overall it looked good. I
attached the fenders, brush painted the tires a very dark gray (almost black)
and attached all five (spare included).
Unfortunately, the front tires had very small attachment points and did
not hold the weight. The next
morning it was sitting on it's axle with a front wheel askew.
I re-glued but the result was the same.
In the end I sanded flat the join area, drilled small holes in the axle
and wheel, then inserted a metal pin (from a small paper clip) and super-glued
it together. Much better.
The few decals went on without incident, and with that out of the way, I
gave the painted areas a thin black wash to bring out the details, being careful
to keep it away from the clear bits.
I dry-brushed then with a tan/sand color from a Tamiya weathering set to
highlight edges and such. I kept
weathering to a minimum for no other reason than being afraid of marring the
clear areas irreparably. A few
final bits were added, along with antenna made from stretched sprue.
I looked things over, gingerly set the model at the back of the table and
thought "Wow, I did it. I'm done."
| CONCLUSIONS |
This kit is simply amazing. The
level of detail is astounding, as is Bronco's ability to mold such tiny pieces
with such finesse. If this review
sounds negative in areas, it is not directed at the kit, but more so at my
inability to work easily with such small parts. There are easily dozens of parts
that I left off, either through breakage while removing from the sprue, losing
them outright, or just being too small to actually work with.
It was frustrating in areas to be sure, but this kit isn't about ease of
assembly. It is about detail at all
costs. For somebody with the
dexterity required, the time required, and the passion required, a true museum
piece could be built, right from this kit.
| REFERENCES |
The internet
September 2013
Thanks to the editor and
www.dragonmodelsusa.com for the review kit. You can find this kit at your favorite
hobby shop or on-line retailer.
If you would like your product reviewed fairly and fairly
quickly, please
contact
the editor or see other details in the
Note to
Contributors.