| KIT #: | 35077 |
| PRICE: | $51.50 MSRP ($29.95 from www.scale-model-kits.com ) |
| DECALS: | Four options |
| REVIEWER: | Drew Nix |
| NOTES: | Recommended for the modeler with several multi-part kits under his belt |
| HISTORY |
In 1938 the British War Office
issued a specification for a scouting vehicle. Out of three designs submitted by
Alvis, BSA and Morris, the one by BSA was selected. The actual production was
passed to Daimler, which was a vehicle manufacturer in the BSA group of
companies. The vehicle was officially designated Daimler Scout Car, but became
widely known as Dingo, which was the name of the competing Alvis prototype.
 Arguably
one of the finest armoured fighting vehicles built in
Arguably
one of the finest armoured fighting vehicles built in
Although the Dingo
featured a flat plate beneath the chassis to slide across uneven ground, it was
extremely vulnerable to mines. No spare wheel was carried, but it was not really
necessary because of the use of run-flat (nearly solid) rubber tyres instead of
pneumatic. Despite the hard tyres, the independent suspension gave it a very
comfortable ride. A swiveling seat next to the driver allowed the other crew
member to attend to the No. 19 wireless set or Bren gun when required.
The Dingo was first
used by the British Expeditionary Force (1st Armoured Division and 4th
Northumberland Fusilers) during the
The Mk
| THE KIT |
 One of
the more recent releases by the Ukrainian company of MiniArt in a series of
Dingo scout vehicles is the British Daimler Dingo Mk.
One of
the more recent releases by the Ukrainian company of MiniArt in a series of
Dingo scout vehicles is the British Daimler Dingo Mk.
| CONSTRUCTION |
The body of the Dingo is built as per
the prototype.
The two sides and two end bulkheads are added to the bottom.
This part of the instructions is the first hint of
confusing times to come.
One has trouble determining which end of the bottom
piece is the front and which is the back.
After much test fitting and many thoughts on MiniArt’s
instruction sheet, most of which can’t be printed in a family-oriented webpage,
I think I got it right.
The rest of the first page of instructions is concerned
with the building of the interior bits.
Here MiniArt was determined to leave no stone unturned.
Every bit and piece that can be molded separately is
molded separately.
This can lead to placement and alignment problems.
For example, the driver’s seat is made up of 4 pieces
and the commander’s seat is composed of 4 separate pieces as well.
These seats could just as easily have been done with
half that number.
Since the Dingo was an open topped vehicle, I painted as
I went along.
The main paints I used were Tamiya acrylics
 and
and
Be careful
installing the steering wheel, try as I might I could not get it to sit up above
the driver’s seat.
The tires and wheels are next.
Here MiniArt chose to mold them in a funky way.
Each wheel consists of the tire and outer wheel molded
as one piece and the inner portion of each wheel as a separate insert.
Page 2 of the instructions continues
with adding various bits to the interior walls of the main cabin.
Many photo-etched pieces are used throughout this build.
I strongly recommend that the builder anneal the p-e
before using it.
I held the fret over the flames of a gas range to anneal it.
Annealing
the brass makes it easier to bend and work with.
After the inner bits have been added each individual
side is added to the cabin floor.
Thankfully fit here is very good although I did have to
use some filler here and there.
I like to use either Tamiya putty (if you can find it)
or Apoxie-Sculpt two-part filler, depending on the size and location of the area
to be filled.
The individual suspension parts are
also constructed on page 2.
Each suspension unit is made up of 7 individual parts
and is supposed to replicate the movement of the original Dingo suspension.
This is all well and good, but it makes for a very
fiddly build and trouble later on getting each individual wheel aligned
correctly on the finished model.
Again over engineering rears its ugly head.
On page three things start to come
together.
The completed suspension builds are installed as are a few of the
many hatches that festooned the Dingo.
The builder has the option of showing these hatches
opened or closed.
I chose open for most of the ones I used.
A word about the radio aerial supports is necessary.
The supports themselves are not too difficult, but the
funky way that MiniArt uses to attach the parts to the sprue make the use of the
aerials themselves problematical.
The sprue representations of the aerials are way over
scale anyway, so I replaced both aerials with piano wire cut to size.
I found the piano wire at
 Be
careful trying to build up the shock absorber units.
They must fit precisely to look right.
Getting them to fit right is another story.
I worked and I sweated and I said many things I later
regretted before solving the mystery of the shock absorber installation.
There is really no way to describe how to do it, you’ll
just have to experiment yourself to see what best works for you.
Be
careful trying to build up the shock absorber units.
They must fit precisely to look right.
Getting them to fit right is another story.
I worked and I sweated and I said many things I later
regretted before solving the mystery of the shock absorber installation.
There is really no way to describe how to do it, you’ll
just have to experiment yourself to see what best works for you.
The Dingo had one or two jump seats
behind the main cabin.
According to the instructions, one is supposed to bend
two flat pieces of p-e to get the seat backs.
Yeah, right.
The p-e pieces are flat, almost two-dimensional strips
that you are supposed to magically be able to bend into a 3D seat support.
I’m not saying that it can’t be done, I’m just saying
that try as I might I couldn’t do it.
My last effort ended up looking like Silly Sting!
No problem, I replaced them with Evergreen sprue rod
bent to the appropriate shapes then glued in place.
Voila, instant, and in my opinion, better looking, more
to scale seat back supports.
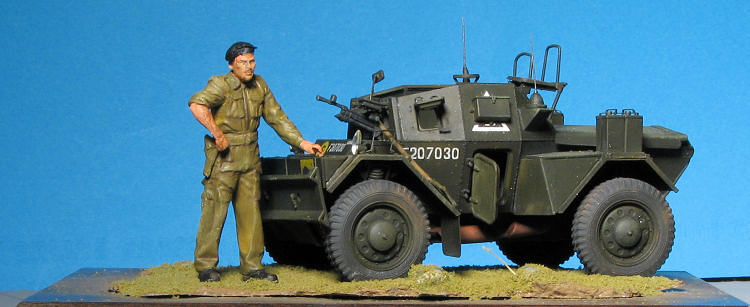
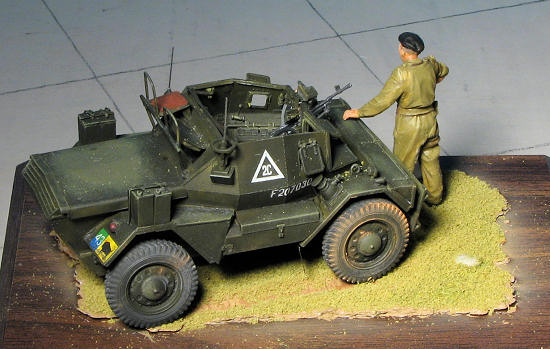
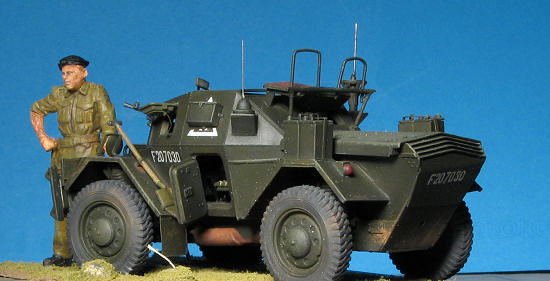
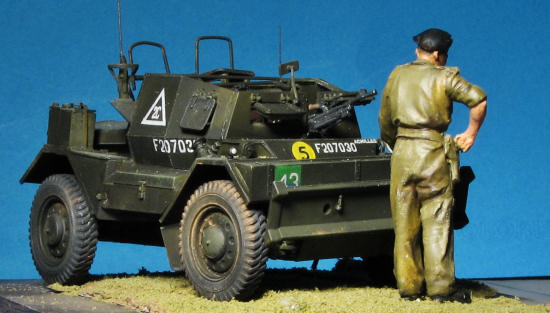
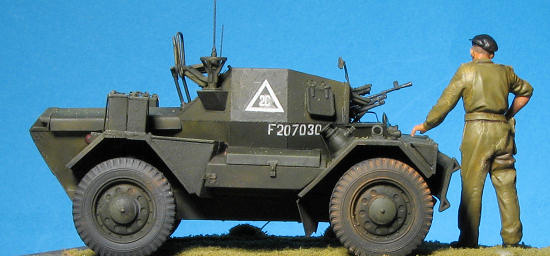
The kit comes with a great representation of the Dingo’s main weapon, the Bren Mk.I machine gun. In some Dingoes a Boys antitank rifle was substituted for the Bren. Since the Dingo was only meant to be used as a limited scouting vehicle, it was presumed that a heavy offensive weapon would not be needed. After all, the Dingo was supposed to scout out enemy positions then skedaddle, not stand and try to fight with even enemy infantry let alone armored cars or armor.
| COLORS & MARKINGS |
 As
mentioned earlier, most of the airbrushing was done with Tamiya acrylics, in
this case XF-62, Olive Drab.
The main body of the vehicle was painted with the wheels
off.
Next the decals were added.
First, the area where the decal is to rest is given a
light brush coat of Future floor polish.
The decal is then slid into place and pressed down.
After the decals had dried thoroughly (about 24 hours),
a mixture of Testors Dullcote lacquer thinned 50/50 with Testors Metallizer
Thinner was sprayed over the decaled areas.
No silvering of the decals was observed using this
method.
The Dullcote can also be thinned with regular lacquer thinner with the
same results.
I have models that are several years old now that have been
finished with this method with still no sign of any yellowing, even on white
areas.
As
mentioned earlier, most of the airbrushing was done with Tamiya acrylics, in
this case XF-62, Olive Drab.
The main body of the vehicle was painted with the wheels
off.
Next the decals were added.
First, the area where the decal is to rest is given a
light brush coat of Future floor polish.
The decal is then slid into place and pressed down.
After the decals had dried thoroughly (about 24 hours),
a mixture of Testors Dullcote lacquer thinned 50/50 with Testors Metallizer
Thinner was sprayed over the decaled areas.
No silvering of the decals was observed using this
method.
The Dullcote can also be thinned with regular lacquer thinner with the
same results.
I have models that are several years old now that have been
finished with this method with still no sign of any yellowing, even on white
areas.
After the wheels were added, and being
sure that all four wheels touched the surface at the same time, the weathering
began.
I use a modified Chris Mrosko method of weathering.
First, a thinned mixture of Testors flat black, the
little square bottle works just fine, is sprayed all over the outside of the
vehicle.
The thinning ratio I use is one part flat black to 10 parts thinner.
The resultant mixture flows into all of the low areas,
cracks and crevices of the model, a wash of sorts.
After that dries, a very thin mixtures on Raw Sienna and
Raw Umber oil paints are allowed to flow from top to bottom at various points on
the vehicle where rain and other elements would stain the finish.
Careful here!
A little of this effect goes a long way.
After I’m satisfied with the results so far, I begin to
drybrush a lighter coat of the base coat on various parts of the vehicle where
the paint would have begun
 to fade.
Since Tamiya acrylic paints are notoriously bad for
brush painting, I substituted Testors OD mixed with a little Testors Faded OD.
Large flat areas and edges were subject to special
attention.
Next another coat of Dullcote is sprayed over the vehicle to
blend everything together.
After that is dried, I like to use pastel chalks to
replicate dust, rust, and general use.
I recommend that, if you can, you get a set of TV chalks
(various shades of gray) as well as Earth tones.
to fade.
Since Tamiya acrylic paints are notoriously bad for
brush painting, I substituted Testors OD mixed with a little Testors Faded OD.
Large flat areas and edges were subject to special
attention.
Next another coat of Dullcote is sprayed over the vehicle to
blend everything together.
After that is dried, I like to use pastel chalks to
replicate dust, rust, and general use.
I recommend that, if you can, you get a set of TV chalks
(various shades of gray) as well as Earth tones.
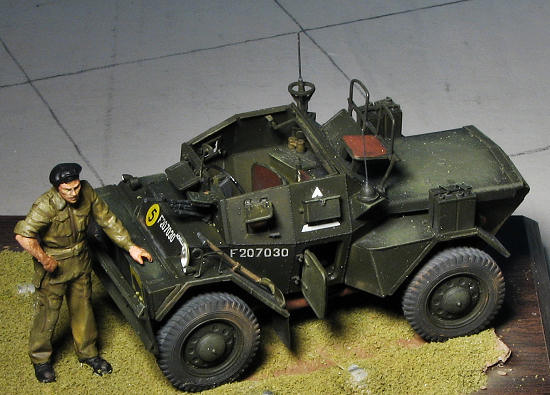
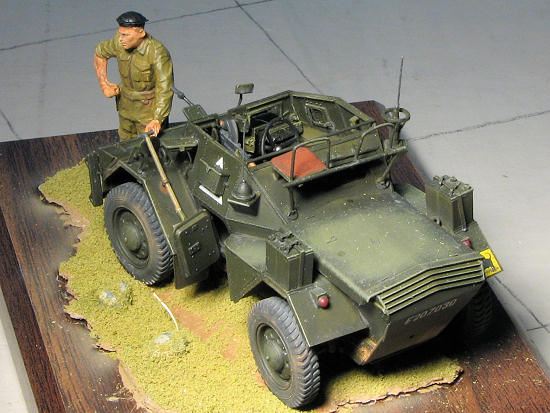
The figure was next. I like to have at least one figure either on or standing next to the vehicle being displayed. I think it adds interest and a feeling of perspective as to the size of the vehicle. I also try to either find a figure that is posed as naturally as possible by the sculptor, or, as in this case, construct one myself from available sources. In this case I used the figures that came with the kit. The legs, lower torso, and upper torso are from the commander figure. The left arm, head, and beret were from the maniacal driver figure. I must admit that I cheated to get the right arm for the pose I had in mind. This piece came from the original MiniArt British Armored Car Crew kit. I don’t remember which figure I stole it from. Painting figures is the subject of another discussion. Suffice it to say that the figure was painted and detailed using Panzer Aces (a division of Vallejo) and Vallejo acrylics.
| CONCLUSIONS |
This
is not a kit for the faint hearted.
The finished product was wrestled into submission.
I ended up substituting many parts for kit parts.
I’ve already mentioned the radio aerials and the seat
backs.
I also had to substitute Grandt Line nuts for some of the kit’s
ridiculously small and almost impossible to work with p-e bolt heads. I also
used an M.V. Products lens to replace the headlight eaten by the carpet monster.
Things I said
while building this kit:
“Why, I oughta…!”
“You dirty fricken
fracken piece of…”
I also called it a working lady of the street on more than one occasion.
| REFERENCES |
The above mentioned You Tube walk around video was of tremendous help.
May 2010 Thanks to
www.scale-model-kits.com
for the review kit. You can find this and many other fine models and accessories
at the link. If you would like your product reviewed fairly and quickly, please
contact
me or see other details in the
Note to
Contributors.