Siga 1/72 T-55 Medium Tank
|
KIT: |
Siga 1/72 T-55 Medium Tank |
|
KIT # |
52315 |
|
PRICE: |
$ |
|
DECALS: |
7 versions |
|
REVIEWER: |
|
|
NOTES: |
Reboxed Ace kit |
|
HISTORY |
Scott saved me some work by doing the preview of this kit with a short description of the history.
|
THE KIT |
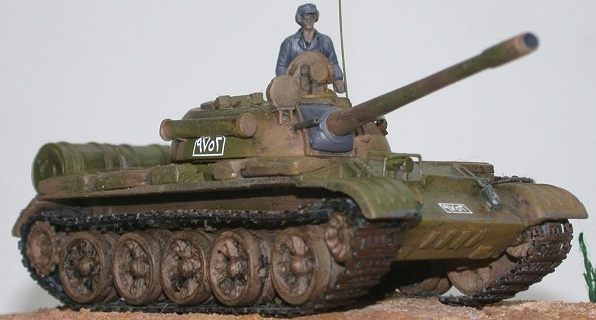
This Siga kit was originally sent to an armor modeler in our local club that unfortunately could not start it due to work commitments so past it on to me, please be aware that I have little to no knowledge of tanks or armor and the old saying "ignorance is bliss" applies here and I apologize beforehand for any accuracy or color issues that AFV experts may pick up from the photos.
 On receiving the Siga T-55 the one
thing that struck me was the quality of the moldings, due to the low pressure
molding techniques that Siga employ for most of their molds the detail is very
soft and all the parts have flash and molding pips. Instructions are well
printed with good painting options for all the versions but turned out to be a
little confusing for this newbie armor molder and I ended up getting a few
things the wrong way around.
On receiving the Siga T-55 the one
thing that struck me was the quality of the moldings, due to the low pressure
molding techniques that Siga employ for most of their molds the detail is very
soft and all the parts have flash and molding pips. Instructions are well
printed with good painting options for all the versions but turned out to be a
little confusing for this newbie armor molder and I ended up getting a few
things the wrong way around.
Siga note that this model is not suitable for modelers under the age of ten and I whole heartily agree with that, also experience with limited run kits, Vacuforms and scratch-building would be an advantage when tackling this kit.
Decals are provided for seven options and look very thin and glossy, in the past the Siga decals have been some of the best I have used and this sheet is no different.
|
CONSTRUCTION |
Assembly starts with the cockpit ...erkk wait a minute, tanks don't have them or wings or props, hmm looks like I'm going to have to actually read the instructions for this one. With the T-55 the modeler has to build the hull up from four parts and all of them do not fit! I had to hack, file, sand and trim each piece to get the four pieces to fit together.
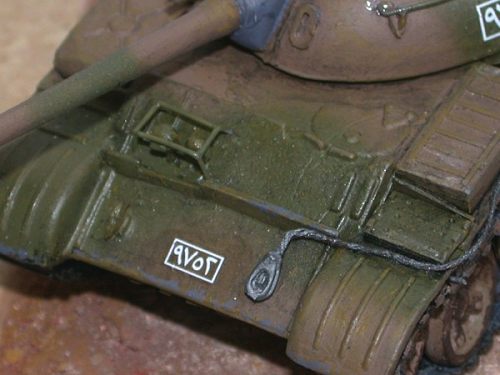
 Plates on the hull were removed and
added from 5 tho plastic card so they didn't look so soft. Once the lower hull
was dry the top hull was wrestled from the sprue and again hacked, filed and
sanded to shape, you sensing a pattern here already? All rear engine detail was
removed and rebuilt using 5 tho card and fine mesh, the access hatches were
scraped off and added the same way.
Plates on the hull were removed and
added from 5 tho plastic card so they didn't look so soft. Once the lower hull
was dry the top hull was wrestled from the sprue and again hacked, filed and
sanded to shape, you sensing a pattern here already? All rear engine detail was
removed and rebuilt using 5 tho card and fine mesh, the access hatches were
scraped off and added the same way.
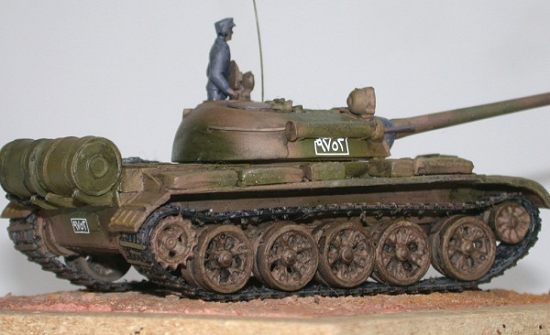
The turret came into some cleaning up next with a number of pips having to be removed from the sides and top of the turret. The 100mm Gun barrel was carefully scraped and sanded to a round profile and the end drilled out, these small modifications dramatically improve the look of the barrel and are well worth spending the time to do.
Tracks' n things, well it was here that the Siga kit almost got trashed, each suspension arm consisted of little more than a shapeless blob. Each arm was removed and cleaned up as best as I could get it but you basically end up carving the arms out of a block of misshapen plastic, I found the easiest way to align them on the hull was to cut off the mounting tab and Mk 1 eyeball the arms.
 The Drive wheels and road wheels were
soft, lacking detail and ranged in shape from oval to triangular, lots of
cutting, filing and sanding was needed on each piece and with two pieces per
wheel this became very tedious and I'm still not happy with the end result.
Small-scale armor modelers probably would be able to dive into their spares box
and replace them but I don't have any tank spares at all. If this had not been a
review model provided by FBN then the whole lot would have ended up in the
rubbish.
The Drive wheels and road wheels were
soft, lacking detail and ranged in shape from oval to triangular, lots of
cutting, filing and sanding was needed on each piece and with two pieces per
wheel this became very tedious and I'm still not happy with the end result.
Small-scale armor modelers probably would be able to dive into their spares box
and replace them but I don't have any tank spares at all. If this had not been a
review model provided by FBN then the whole lot would have ended up in the
rubbish.
Siga provide the tracks as separate track linkages that normally make for a more realistic appearance, unfortunately the linkages are so poorly molded they were unusable with my limited modeling skills. To Siga's credit they have since released a "Update track link set" that is far better molded but was unable to get one in time. I took the easy way out and borrowed a set of "rubber band" tracks from an old Panther model my son did some time ago, completely the wrong type of track but at this point I couldn't have cared less, as least it would have tracks.
I wont bore you with more stories of hacking, sanding, trimming etc suffice to say that every part on the T-55 needs to be wrestled from the sprue and lots of time put into the clean up before you can glue it on your model. Some of the smaller bits would have been better off done in an etched brass set rather than the low-pressure injection molding done by Siga.
|
CAMOUFLAGE & MARKINGS |
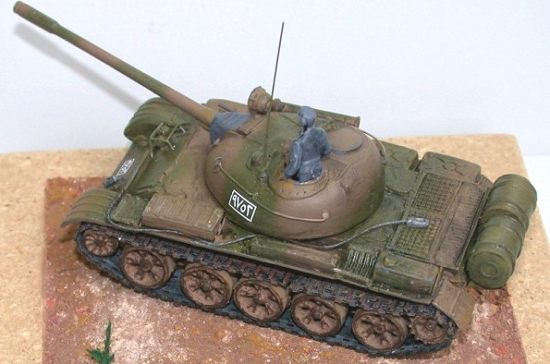
 As mentioned in the instruction you get
seven different decal and paint options and after much pondering decided on the
Syrian scheme of sand and khaki green. The sand was brush painted on to ensure
it covered all the nooks and crannies that airbrushing would have missed, when
dry I airbrushed the khaki green in wide stripes over the hull and turret as
shown on the instruction plans.
As mentioned in the instruction you get
seven different decal and paint options and after much pondering decided on the
Syrian scheme of sand and khaki green. The sand was brush painted on to ensure
it covered all the nooks and crannies that airbrushing would have missed, when
dry I airbrushed the khaki green in wide stripes over the hull and turret as
shown on the instruction plans.
Once the paint had hardened off my HP printer ink wash went over the entire tank to highlight the detail and give it a grubby used look. Weathering was done with a combination of pastels and drybrushed oils. Once I was happy with the weathering a coat of future sealed everything in and prepared it for the decals and like most Siga decals went down with no fuss.
Final work consisted of a mist of matt varnish over the model to dull down the gloss finish and the addition of the tow ropes and tank commander.
|
CONCLUSIONS |
It is a pity that Siga couldn't re-kit the T-55 with the new set of tracks and wheels as this is really the worst part of the kit, the rest of the tank can be made to look very presentable with a little work, but the tracks and wheels are just shocking.
You have to remember that the Siga/ACE T-55 is a limited run kit and needs to be treated as such, apart from the wheels and tracks the rest of the kit went together with no more work than any limited run kit and for me made a welcome change from my usual aircraft diet. My thanks to FBN productions for the review sample.
|
REFERENCES |
Did a search for T-55 with the major search engines.
http://www.sovietarmy.com/vehicles/t-55.html
http://www.bharat-rakshak.com/LAND-FORCES/Army/Images-MBT5.html
Box Top and instructions
If you would like your product reviewed fairly and quickly, please contact
me or see other details in the Note to
Contributors.