Airfix 1/72 RAF Refueling set
| KIT #: | 03302 |
| PRICE: | $8.98 MSRP |
| DECALS: | Two options |
| REVIEWER: | Greg Ewald |
| NOTES: | Two separate vehicles: This is just the Bedford tanker |
| HISTORY |
The first part of this review will be dealing with the Bedford Q.L. refueling platform, possibly one of the most widely used 4x4 vehicles in the 40’s and 50’s. The stable structure lent itself quite well to the needs of smaller airfields, and the near 12 foot wheelbase gave the 6 cylinder powered beast the ability to race around the rough terrain, filling up hurricanes and mosquitoes as needed.
The frame of the truck did limit, however, the amount of fuel that could be carried, and the QL topped out at only 950 gallons of petrol, meaning that it was of partial use for a large air wing.
| THE KIT |
 This tiny truck kit
has 63 pieces that go into it, some of them quite small and finicky…I
recommend the use of hemostats or tweezers for much of the construction.
Molded in light grey styrene with quite a lot of flash, this one took a lot
of cleaning up with a scraper and some 200grit sandpaper.
This tiny truck kit
has 63 pieces that go into it, some of them quite small and finicky…I
recommend the use of hemostats or tweezers for much of the construction.
Molded in light grey styrene with quite a lot of flash, this one took a lot
of cleaning up with a scraper and some 200grit sandpaper.
No windscreens are included, so you will also need KrystalKleer or a like product.
The instructions for both trucks are unfortunately very poor (odd for Airfix) and are printed on one page of a folded section of paper, hence the reason for breaking up this review. A small historical paragraph is included, as well as a schematic for Humbrol colours.
| CONSTRUCTION |
I am going to take this one step by step, so that you can avoid the mistakes I made trying to puzzle out the directions supplied by the manufacturer.
Step 1: The cab is made up of 9 pieces with no locating pins, just angles. Attach part 4 (the interior front panel) to the front of the truck prior to gluing it to the main body, then attach the rear of the cab and the roof at the same time. Use a slow setting glue for easiest results. There is no steering column or wheel provided, so you will need to scratchbuild one, I used an old 1/72nd radio loop antennae with some stretched sprue for the crossbraces and column.
 Step 2: Make
sure you assemble the undercarriage on a level surface…I did not, and will
be paying the price ! The leaf springs are somewhat hard to locate
properly, and only work if put on if facing the right direction…pay close
attention to the diagram. Part 13, the main drive shaft, needs to be put
in with the longest pin towards the front of the frame. On the brighter
side, Airfix includes solid tires for this model, not the usual two piece
affairs that require a lot of sanding, and separate wheels, so painting is
a breeze.
Step 2: Make
sure you assemble the undercarriage on a level surface…I did not, and will
be paying the price ! The leaf springs are somewhat hard to locate
properly, and only work if put on if facing the right direction…pay close
attention to the diagram. Part 13, the main drive shaft, needs to be put
in with the longest pin towards the front of the frame. On the brighter
side, Airfix includes solid tires for this model, not the usual two piece
affairs that require a lot of sanding, and separate wheels, so painting is
a breeze.
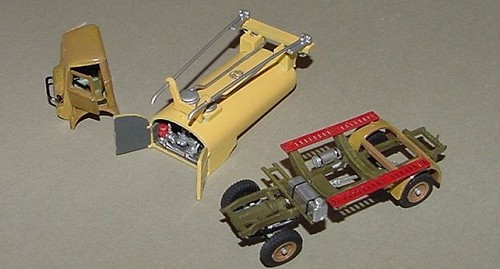
Step 3: The cradles that hold the fuel tank should be assembled first, filled and sanded as necessary, then attached to the frame. I had to notch both of mine out substantially to get them to fit correctly. The small gas tanks are molded in one piece units and have good locating mounts. Platform walkways are on either side of the truck, and the locating pins/receivers on mine had to be removed completely for a good fit. Oddly enough, the rear fender assembly almost falls into the correct spot!
Step 4: If you are old enough, I recommend having a drink during this one. Assemble the main tank halves and front piece (it has “top” printed on the inside so you know which end is up) and fill and sand. The arch supports for the fueling crossbeam are extremely hard to get into the correct position, a dremel tool with a round sanding bit works wonders here. If these are put on even slightly off skew, the crossbeam that holds the refueling wands (part 60) will not sit level with the cab and the frame, so be careful !
 The lines from the
top of the tank ports to the wands are also tricky to get into place, I
found the best way was to glue the upright portion to the crossbeam, let
dry, then dry fit to the ports. Once you have them positioned correctly,
use a glue applicator to cement them in place.
The lines from the
top of the tank ports to the wands are also tricky to get into place, I
found the best way was to glue the upright portion to the crossbeam, let
dry, then dry fit to the ports. Once you have them positioned correctly,
use a glue applicator to cement them in place.
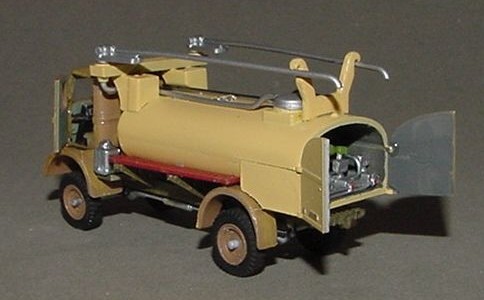
The inside of the tank in an exercise in patience…gluing in the downspouts (48 and 50) first, and then the receiver pumps (44 and 45) worked the easiest for me, as you have to fit the back of the spout’s line into the pump. H-Stats and some deep breaths did the trick!
A compressor bottle has a totally ambiguous fit into the middle of the machinery, there is a small inset diagram that shows the location of all the parts, but good luck on getting it to look like that, it took me several tries before I was happy with the fit. I ended up gluing I the end bit of a snipped off paper clip to make it match a grainy photo…guesswork here.
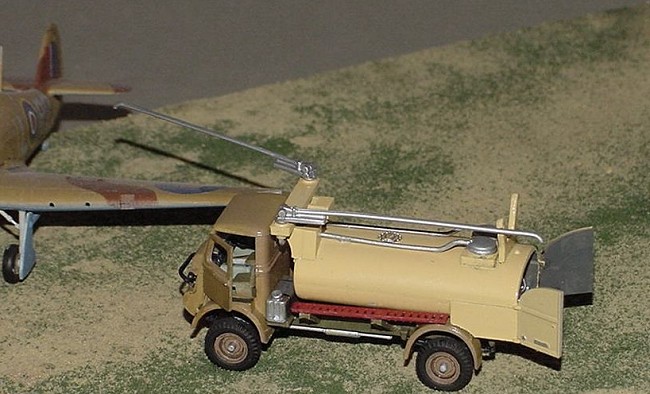
I did not glue on the refueling wands, as I plan on using this vehicle in a diorama with our group build Hurricane. The rear doors were painted and glued on open, so that the little bits and pieces could all be viewed.
| COLORS & MARKINGS |
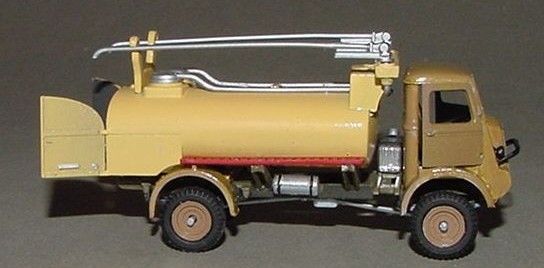
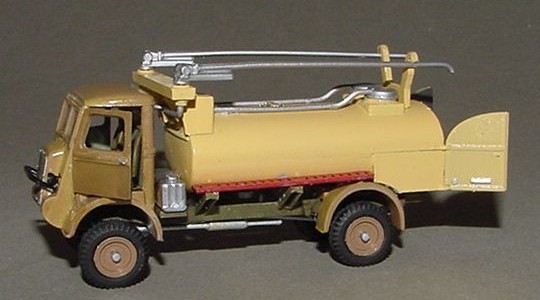 The kit includes
markings for a field truck based in Britain. Since mine was supposed to be
in North Africa, I did not use them. Schematics are supplied for a two
tone vehicle, blue gray on the bottom, and a yellow band on top. Using old
photos found on the net as a reference, I winged the colours with desert
tan, field drab, and dark grey as the primary colours. Weathering was
done lightly (I wanted a newer looking truck) with pastels and a few washes
of oily black.
The kit includes
markings for a field truck based in Britain. Since mine was supposed to be
in North Africa, I did not use them. Schematics are supplied for a two
tone vehicle, blue gray on the bottom, and a yellow band on top. Using old
photos found on the net as a reference, I winged the colours with desert
tan, field drab, and dark grey as the primary colours. Weathering was
done lightly (I wanted a newer looking truck) with pastels and a few washes
of oily black.
| FINAL CONSTRUCTION |
Krystal Kleer was used for the cab windows and rear view…you need to suspend the cab while the KK dries to prevent puddling though, as these window openings are quite large. One of the compliments associated with the Bedford, was it’s amazing range of vision from the driver’s point.
| CONCLUSIONS |
This kit is worth it’s weight in gold…despite the little fiddly bits and hard to follow instructions, so many things can be made from this base chassis, it is almost enough to boggle the mind…Bedford’s were used as weapon carriers, AA mounts, ambulances, etc. Pick this kit up!!!
July 2005
Review kit courtesy of: my cash
If you would like your product reviewed fairly and fairly quickly, please contact the editor or see other details in the Note to Contributors.