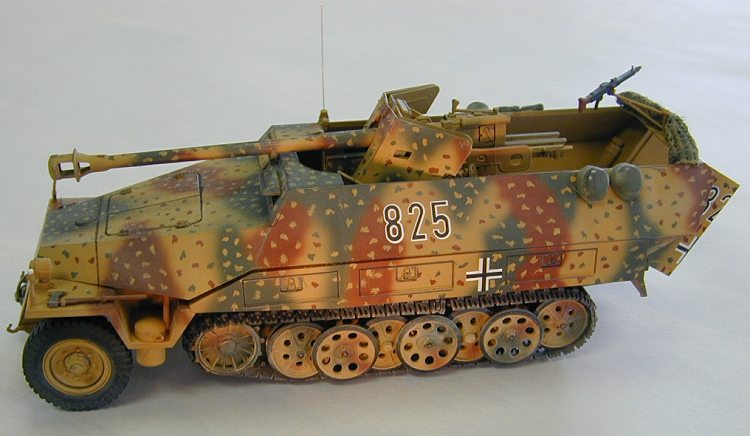
Tamiya SdKfz 251/9
|
KIT # |
35147 |
|
PRICE: |
$20 |
|
DECALS: |
See Reveiw |
|
REVIEW : |
Blair Stewart |
|
NOTES: |
Tamiya 7.5 cm Pak 40 kit (35047) added. |
|
HISTORY |
 Throughout WWII, the German Army used this vehicle extensively, and as the war
wore on, more and more variants of it came into service to meet the expanding
mission requirements (a great description of all of the vehicle¹s variants is
available on the web at Hanomag Sd.Kfz. 251). In the last stages of the war, the
Germans put every available gun on any available mount to create self-propelled
weapons. The result of this emphasis was the evolution of the SdKfz 251/22,
mounting the 7.5 cm Pak 40 (L/46) anti-tank weapon. By the time this version of
the SdKfz 251 was being produced, the Germans also produced the towed version of
the Pak 40 with a trimmed shield so it could be mounted directly to the SdKfz
251. Unfortunately, the vehicle¹s chassis and structure were not designed for
the strain of the gun¹s recoil, resulting in many mechanical breakdowns in the
field.
Throughout WWII, the German Army used this vehicle extensively, and as the war
wore on, more and more variants of it came into service to meet the expanding
mission requirements (a great description of all of the vehicle¹s variants is
available on the web at Hanomag Sd.Kfz. 251). In the last stages of the war, the
Germans put every available gun on any available mount to create self-propelled
weapons. The result of this emphasis was the evolution of the SdKfz 251/22,
mounting the 7.5 cm Pak 40 (L/46) anti-tank weapon. By the time this version of
the SdKfz 251 was being produced, the Germans also produced the towed version of
the Pak 40 with a trimmed shield so it could be mounted directly to the SdKfz
251. Unfortunately, the vehicle¹s chassis and structure were not designed for
the strain of the gun¹s recoil, resulting in many mechanical breakdowns in the
field.|
THE KITS |
 Unfortunately, no one produces a
1/35th scale kit of the SdKfz 251/22 (although I believe that Hasegawa recently
released a 1/72nd scale version of this vehicle), so creating one in this
popular armor scale requires some modifications. I am not normally one who
enjoys modifying kits, but after reading an excellent article some years ago in
Finescale Modeler by Curtiss Knowles and Glen Phillips on how to combine two
existing kits to make this particular vehicle, I decided to give it a try. Per
the article, I purchased Tamiya¹s kit of the 251/9 Ausf D (#35147). I already
had the Pak 40 gun (#35047), so I was ready to start the project.
Unfortunately, no one produces a
1/35th scale kit of the SdKfz 251/22 (although I believe that Hasegawa recently
released a 1/72nd scale version of this vehicle), so creating one in this
popular armor scale requires some modifications. I am not normally one who
enjoys modifying kits, but after reading an excellent article some years ago in
Finescale Modeler by Curtiss Knowles and Glen Phillips on how to combine two
existing kits to make this particular vehicle, I decided to give it a try. Per
the article, I purchased Tamiya¹s kit of the 251/9 Ausf D (#35147). I already
had the Pak 40 gun (#35047), so I was ready to start the project.
Both of these Tamiya kits are excellent models and a pleasure to build, with
plenty of extra equipment and a full interior included in the SdKfz 251/9 kit.
The Pak 40 has been around since the early seventies, but it still holds up well
when compared to today¹s kit standards. The SdKfz kit has no engine detail as
the hood is closed on the model, but it does have a fairly detailed driver¹s
compartment (unfortunately, this is not visible once the gun is installed in the
vehicle). The vehicle kit has vinyl tracks and a well-detailed, steerable front
suspension. The gun, of course, is boxed as the towed version of the Pak 40, so
you get all of the chassis equipment associated with a towed gun.
|
CONSTRUCTION |
 The first thing I addressed was
the vehicle. The FSM article suggested a new floorboard cut from photo-etched
brass plate for the fighting compartment, but given my cheap nature, I opted
instead to stick with the kit¹s floorboard. I sawed off the interior stowage
box, moved it to the left side, and glued one of the kit¹s seats to the box.
The FSM article provided scale drawings of all the scratchbuilt parts, so I used
those drawings as templates for the driver¹s vision plate, the roof plate, and
the ammo bins, all of which were constructed from sheet plastic. For the gun
mount H beams, I used Plastruct 1/8² I beams cut to length, then attached to
these part B28, the bottom of the gun mount, from the Pak 40 kit. Additional
sheet plastic was used at this time to form the remainder of the gun mount.
Various scrap pieces were used to make hinges for the ammo bins.
The first thing I addressed was
the vehicle. The FSM article suggested a new floorboard cut from photo-etched
brass plate for the fighting compartment, but given my cheap nature, I opted
instead to stick with the kit¹s floorboard. I sawed off the interior stowage
box, moved it to the left side, and glued one of the kit¹s seats to the box.
The FSM article provided scale drawings of all the scratchbuilt parts, so I used
those drawings as templates for the driver¹s vision plate, the roof plate, and
the ammo bins, all of which were constructed from sheet plastic. For the gun
mount H beams, I used Plastruct 1/8² I beams cut to length, then attached to
these part B28, the bottom of the gun mount, from the Pak 40 kit. Additional
sheet plastic was used at this time to form the remainder of the gun mount.
Various scrap pieces were used to make hinges for the ammo bins.
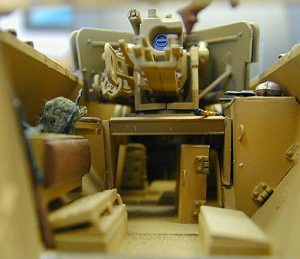
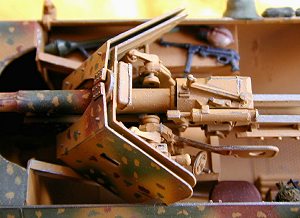 After making these vehicle modifications, I tackled the Pak 40. The first task
was to trim the bottom of the gun shield (see the FSM article for specific
instructions on how to do this), which was done on the prototype to allow the
gun to traverse on its mount inside the vehicle. Super detailers can go crazy
adding additional parts to the already excellent Tamiya Pak 40 gun kit, but I
chose to build it essentially box stock. After assembling the gun, I mounted it
to the vehicle.
After making these vehicle modifications, I tackled the Pak 40. The first task
was to trim the bottom of the gun shield (see the FSM article for specific
instructions on how to do this), which was done on the prototype to allow the
gun to traverse on its mount inside the vehicle. Super detailers can go crazy
adding additional parts to the already excellent Tamiya Pak 40 gun kit, but I
chose to build it essentially box stock. After assembling the gun, I mounted it
to the vehicle.
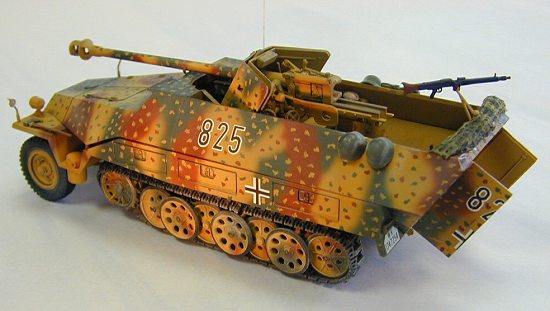
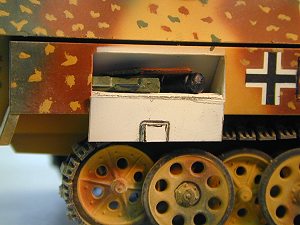 As an additional touch, I cut open one of the side stowage bins, boxed it in
with sheet plastic, and installed a sheet plastic door in the open position.
This compartment would later be filled with various pieces of crew equipment.
The rear doors were also cut out and glued in the open position.
As an additional touch, I cut open one of the side stowage bins, boxed it in
with sheet plastic, and installed a sheet plastic door in the open position.
This compartment would later be filled with various pieces of crew equipment.
The rear doors were also cut out and glued in the open position.
Numerous small arms and personnel equipment items were added to the open
internal stowage bin and hung on the sides of the vehicle. A camouflage net was
made out of gauze that had been soaked in diluted white glue, rolled up and
shaped to 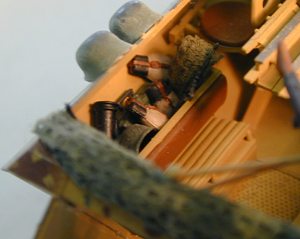 look like it was draped on the back of the vehicle. This was then
painted with olive drab paint. The kit-supplied MG42 was mounted on its pivot at
the rear of the vehicle. The kit¹s pickaxe and long handled axe were then
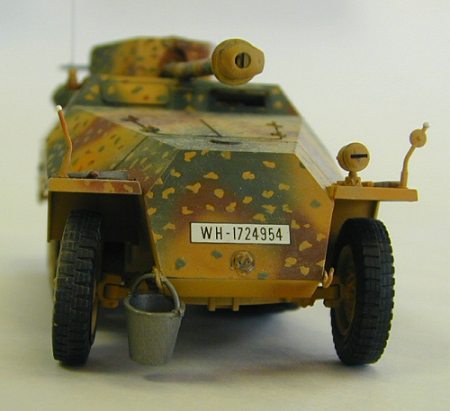
mounted to the front and left fenders. A steel pail from the spares box was
glued to one of the front tow hooks. As a final touch, a .010 inch guitar string
was cut to length and superglued into the radio antenna base to simulate the
vehicle¹s radio antenna.
look like it was draped on the back of the vehicle. This was then
painted with olive drab paint. The kit-supplied MG42 was mounted on its pivot at
the rear of the vehicle. The kit¹s pickaxe and long handled axe were then
mounted to the front and left fenders. A steel pail from the spares box was
glued to one of the front tow hooks. As a final touch, a .010 inch guitar string
was cut to length and superglued into the radio antenna base to simulate the
vehicle¹s radio antenna.
|
PAINT & FINISHING |
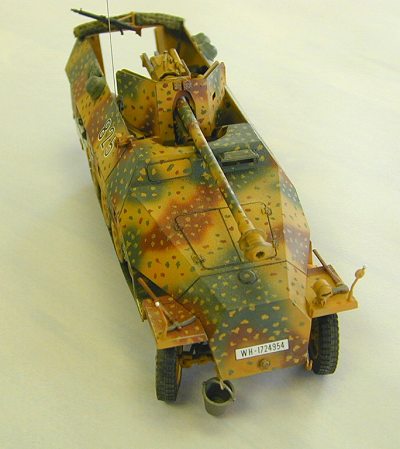 Having constructed my share of
German armored vehicles, I have grown fond of the ³ambush² scheme that
appeared in the later part of the war. Unfortunately, I had never seen a picture
of an SdKfz 251/22 painted in this scheme, so I was very worried about the ³model
correctness police² getting on my case for creating a bogus model. After
searching every available armor reference I could lay my hands on, I finally
decided to consult an expert on German vehicle markings and color schemes: Bill
Murphy (for those who are not familiar with the ambush scheme, you can read a
good description of it in Bill¹s 1976 book, Panzer Colors, written with Bruce
Culver and published by Squadron/Signal Publications). I contacted Bill via the
question and answer forum at Armored Fighting Vehicle News¹ website (http://www.geocities.com/Baja/1654/).
Bill, even in his copious research, also had never seen a specific picture
depicting this scheme applied to this particular vehicle variant, but in his
words, ³I have seen too many 1945 era photos of Œambush¹ scheme Hetzers and
also a few of other types of 251s [painted in an ambush scheme] and I agree with
you that it is logical to assume that some of the 251/22's sported that scheme.²
That was enough for me: time to break out the old airbrush and to heck
with the purists!
Having constructed my share of
German armored vehicles, I have grown fond of the ³ambush² scheme that
appeared in the later part of the war. Unfortunately, I had never seen a picture
of an SdKfz 251/22 painted in this scheme, so I was very worried about the ³model
correctness police² getting on my case for creating a bogus model. After
searching every available armor reference I could lay my hands on, I finally
decided to consult an expert on German vehicle markings and color schemes: Bill
Murphy (for those who are not familiar with the ambush scheme, you can read a
good description of it in Bill¹s 1976 book, Panzer Colors, written with Bruce
Culver and published by Squadron/Signal Publications). I contacted Bill via the
question and answer forum at Armored Fighting Vehicle News¹ website (http://www.geocities.com/Baja/1654/).
Bill, even in his copious research, also had never seen a specific picture
depicting this scheme applied to this particular vehicle variant, but in his
words, ³I have seen too many 1945 era photos of Œambush¹ scheme Hetzers and
also a few of other types of 251s [painted in an ambush scheme] and I agree with
you that it is logical to assume that some of the 251/22's sported that scheme.²
That was enough for me: time to break out the old airbrush and to heck
with the purists!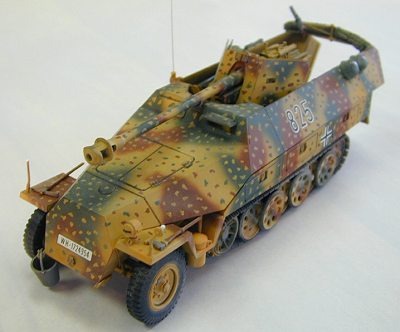 The MG42, the personnel equipment hanging on the vehicle¹s sides, and the tools
on the front fenders were then hand painted using various shades of Model
Masters¹ flat enamel paints.
The MG42, the personnel equipment hanging on the vehicle¹s sides, and the tools
on the front fenders were then hand painted using various shades of Model
Masters¹ flat enamel paints.|
CONCLUSIONS |
This was an enjoyable conversion project resulting in a unique model
for my collection. Given the excellent FSM how-to article, the project took
relatively little time to complete once I got started. The two Tamiya kits are
good representations of the prototypes and fairly easy to construct. If you¹ve
never tried a conversion before, this one is simple and straightforward, and is
a great one to try for the first time.
|
REFERENCES |
1. Knowles, C. and Phillips, D., ³SdKfZ 251/22,² Finescale
Modeler Magazine, April 1997.
2. ³Hanomag SdKfz 251,² http://www.geocities.com/motorcity/pit/3515/251/index.htm,
World Wide Web.
3. Culver, B. and Murray, B., Panzer Colors, Squadron/Signal
Publications, Inc., 1976.
Copyright ModelingMadness.com
If you would like your product reviewed fairly and fairly quickly, please contact the editor or see other details in the Note to Contributors.
Back to Reviews Page 2018