Italeri Leonardo Da Vinci Ornithopter
| KIT #: | 3108 |
| PRICE: | 18.99 GBP |
| DECALS: | None |
| REVIEWER: | Jeffery Simpson |
| NOTES: | Powered by a spring |
A description of the kit and history was provided in the preview.
| CONSTRUCTION |
There is an 8 page fold out instructions leaflet. I followed the sequence set out, but I checked the operation of the mechanism on the way, not leaving it to step 9.
I was going to make the kit "out-of-box" concentrating on making the moving parts work satsifactorily (but I changed my mind). I washed the two plastic trees in detergent, but not the spring mechanism. I detached the parts from the trees with a sprue cutter and then trimmed and smoothed the nubs. At the same time I trimmed off any flash. I found that the parts were generally an easy push fit, and could be push detached too, which is nice. In step 1 part 6a is connected to the tree on the gear teeth and I was very careful to trim and smooth this part.
 Two or three parts have a spline moulded on the
pin. In those cases I ran a knife down the spline and test fitted until it slid
on to my satisfaction, then I pushed home. It is possible that I could have
forced the parts to fit without trimming, but I never like to do this for fear
of getting a part "nearly" seated home, but being unable to apply enough force
to get it completely seated, and being unable to get it to detach for a second
attempt.
Two or three parts have a spline moulded on the
pin. In those cases I ran a knife down the spline and test fitted until it slid
on to my satisfaction, then I pushed home. It is possible that I could have
forced the parts to fit without trimming, but I never like to do this for fear
of getting a part "nearly" seated home, but being unable to apply enough force
to get it completely seated, and being unable to get it to detach for a second
attempt.
Step 4 part 10a the "locking lever" needed more severe surgery until it could be persuaded to pop into position in the stand. This part looked robust and I tried a lot of pressure, but trimming seemed to be essential.
I found that one of the wings was a bit looser than the other, but this does not prevent them flapping perfectly well. I did try the spring before fitting the wings: on repeasing the locking lever the gears spun quite freely, so there was no need to make any adjustments.
Step 9 explains, in diagram form, how to operate the wing flap: lock the mechanism, give the spring a half-turn and release the lock: the wings flap quite quickly. It is also possible to hold the ratchet mechanism off the gear and rotate the gear wheel by hand allowing one to vary the speed and observe the operation more closely.
| COLORS & MARKINGS |
 So now came the change of plan: paint: since this
is going to be a static display model most of the time, one has to consider the
overall appearance. The brown plastic has a nice stippled texture and a pleasant
sheen, but, as in the box art, a bit of variation and perhaps a more satin look
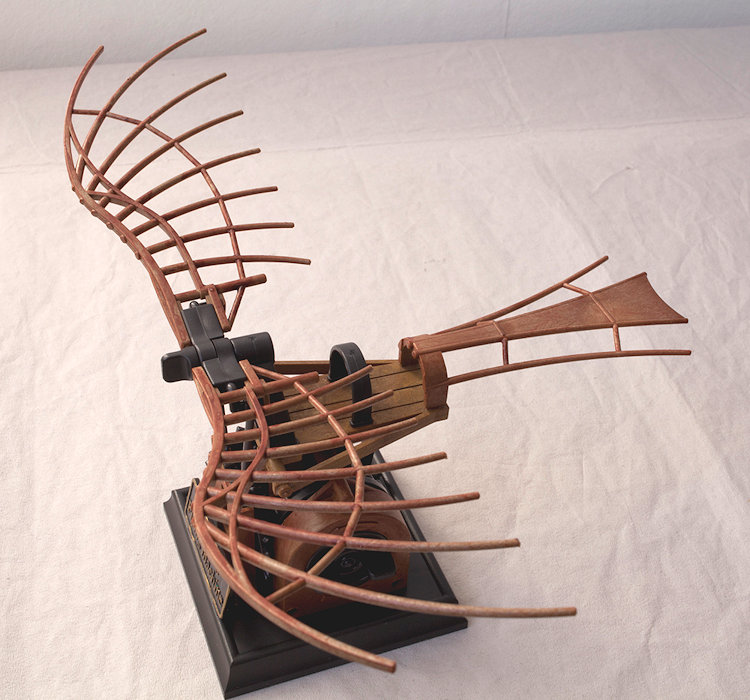
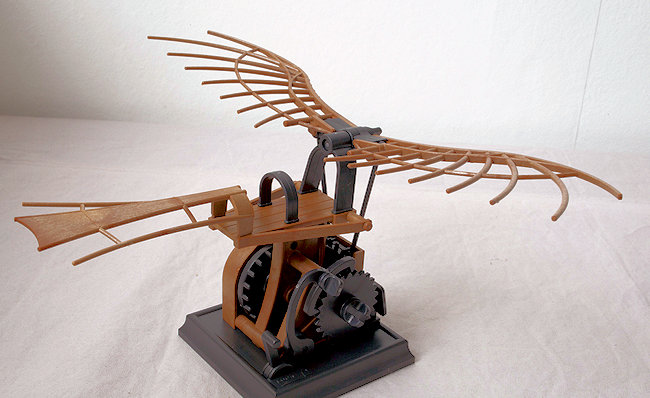
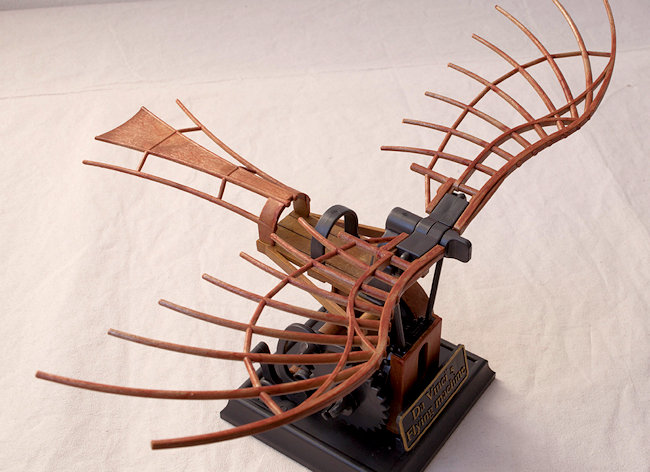
would, to me, be better. (Editor's note: the image above
is unpainted and the one here to the right has been.)
So now came the change of plan: paint: since this
is going to be a static display model most of the time, one has to consider the
overall appearance. The brown plastic has a nice stippled texture and a pleasant
sheen, but, as in the box art, a bit of variation and perhaps a more satin look
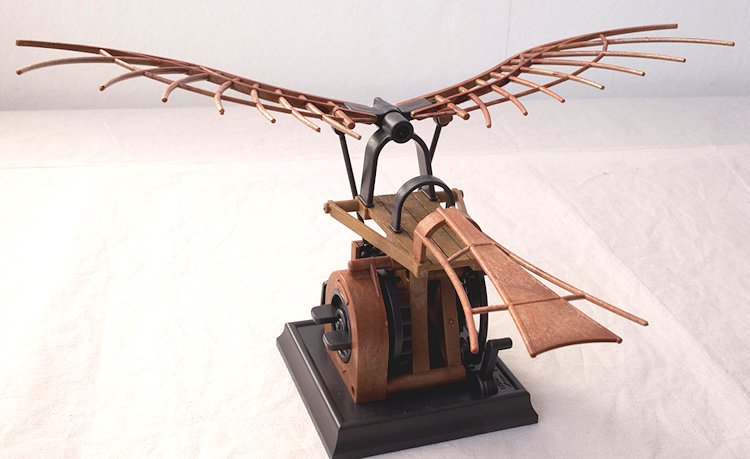
would, to me, be better. (Editor's note: the image above
is unpainted and the one here to the right has been.)
After assembling the model and verifying that it does work I decided to at least try some painting. Since I was not going to paint the mechanism there was no need to dismantle the model, completely. No doubt it would have been slightly easier to paint the parts before assembly. All the colour reference numbers are Vallejo model colour.
I tried 3 different transparent colours, smoke 939, woodgrain 828 (reddish), natural woodgrain 834 (yellowish) applied over the brown plastic, so that the stippling effect of the plastic still shows through. I thinned them down, but too late I realised that the reddish woodgrain really needs more than 10 parts thinners to 1 part paint, so the wings are a bit darker than I would have liked.
 I left the plank in woodgrain 834, but with a wash
of black shade 201 to bring out the planking effect.
The smoke colour was a bit too subtle and I overpainted it on the tail with the
reddish woodgrain 828 at 15:1 thinner. Vallejo make a "thinner medium" which is
preferred for brush painting, it thins the paint, but without risking losing
adhesion. I imagine that more or less any colour can be made "transparent" by
adding a dash of it to a quantity of the thinner medium. As an aside I realise
now that in my youth I was destroying paints by adding tapwater to them to thin
them, it is a pleasure to use the Vallejo paint "system".
I left the plank in woodgrain 834, but with a wash
of black shade 201 to bring out the planking effect.
The smoke colour was a bit too subtle and I overpainted it on the tail with the
reddish woodgrain 828 at 15:1 thinner. Vallejo make a "thinner medium" which is
preferred for brush painting, it thins the paint, but without risking losing
adhesion. I imagine that more or less any colour can be made "transparent" by
adding a dash of it to a quantity of the thinner medium. As an aside I realise
now that in my youth I was destroying paints by adding tapwater to them to thin
them, it is a pleasure to use the Vallejo paint "system".
I also painted the lettering on the nameplate with old gold 878. I made the mistake of applying liquid mask and then the gold, this did not work well, the mask was very difficult to get out of the centres of letter "a" "e" "g", so, after rubbing most of the paint off while handling it to get the mask off, I used a fine brush and painted the lettering by hand. After it had dried the 3 or 4 excess daubs were removed with a scalpel. I did not apply varnish.
| CONCLUSIONS |
1. As a demonstration of a vertical flapping wing it is a fun machine.
2. Unpainted the model is satisfactory and an unusual display piece.
3. There is scope with some painting, to make quite an attractive display and working model.
4. As is often the case with kits supposed to be suitable for children there is a bit of test fitting and scalpel work that is probably best done with adult supervision.
Overall recommended. Good value for money.
Jeffery Simpson
March 2016 Copyright ModelingMadness.com I paid for this model myself. If you would like your product reviewed fairly and fairly quickly, please contact the editor or see other details in the
Note to
Contributors.