Tamiya 1/16 King Tiger: Porsche Turret
|
KIT # |
1 |
|
PRICE: |
$210.00 |
|
DECALS: |
Four tanks |
|
REVIEWER: |
Brian Shields |
|
NOTES: |
|
|
HISTORY |
As soon as the first prototypes of the
Tiger I were shown to Adolph Hitler in 1941 plans were made to begin development
of an another heavy tank that would include an upgraded model of the dreaded
8.8cm gun. Both the Henschel and Porsche firms designed two different versions
of the Tiger II. They both used the same bodies, which were a larger version of
the Panther design, but had very different turrets. The Henschel turret had a
boxier squared off shape while the Porsche turret was rounded and more stream
lined. After some controversy (Porsche and Hitler were buddies) Henschel was
awarded the contract to manufacture the Tiger II because its construction
process was much simpler and cost effective. The Porsche design was not
practical since it involved rolling steel and required special machinery to
produce its sleek curves. 
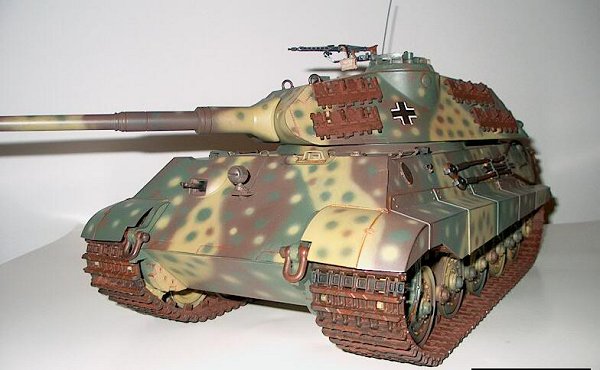
Even though Porsche wasn’t chosen to produce the King Tiger they still made 50 tanks before the contract was awarded (the first few did not have the zimmerit coating). The tank was often mistaken as a Panther during engagements, but as word spread of its improved firepower, America and its allies knew it was something else. Americans first got an opportunity to see this monster up close during the invasion of Normandy. In the British sector advancing troops had managed to knock out a Tiger II equipped with a Porsche turret. Their findings were shocking, this new tank had a redesigned 8.8cm gun, armor nearly 6 inches thick in some places, and was virtually indestructible.
While the Tiger II was a formidable foe, more times than not mechanical failure and poor operating conditions often negated its effectiveness. Many Tiger II’s were found to have either run out of gas due to poor mileage or to have broken down. Weighing between 60 and 70 tons depending on its setup the Tiger II was also susceptible to becoming stuck. When a vehicle of this size got stuck it usually took the same type of vehicle to get it out. This was a practice that was frowned upon by the German army because they believed it put undue stress on both vehicles. Overall the Tiger II was very powerful vehicle with its firepower and its psychological impact on American and allied forces.
|
THE KIT |
 There’s no mistaking this kit when it comes
to your door! I thought I would need a handcart to bring it in the house! Upon
opening the huge box you see typical Tamiya packaging and quality. The parts are
organized in a very orderly manor. Smaller parts such as screws and links are
all contained in a separate box while the metal drive sprockets and axles are on
a blister-packaged card. There are 12 sprues of parts molded in tan. This is
the same color tan that most of the 1/35 scale armor they offer is molded in.
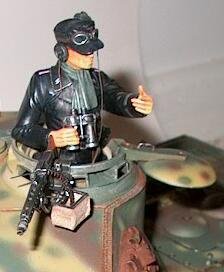
Two of these trees however contain the parts to make two German infantrymen
figures; these are a slightly different shade of tan. The rest of the sprues
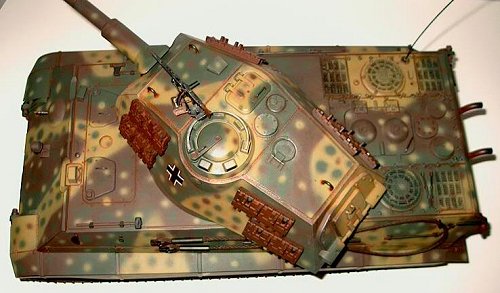
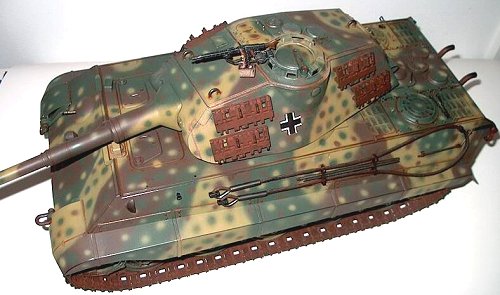
hold the turret and chassis parts. The detail is great as always with Tamiya.
Some of the larger parts on the trees include the fender skirts, bottom turret
portion, & exhaust parts, all molded flash free with superb detail. The top of
the turret is molded in one piece and finely detailed with incredible weld seams
that show the separate interlocking plates very realistically.
There’s no mistaking this kit when it comes
to your door! I thought I would need a handcart to bring it in the house! Upon
opening the huge box you see typical Tamiya packaging and quality. The parts are
organized in a very orderly manor. Smaller parts such as screws and links are
all contained in a separate box while the metal drive sprockets and axles are on
a blister-packaged card. There are 12 sprues of parts molded in tan. This is
the same color tan that most of the 1/35 scale armor they offer is molded in.
Two of these trees however contain the parts to make two German infantrymen
figures; these are a slightly different shade of tan. The rest of the sprues
hold the turret and chassis parts. The detail is great as always with Tamiya.
Some of the larger parts on the trees include the fender skirts, bottom turret
portion, & exhaust parts, all molded flash free with superb detail. The top of
the turret is molded in one piece and finely detailed with incredible weld seams
that show the separate interlocking plates very realistically.
|
CONSTRUCTION |
 Like its 1/35 scale counter part
construction of this kit begins with the chassis. Since this kit is a static
model of the R/C version, the chassis is comprised of mostly metal parts. I
chose to sand the chassis tub with fine steel wool and then apply a several
coats of automotive primer. This was done to give the paint a surface to adhere
to. Next I began to add the suspension housings for the torsion bars. These
parts are all attached by tiny screws and when completely assembled, function
like the real system . These parts are finely cast and show great attention to
detail. Next I airbrushed a base coat of Africa Grunbraun ’41 over the outside
of the assembled chassis tub.
Like its 1/35 scale counter part
construction of this kit begins with the chassis. Since this kit is a static
model of the R/C version, the chassis is comprised of mostly metal parts. I
chose to sand the chassis tub with fine steel wool and then apply a several
coats of automotive primer. This was done to give the paint a surface to adhere
to. Next I began to add the suspension housings for the torsion bars. These
parts are all attached by tiny screws and when completely assembled, function
like the real system . These parts are finely cast and show great attention to
detail. Next I airbrushed a base coat of Africa Grunbraun ’41 over the outside
of the assembled chassis tub.
Assembly of the road wheels was
done next. There are eighteen road wheels each consisting of eight parts. The
idler wheels and front drive sprockets were also constructed at this time.
These were all airbrushed with a base coat of Africa Grunbraun ’41. Dunkelgrun
RLM 82 and P. Schokoladenbraun 1943 were then airbrushed in a camouflaged
pattern. This was done because painting would be impossible after assembly.
After being allowed to dry overnight, the wheels were then attached to the
chassis by 3mm grub screws. The backing plate was also attached at this time.
This is made of plastic and screwed to the metal chassis tub. The mufflers and
mudflaps were attached to the back plate using pro welled liquid cement.
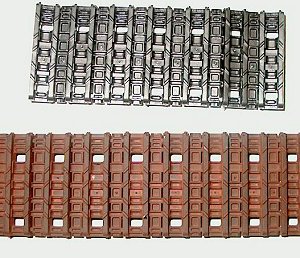
Now that the suspension was completed, I
jumped ahead in the instructions and decided to assemble the track links. I
wanted to get this portion of construction out of the way since I was not
looking forward to it. The links assemble in the same manor that the real ones
do in the fact that they are a link and pin assembly. This is a slow going
assembly process but since it doesn’t require any real concentration I was able
to watch a few movies and build them at the same time! Each side consists of 88
links and is quite impressive when finished. I painted them with Krylon ultra
flat black, which dries almost instantly. Unfortunately the paint does not
adhere very well to the abs plastic so great care has to be taken not to bump
them against anything ( I should have used acrylic black). After several coats
of Krylon I applied several washes of Grumbacher burnt umber oil paint. A
generous dusting of brown and rust colored pastels followed this and ultimately
they were sealed with Testor's clear lacquer flat.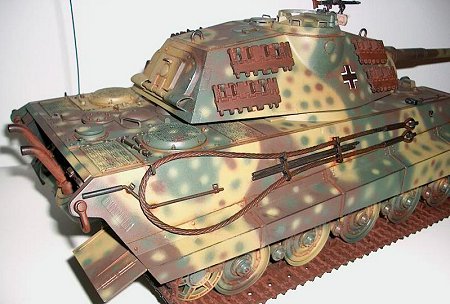
Now came the part I was waiting for the turret and body. The turret goes together just like the 1/35 scale version with the exception of a slightly more complicated elevation mechanism housed inside. The detail of the steel texture and the weld joints on these parts is second to none. The body is molded in one piece and is truly motivating. Tamiya includes a small piece of screen to use for the radiator and exhaust fan covers and this works fantastic. I compared it to a piece of screen in my window and it was exactly the same so don’t worry if you miscut it, you can get it for next to nothing at a hardware store. I carefully measured and cut each piece and super glued them to the body. I also attached all of the other small parts including the fenders to the body at this time. I chose to glue the fenders to the body instead of screwing them as the instructions suggest. I had to fill all of the mounting holes with Squadron green putty and sand them before painting. This took longer than using the screws but also helped it look less like a remote control toy.
I also chose to replace all of the hatch handles with copper wire since the molded on kit ones surprisingly had no detail at all. I simply sanded the old ones off, drilled new holes and dry fitted and bent the wire until I felt I had the right shapes and then super glued them in. The same was done for the Bosch headlamp wire in the front.
|
PAINT |
I painted the ambush scheme using the same colors as mentioned during the road wheel construction. After deciding on a basic pattern I then added alternating spots of opposite colors. Once I finished I added liberal washes of artists oils and pastel chalks to achieve the desired weathering. This was followed by selected scrubbing with a No. 2 to achieve the worn steel look.
|
ADDING DETAILS |
 After assembling the main body
components I moved on to the mufflers and tool racks. I gave the mufflers the
same treatment as the track links, which gave them a very realistic appearance.
The tool racks and tow cables that come with the kit look rather “toyish” so I
decided to build my own from scratch. I began by replacing the racks themselves
with square brass stock and evergreen sheet plastic. After these were all
mounted on the body I painted each one accordingly. The tow cables are made out
of garage door cable and aluminum tubing. This was not easy because the cable
didn’t want to form to the right shape. I had to carefully feed the cable
through the racks just like the real thing to get it to work right. After it was
in the racks I attached the ends. I modified the kit cable ends and inserted
them into the aluminum rods since there was no way to bend the garage door cable
tight enough to reproduce the ends. The kit shovel blade was cut in half and
the tip was used along with more evergreen sheet to make the empty mounting
bracket for the shovel itself. The construction was finished off by adding a
guitar string to represent the antenna followed by a coat of Testor’s flat.
After assembling the main body
components I moved on to the mufflers and tool racks. I gave the mufflers the
same treatment as the track links, which gave them a very realistic appearance.
The tool racks and tow cables that come with the kit look rather “toyish” so I
decided to build my own from scratch. I began by replacing the racks themselves
with square brass stock and evergreen sheet plastic. After these were all
mounted on the body I painted each one accordingly. The tow cables are made out
of garage door cable and aluminum tubing. This was not easy because the cable
didn’t want to form to the right shape. I had to carefully feed the cable
through the racks just like the real thing to get it to work right. After it was
in the racks I attached the ends. I modified the kit cable ends and inserted
them into the aluminum rods since there was no way to bend the garage door cable
tight enough to reproduce the ends. The kit shovel blade was cut in half and
the tip was used along with more evergreen sheet to make the empty mounting
bracket for the shovel itself. The construction was finished off by adding a
guitar string to represent the antenna followed by a coat of Testor’s flat.
|
CONCLUSIONS |
While this kit is a bit extreme in size and construction, it is worth every penny. It makes a great conversation piece and is just plain impressive. You really can’t appreciate the size of this monster until you see it in person. It takes quite a bit of time to make it not resemble its R/C conterpart but with a little scratch building and patience it is definitely achievable. I would like to thank Richard Duffey for providing me invaluable research material and Mike Dipierro at Denbigh Hobby, Dave Dinterman, Colonel Cole and Jerry Little for their advise and tips throughout this project.
|
REFERENCES |
Tiger Tanks – Michael Green – 1995, MBI publishing Co.
Encyclopedia of German tanks of World War II – Peter Chamberlain, Hilary Doyle, & Thomas Jentz – 1978 & 1993, Arms & Armour Press
Waffen SS Hitler’s Black Guard at war – Christopher Ailsby – 1998, Siena books
If you would like your product reviewed fairly and fairly quickly, please contact the editor or see other details in the Note to Contributors.