Bandai 1/144 AT-AT
| KIT #: | 0214476 |
| PRICE: | 4536 yen SRP |
| DECALS: | One option |
| REVIEWER: | Dan Lee |
| NOTES: |
| HISTORY |
An AT-AT makes a brief appearance in Return of the
Jedi, where one walks up alongside a landing platform on Endor, delivering Luke
to Darth Vader. The first appearance of an AT-AT in the Star Wars Rebels TV
series occurs in the second season episode Relics of the Old Republic, when
Agent Kallus (thanks to Captain Rex's tactics against him) unsuccessfully
confronts the rebels while on Seelos, with a trio of the four-legged walkers
challenging Captain Rex's retired clone cohorts and their own much-modified
AT-TE six-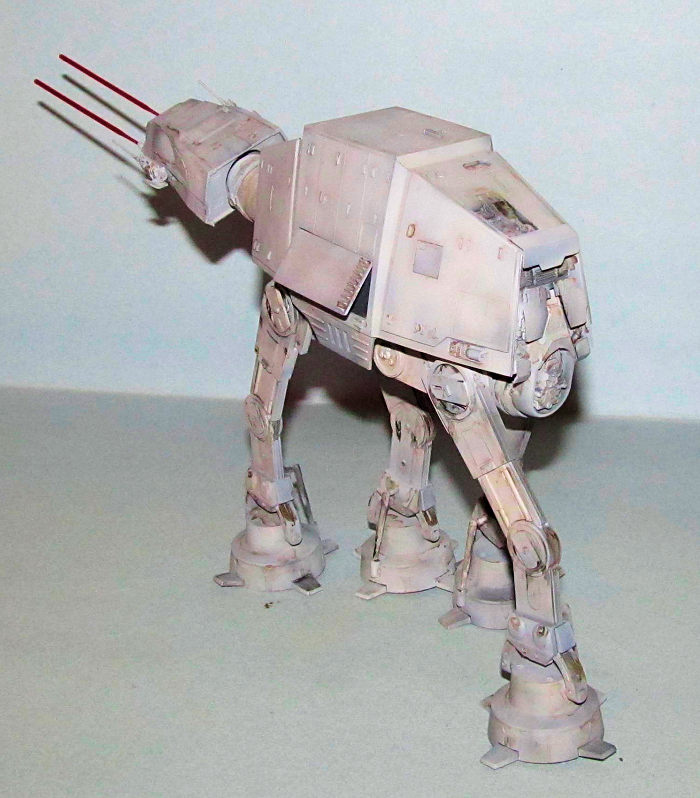 legged walker, where the rebels are hiding out. A ruined AT-AT appears
in Star Wars: The Force Awakens as the makeshift home of the scavenger Rey on
the planet Jakku.
legged walker, where the rebels are hiding out. A ruined AT-AT appears
in Star Wars: The Force Awakens as the makeshift home of the scavenger Rey on
the planet Jakku.
The AT-AT walker was a behemoth of a war machine, standing at a height of 22.5 meters. The quadrupedal walker closely resembled ancient beasts of war, or even a giant legendary beast from the dark side of the Force. Designed for the dual purpose of crushing and demoralizing enemy forces, and also serving as a transport for Imperial troops and light vehicles, the AT-AT was among the most astonishing vehicles in the Imperial Army's inventory. Hundreds of these walkers were produced during the Galactic Civil War, and its intimidating and powerful presence often earned it the distinction of being the first vehicle into a combat zone.
Serving as the "head" of the mechanical walker was a movable command section containing the command cockpit, with room for the commander, pilot and gunner. The command section housed all of the AT-AT's weapon systems, as well as holographic targeting systems allowing the gunners a 360-degree view of their position. The cockpit was also equipped with a holoprojector for purposes of external communication. Forward visualization was supplied by a glowing red command viewport. The head could rotate as much as ninety degrees right or left and thirty degrees up or down for an expansive field of fire. Positioned above and below the command section was the walker's sensor array and blaster cannon energizer, respectively.
The command head was attached to the trapezoidal armed body section by a flexible armored tunnel, allowing cockpit access from the rest of the machine. The AT-AT's troop section could typically carry five speeder bikes, up to forty troops normally comprising Imperial stormtroopers or Imperial land assault troopers in a double-tiered passenger section, and heavy weaponry, such as E-Web heavy repeating blasters. The AT-AT could also variably hold two All Terrain Scout Transports in lieu of soldiers in a rear vehicle bay, though they required partial disassembly to fit inside. Housing the troop section were two large side panels; each one held an escape hatch. The rear panel also housed the troop staging area. Positioned in the center of the body section was a rectangular boarding hatch with sliding ramps where the AT-AT's complement of troops loaded and disembarked. An AT-AT unloaded its troops by kneeling to three meters above ground level until the boarding ramp could extend outward. Individual stormtroopers could also be deployed rapidly by rappelling cable.
Below the troop body section were two immense Kuat
Drive Yards FW62 compact fusion drive systems that, in conjunction with the
walker's four giant heavily-reinforced legs, propelled the AT-AT forward at a
top speed of sixty kilometers per hour. However, this maximum rate was
achievable only on flat, stable terrain. At the rear of, and connected to, the
drive motors were the walker's three fuel slug tanks that powered the massive
machine. The AT-AT's rear also included atmospheric exchangers and a filtration
unit to regulate the interior living conditions. The walker's legs were
supported by massive durasteel footpads with impulse terrain sensors,
supplemented by toe flaps, that could crush obstacles in its path with little
effort, effectively helping the AT-AT to live up to its name. The legs did,
however, require c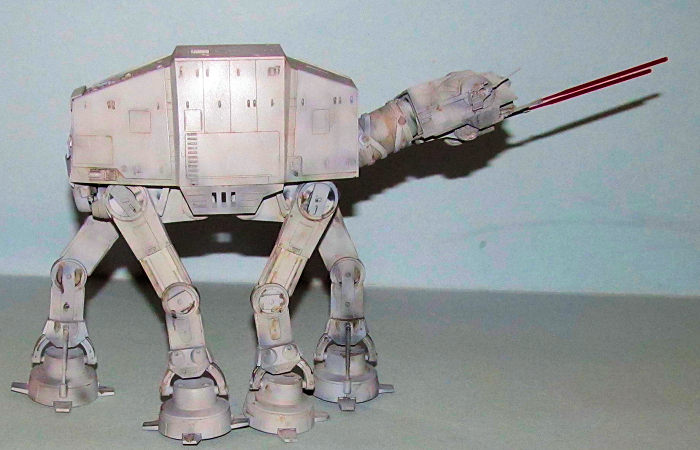 onstant maintenance and repair. As the titanic walker marched
down the battlefield, its heavy, stomping feet would cause the ground to shake,
demoralizing the enemy before they were even engaged.
onstant maintenance and repair. As the titanic walker marched
down the battlefield, its heavy, stomping feet would cause the ground to shake,
demoralizing the enemy before they were even engaged.
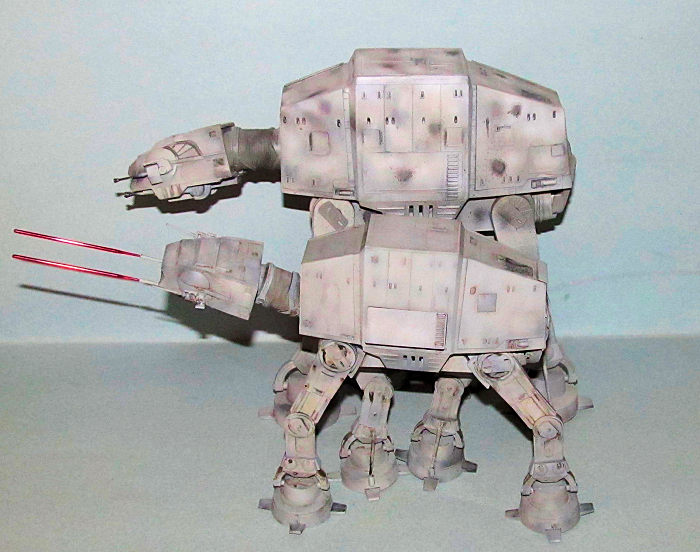
The AT-AT's formidable offensive capabilities were supplied by dual, chin-mounted Taim & Bak MS-1 fire-linked heavy laser cannons (for slower, more cumbersome targets) and two fire-linked medium repeating blasters mounted on each side of the head (designed for lighter, agile targets). The two sets of weapons could be independently rotated in order to engage multiple targets at once. However, the AT-AT's head, which could move between a range of left, center and right firing arcs, could only rotate one fire arc per heavy laser volley. The walker's strong external 9095-T8511 grade durasteel armor was virtually impervious to all but the heaviest of artillery weapons.
The most vulnerable part of the walker was its flexible neck, which was susceptible to lighter blaster barrages. The legs were also somewhat unstable and could be tripped due to a high center of gravity, leaving the walker defenseless. While first appearing to be a slow, lumbering vehicle, the AT-AT would often be on top of its enemies before they knew what had hit them. The AT-AT also lacked armor covering on its underbelly, leaving the spot vulnerable to mounted guns or portable missile launchers. To remedy this weakness, AT-STs were usually stationed around the walker's flanks to ensure nothing was given a clear shot at the AT-AT's weak underside.
AT-ATs were typically deployed for ground assault from orbit by large dropships. Walkers stationed within larger warships, such as the Executor-class Star Dreadnought, were delivered to planetary surfaces within Incom Y-85 Titan dropships, capable of carrying four AT-ATs. Smaller starships, such as the Imperial-class Star Destroyer, deployed single walkers via the Theta-class AT-AT barge. Other designs, including the Telgorn Corporation Warlord Dropship, were capable of delivering a platoon of four walkers.
The Reel History from Wikipedia
The AT-AT (canonically pronounced "A T - A T" but often pronounced as an acronym, instead of a correct initialism) was first introduced in The Empire Strikes Back and also appears in Return of the Jedi. The AT-AT also appears in a destroyed form in Star Wars: The Force Awakens.
Joe Johnston's original design for the Empire's
war machines was a giant, multi-wheeled vehicle; this design later became the
"Juggernaut" in West End Games' roleplaying material, and the design was
reworke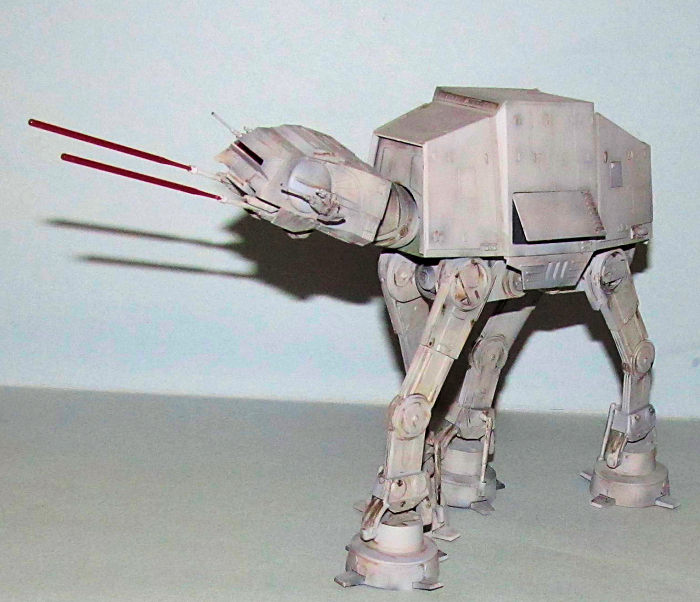 d into the clone turbo tank for Star Wars: Episode III – Revenge of the Sith. Johnston said Lucas wanted the walkers to look like anthropomorphic
walking tanks to make them frightening.
d into the clone turbo tank for Star Wars: Episode III – Revenge of the Sith. Johnston said Lucas wanted the walkers to look like anthropomorphic
walking tanks to make them frightening.
For The Empire Strikes Back, however, the final design was a four-legged walker. Inspiration for the AT-AT came from Paraceratherium, an extinct rhino and the largest land mammal in history. George Lucas later dismissed claims that the AT-AT design was inspired by container cranes at the Port of Oakland (across San Francisco Bay from ILM's San Rafael offices), calling it a "myth"; animator Phil Tippett told the San Francisco Chronicle the same thing.
ILM created models ranging from 6 to 50 centimeters in height. ILM filmed the AT-ATs using stop-motion animation against matte paintings created by Michael Pangrazio because attempts at compositing miniature footage against live-action background footage yielded mediocre results. Additionally, ILM studied elephants to determine the best way to animate the four-legged AT-ATs. Although the stop-motion animation style gave the AT-ATs a jerky, "staccato-like" effect on film, ILM found this movement acceptable because of the AT-ATs' mechanical nature.
The sound of the AT-AT walking was created by
Sound Designer Ben Burtt, by using the sound of an industrial sheet metal
stamper.
| THE KIT |
 Bandai's AT-AT kit is a 1/144 scale version of the
Imperial AT-AT. This is the first kit instruction I've seen that includes
English as well as Japanese as it looks like it was designed for both the
Japanese market and international (at least the English speaking side.) The
booklet is the typical Bandai offering which provides the parts breakdown and
the build order in pictures.
Bandai's AT-AT kit is a 1/144 scale version of the
Imperial AT-AT. This is the first kit instruction I've seen that includes
English as well as Japanese as it looks like it was designed for both the
Japanese market and international (at least the English speaking side.) The
booklet is the typical Bandai offering which provides the parts breakdown and
the build order in pictures.
There are seven sprues for this kit. The first one is Bandai's traditional multi-color offering which contains the clear red laser pieces, weapons and the interior parts including crew. The remaining six sprues consist of the outer hull, the inner hull, the head, the white base and two sprues for the legs and feet. The parts detail is pretty good for a 1/144 kit and better than the older and larger AMT kit (I know because I've built the AMT kit and still have it.) There is no flash and minimal mold markings. It includes the customary stickers and decals options. There are only two stickers or decals and that is for the clear red windscreen.
| CONSTRUCTION |
I began with the AT-AT's legs and feet. To my dismay, I noticed the tops of the AT-AT feet were made from two halves which made sanding/filling awkward. I glued all four of the top feet subassemblies together and then threw them into the box to let them fester for a couple of weeks to eliminate the headache of phantom seams. I also had to do the same with the four piece chin mounted blasters.
After about two weeks sitting in the box I spent several hours filling and sanding the visible seams around the four top foot pieces and the chin-mounted blasters. I had to be careful not to sand away the details. The only seams I didn't fix were the seams at the top of the foot which is underneath the “ankle” and most of the “ankle” seams because they were too awkward to fix or barely noticeable.
Meanwhile I followed the instructions as I glued the various sub assemblies together including the head, the top half of the chassis, the bottom half of the chassis and then the four legs minus the feet. There were a fair amount of parts cleanup mostly due to the number of parts.
 Unlike the AMT AT-AT, the Bandai AT-AT didn't use
an elastic band to make the neck flexible instead Bandai designed the neck parts
to make a universal joint which is about more durable over the long run than an
elastic band. Unfortunately like the older AMT AT-AT the corrugated neck is
still made from two halves which meant a lot of headaches if you want to sand
and fill the seam running down the middle. Like my previous AMT AT-AT build, I
left corrugated portion of the seam alone while I filled/sanded what I could.
Unlike the AMT AT-AT, the Bandai AT-AT didn't use
an elastic band to make the neck flexible instead Bandai designed the neck parts
to make a universal joint which is about more durable over the long run than an
elastic band. Unfortunately like the older AMT AT-AT the corrugated neck is
still made from two halves which meant a lot of headaches if you want to sand
and fill the seam running down the middle. Like my previous AMT AT-AT build, I
left corrugated portion of the seam alone while I filled/sanded what I could.
Bandai's instructions show one can paint the figures and cockpit. I did not paint the figures and I sort of painted the interior of the cockpit because nothing can be seen through the clear red windscreen. I wasn't going to waste my time and effort for something that I couldn't see unlike some past efforts.
I did waste my time and energy to fill and sand the seams around the engines (which include the leg attachment points) as I later discovered during final assembly that I really didn't need to.
The four blasters were filled and sanded. There is the option of using two different versions of cheek mounted blasters, but I selected the one that needed more work.
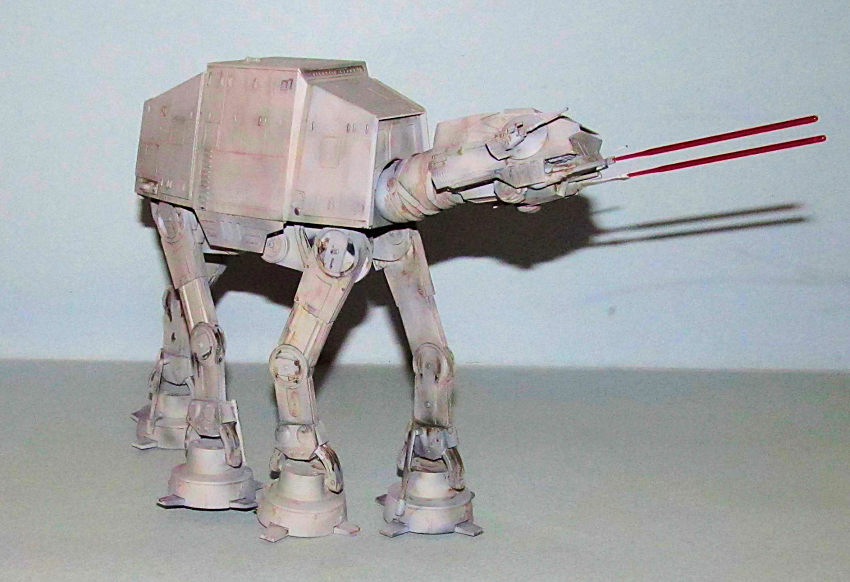
| COLORS & MARKINGS |
You can pick any color for your AT-AT as long as
it is grey. I opted to paint it using Tamiya XF-80 Royal Grey which is a very
light grey color, but first I pre shaded it. I was painting the Strv S103C tank
at the time so I emptied out my airbrush with the remnants of Earth Brown, NATO
Green, IJN Green and NATO black to pre shade the AT-AT. Once it was dry, I
sprayed on very fine coats of XF-80 Royal Grey. This took longer than I thought
as it took a couple of spray sessions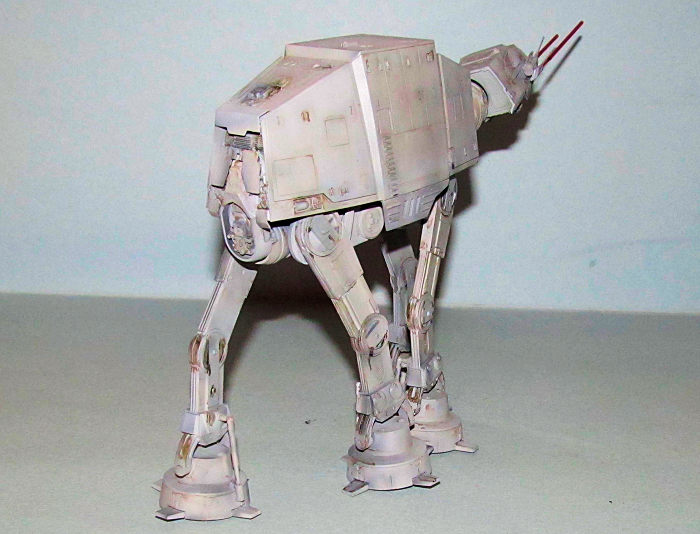 to get the paint job to be as ugly as I
wanted it. The “interior” areas of the main body were sprayed NATO Black. This
beast only has two decals on it. Both added to the windscreen and are barely
noticeable.
to get the paint job to be as ugly as I
wanted it. The “interior” areas of the main body were sprayed NATO Black. This
beast only has two decals on it. Both added to the windscreen and are barely
noticeable.
For weathering, I first sprayed on a flat coat to provide more grip than a gloss coat for the wash. When it was dry, I painted on paint chips using a fine brush but I made the mistake of using Vallejo Metal Color Steel because it was too shiny for paint chipping. I instead used Tamiya Dark Sea Grey for paint chipping around the moving parts, but I didn't want to over do it,
I went to town with the watercolor wash of raw umber. Once it was dry I removed the excess using damp Q-Tips in the likely direction of wind/rain to get a streaky effect. I brush painted Tamiya Smoke around the joints for lubrication leaks after the final flat coat.
I attached the upper chassis to the chassis/legs without the need for glue as it snap fit into place. Glued the portside door in open position. I slid the top of the head into place and I didn't need glue to keep it there. The side blasters were added. The legs simply snapped into place and easily posed in walking position. Lastly, I added the clear red laser pieces.
| CONCLUSIONS |
 Not as easy to build as I thought thanks to the
two part feet with awkward to sand seams. Still much better detail and easier to
build than the old 1980s era 1/96ish scale AMT-Ertl AT-AT which was my first
article for MM published in July 2005.
Not as easy to build as I thought thanks to the
two part feet with awkward to sand seams. Still much better detail and easier to
build than the old 1980s era 1/96ish scale AMT-Ertl AT-AT which was my first
article for MM published in July 2005.
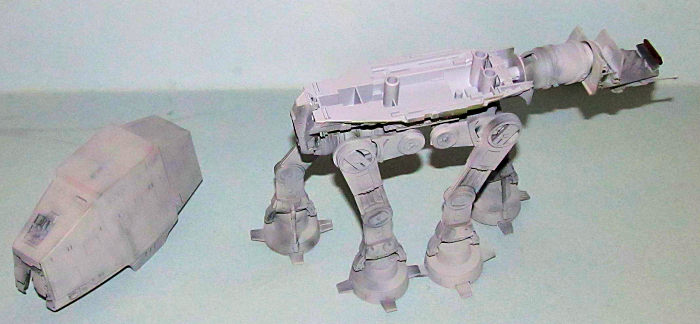
For comparison's sake, here is the AMT AT-AT with the Bandai AT-AT. You can see the difference in the detail and the improved quality of the paint job (with 13 years of experience vs just starting out/over.)
| REFERENCES |
Wookiepedia and Wikipedia
20 July 2017
Copyright ModelingMadness.com
If you would like your product reviewed fairly and fairly quickly, please contact the editor or see other details in the Note to Contributors.
Back to the Main Page Back to the Review Index Page Back to the Previews Index Page