Bandai 1/12 AT-ST
|
KIT #: |
149869 |
|
PRICE: |
@$25.00
|
|
DECALS: |
One option |
|
REVIEWER: |
Dan Lee |
|
NOTES: |
|
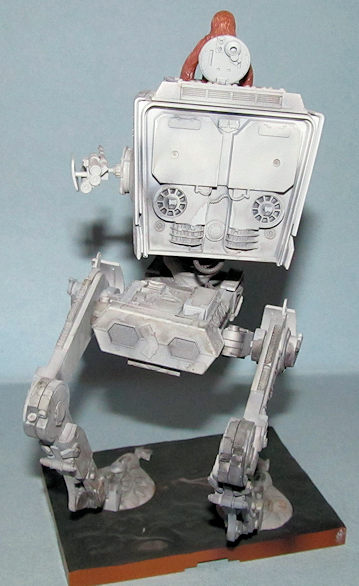
 The AT-ST
(All Terrain-Scout Transport) was colloquially known as a "chicken walker"
because of its shape and walking motion, the AT-ST was a light, heavily-armed,
ground combat vehicle, and able to trek various environments. The stock model
was equipped with a medium, chin-mounted, double blaster cannon, a blaster
cannon on the port side, a concussion grenade launcher on the starboard side of
its head, two clawed feet, and was encased with 9095-T8511 grade durasteel.
The AT-ST
(All Terrain-Scout Transport) was colloquially known as a "chicken walker"
because of its shape and walking motion, the AT-ST was a light, heavily-armed,
ground combat vehicle, and able to trek various environments. The stock model
was equipped with a medium, chin-mounted, double blaster cannon, a blaster
cannon on the port side, a concussion grenade launcher on the starboard side of
its head, two clawed feet, and was encased with 9095-T8511 grade durasteel.
The AT-ST was designed to be a recon, hit-and-run vehicle. It was lighter than
its bigger brother, the AT-AT, and could withstand standard blaster fire, but
was vulnerable to heavy laser fire and missiles, as well as physical attacks to
the legs and the side of the head. The latter weakness was witnessed during the
Battle of Endor, when the Ewok tribal warriors destroyed an AT-ST by using logs
to ram the sides of the walker's head. The AT-ST could also be infiltrated by
species with great physical strength. At Endor, the Wookiee, Chewbacca, forced
his way through the top hatch and took control of the walker in this manner.
The AT-ST's chin blasters
had an effective range of two kilometers and were used for anti-vehicle attacks,
while the armor-shielded blaster cannon and grenade launcher provided
close-range protection against infantry and light emplacements. Like the AT-AT,
the AT-ST utilized a holographic targeting system, allowing a 360-degree view of
its position. The armor was not sufficient to withstand blasts from starship
cannons, but was impervious to small-arms fire.
The 8.6-meter-tall walkers
were piloted by a crew of two Imperial Army pilots and carried 200 kilograms of
cargo. The bipedal propulsion system was one of the primary weaknesses of the
AT-ST. On even terrain, the walker could achieve over 90 kilometers per hour,
but on uneven or shifting terrain, a walker could quickly become unbalanced
enough to fall over. An advanced gyro system, located beneath the command
module, provided the balance needed, but could be easily damaged. Following the
Battle of Hoth, Rebel tacticians learned to ambush and immobilize AT-ST's; once
trapped, a well-placed rifle shot could destroy the walker's gyro system.
Lifted directly from
Wookipedia
 A trivia
note: the crew of the AT-ST that was captured by the Ewoks and Chewbacca was
named Major Marquand and Lt. Watts. They were played respectively by Return of
the Jedi director Richard Marquand and producer Robert Watts.
A trivia
note: the crew of the AT-ST that was captured by the Ewoks and Chewbacca was
named Major Marquand and Lt. Watts. They were played respectively by Return of
the Jedi director Richard Marquand and producer Robert Watts.
Unless you happen to live
in Asia, you may have a hard time getting one because the legal rights holders
(Disney aka the Mouse aka The Empire) has put a stop to 3rd party resellers like
Hobby Link Japan selling Bandai kits outside of the licensing agreement zone as
of Sept 2015.
It consists of 136
different parts on six different sprues including five grey plastic sprue plus
one multicolor sprue containing grey, red clear and brown parts (a Bandai
trademark.) The parts are very well done with little or no flash. The detail is
amazingly done on all parts including both sides of the interior components and
the blaster cannon barrels are hollow (showing off the slide molding used.) I
have never had a kit floor me with all the detail here. My understanding is that
this is what Bandai does well, but I’ve never made any of their Gundam kits so
this is all new to me.
From the looks of the
parts, you don’t need to glue much but from what I’ve read you have to be
careful attaching as the parts so tight that sometimes they will break from the
stress. I personally think the red clear lasers pieces are useless, but that’s
just my opinion and others will probably think it is really cool and I should
just shut my mouth.
 The kit
comes with markings consisting of waterslide decals (for advanced modelers) and
stickers (for kids or adults who can’t be bothered.) Your choice of what to use.
The instruction booklet is in Japanese (not surprising as this kit is strictly
for the Japanese/Asian market.) However, the color scheme is not complicated so
it will not be hard to paint.
The kit
comes with markings consisting of waterslide decals (for advanced modelers) and
stickers (for kids or adults who can’t be bothered.) Your choice of what to use.
The instruction booklet is in Japanese (not surprising as this kit is strictly
for the Japanese/Asian market.) However, the color scheme is not complicated so
it will not be hard to paint.
I followed most of the kit
instructions for the most part. Really hard to go wrong assembling it. I built
the AT-ST by assembling the major sub assemblies (legs, forward portion of the
head, the rear of the head, the armored sides and main body) so as to allow for
ease of painting including the interior.
About the only issue I had
was with the side weapons. I was careful to cut away any sprue gate material to
make for a snug but not too snug fit to prevent the starboard side grenade
launcher plastic from cracking as I read in an earlier review.
The main pivot was the
only part of the kit that required filling/sanding. I used CA glue to fill it
and then sanded it smooth and the main guns had a noticeable gap (my bad) that I
covered up using a cut sheet of 5 thou thick plastic card. I left off the hoses
and various leg parts for ease of painting.
Chewie was a two piece
figure that required a bit of filler for the seams and for join between the arms
and torso. I didn't sand much and only filled in what was visible (above the
waist.)
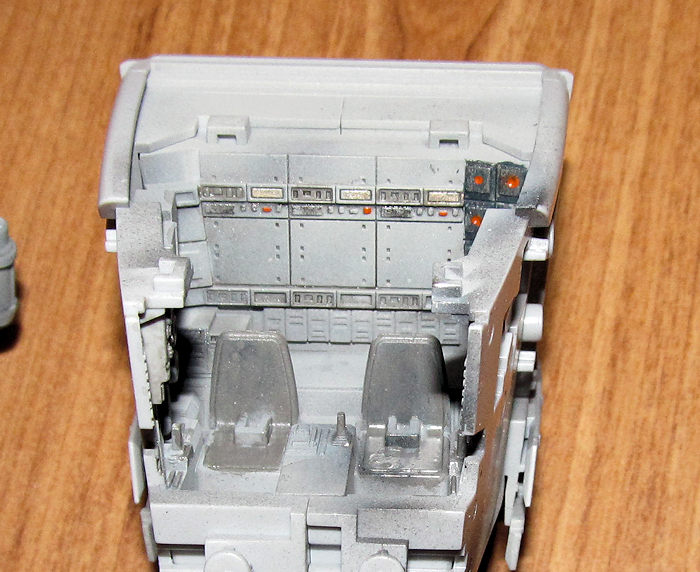 The
interior was painted based on details seen in the Return of the Jedi screen
shots. One thing I was worried about was losing my brush painting skills after a
long layoff. I didn't have an issue with painting as I had fun painting the
detail. The crew figures were painted at the same time using approximate colors
based on screen shots (light grey uniforms, flat black helmets, flesh tone and
gloss black goggles.) Chewie was brush painted with Tamiya Red Brown XF-64 for
the base color. Next he required the most precision and careful dry brushing
using Tamiya Deck Tan XF-55, flat black, silver and Model Master Burnt Sienna to
emphasize the various shades of fur, his facial features and his ammo bandoleer.
The
interior was painted based on details seen in the Return of the Jedi screen
shots. One thing I was worried about was losing my brush painting skills after a
long layoff. I didn't have an issue with painting as I had fun painting the
detail. The crew figures were painted at the same time using approximate colors
based on screen shots (light grey uniforms, flat black helmets, flesh tone and
gloss black goggles.) Chewie was brush painted with Tamiya Red Brown XF-64 for
the base color. Next he required the most precision and careful dry brushing
using Tamiya Deck Tan XF-55, flat black, silver and Model Master Burnt Sienna to
emphasize the various shades of fur, his facial features and his ammo bandoleer.
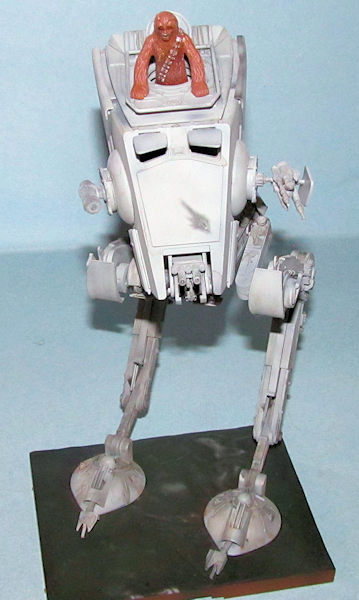
My approach to the AT-ST
was the same as a tank. I initially sprayed all the exterior parts with flat
black and then approached it with thin coats of Tamiya Royal Grey XF-80. I
sprayed on each coat in a random squiggle pattern to produce an slightly
distorted uneven coat that looks like worn blotchy paint. It took several fine
coats to end up with the effect I was looking for. The leg hoses were hand
painted with Tamiya Burnt Iron XF-84.
 After the
paint was cured, I sprayed on a thin coat of Pledge (aka Future) for the single
decal I was going to add. The scorch marking was added to the front of the AT-ST
and that was it for the decals. Bandai decals are pretty good, but a touch
thick.
After the
paint was cured, I sprayed on a thin coat of Pledge (aka Future) for the single
decal I was going to add. The scorch marking was added to the front of the AT-ST
and that was it for the decals. Bandai decals are pretty good, but a touch
thick.
Next I added the various
washes and stains using Vallejo Ochre Yellow and Earth Brown paints and
black/brown water colors. This took a fair amount of time as I started from the
base of the feet and moved to the top of the AT-ST while using lesser and lesser
amounts as I got to the top. Once the excess wash was removed using damp Q-Tips,
I sprayed on the final coat of flat clear. The base was painted various greens
and that was it.
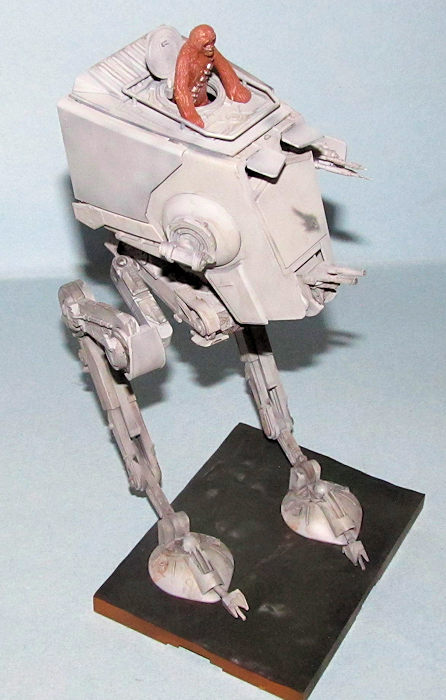
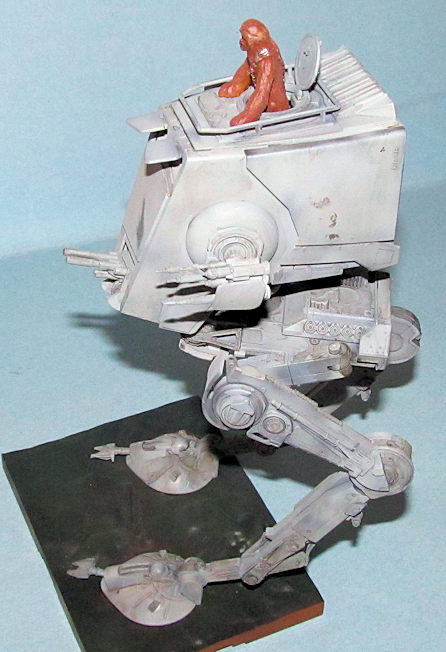
I glued the main hull
together with the hatch and windows open while the rest of the parts were added
together without gluing. The completed AT-ST was mounted onto the base without
gluing. I was dismayed to discover that I could barely see the interior I had
painted. All that decent painting almost disappeared.
This kit was the easiest
and least hassle free kit (science fiction or otherwise) I have ever had the
pleasure to assemble/build. Highly recommended for Star Wars fans or someone who
just wants a hassle free weekend build but it could be a one day build if you
don't want to paint most of the interior like I did.
Dan Lee
12 September 2016
Copyright ModelingMadness.Com
If you would like your product reviewed fairly and fairly quickly, please contact the editor or see other details in the
Note to
Contributors.
Back to the Main Page
Back to the Review
Index Page