| KIT #: | CW03 (64503) |
| PRICE: | 3400 yen retail [$65.00 retail in the US] |
| DECALS: | Two options |
| REVIEWER: | Dan Lee |
| NOTES: | Used two kits due to foot stomping |
| HISTORY |
The ASF-X Shinden II (震電Ⅱ, "Magnificent Lightning") is a next-generation combat aircraft. In the Ace Combat: Assault Horizon universe, the aircraft was a prototype for the active service variants, collectively known as the F-3 Shinden II, developed to protect Japan airspace.
 The ASF-X Shinden II was
created by Shōji Kawamori, known as the creator of the Macross series, as
exclusive downloadable content for Ace Combat: Assault Horizon. The aircraft was
an attempt by Project Aces to bring together the futuristic style of Kawamori's
work (most notably seen in his Variable Fighter designs) with modern flight
technology.
The ASF-X Shinden II was
created by Shōji Kawamori, known as the creator of the Macross series, as
exclusive downloadable content for Ace Combat: Assault Horizon. The aircraft was
an attempt by Project Aces to bring together the futuristic style of Kawamori's
work (most notably seen in his Variable Fighter designs) with modern flight
technology.
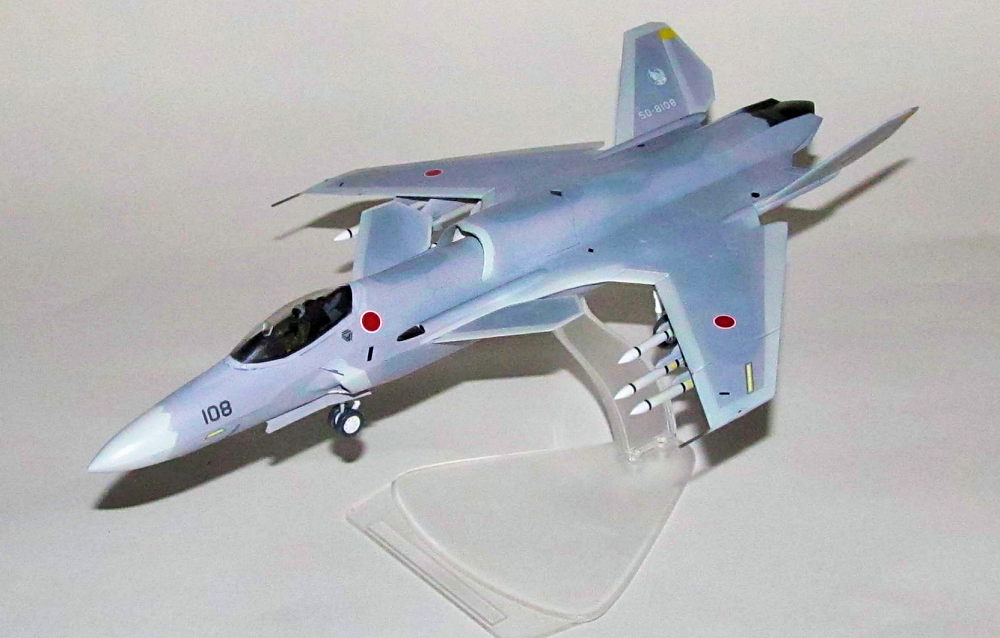
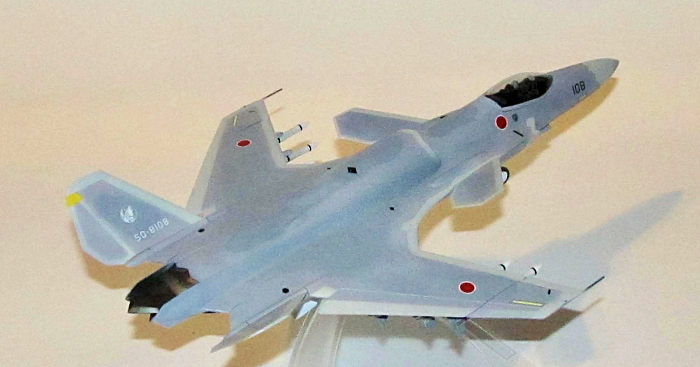
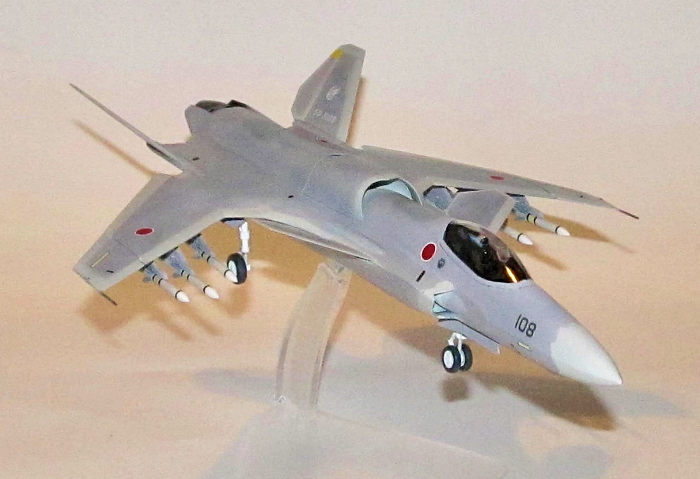
The Shinden II has what appears to be a F-35 nose, the forward swept wings of a Su-47 Berkut, the tail section of a YF-23 and with the top/bottom dual engine configuration of the BAC Lightning. It can fly in stealth supercruise mode and has VTOL capabilities while it carries 6 advanced AIM-120 AAMs and a 20mm Vulcan cannon as armament.
| THE KIT |
The ASF-X Shinden II kit comes from Hasegawa as part of their product line based on vehicles from video games. This is not unique to Hasegawa either as other companies such as Revel have also produced series of kits based on video games (in Revel's case, they are from the Halo universe.) First, let's not kid ourselves about accuracy here as the plane comes from the imagination of Macross designer Shoji Kawamori and not real life.
 This
Hasegawa comes with nine sprues. Sprues A and B contain the top and bottom
halves of the plane including most of the wing. Sprue C contains mostly the
flight control surfaces, cockpit parts,wing tips and intakes. Sprue D contains
the engine nozzles and landing gear doors. There are two sprue Es which has the
weapons, launch rails, wheels and exhaust face. Sprue F contains the landing
gear parts. Sprue G has all the clear parts including the untinted canopy. There
is an un-numbered clear sprue that contains all the parts for the inflight
stand.
This
Hasegawa comes with nine sprues. Sprues A and B contain the top and bottom
halves of the plane including most of the wing. Sprue C contains mostly the
flight control surfaces, cockpit parts,wing tips and intakes. Sprue D contains
the engine nozzles and landing gear doors. There are two sprue Es which has the
weapons, launch rails, wheels and exhaust face. Sprue F contains the landing
gear parts. Sprue G has all the clear parts including the untinted canopy. There
is an un-numbered clear sprue that contains all the parts for the inflight
stand.
The parts are very well done with no Flash or flaws except the mold markings. It is fairly well detailed for a 1/72 kit. The plastic is the typical Hasegawa hard plastic. The decal sheet is for two basic airframes, but there is enough numbers provided to make serial and modex numbers for any different numbered aircraft.
| CONSTRUCTION |
I began this almost two
years ago with the first kit. It did not end well as in May 2017 the newly
painted canopy fell on the floor. My first step in the search found it and
crushed it under foot. After I stopped swearing, I put the kit aside a couple of
months and then prepared to order another canopy. In the middle
 of the
night I kicked over the box and stepped on the main fuselage. Snapped off the
port wing and crushed the tail. I threw it out, my first ever casualty of AA
foot.
of the
night I kicked over the box and stepped on the main fuselage. Snapped off the
port wing and crushed the tail. I threw it out, my first ever casualty of AA
foot.
Undaunted or stubbornly stupid, I bought another kit and started again. I started by following the instructions which meant I started with the exhaust tube and engine petals. The kit gives you option of VTOL or regular flight, I chose regular flight and used all the parts for normal flight.
The exhaust tubes come in
two halves, left and right. I don't like ex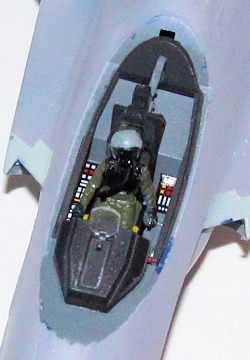 haust
tubes done this way because it is a pain to fill/sand even worse in 1/72 scale.
I opted for something a bit smarter. As the tubes do not have any detail, I
added cut lengths of half round rod at 90 degree intervals to cover up the seams
and provide some detail. The exhaust petals were glued together and the seams
were filled with Vallejo plastic putty with the excess putty wiped away. Later I
painted the inside of the exhausts flat white and the exhaust petals/exhaust
faces metallic grey and gunmetal. I glued the exhaust faces to the back of the
exhaust tubes and I put that subassembly aside.
haust
tubes done this way because it is a pain to fill/sand even worse in 1/72 scale.
I opted for something a bit smarter. As the tubes do not have any detail, I
added cut lengths of half round rod at 90 degree intervals to cover up the seams
and provide some detail. The exhaust petals were glued together and the seams
were filled with Vallejo plastic putty with the excess putty wiped away. Later I
painted the inside of the exhausts flat white and the exhaust petals/exhaust
faces metallic grey and gunmetal. I glued the exhaust faces to the back of the
exhaust tubes and I put that subassembly aside.
Next I drilled out the holes for the pylon mounts on the lower fuselage half of the Shinden II. I removed those parts from the sprue, cleaned them up and glued them on. The intakes are made up of separate pieces which actually help modellers to paint the interior. I took advantage of it and sprayed the intakes and the edges dark grey. These were carefully added to the bottom half of the fuselage. I added the top and bottom halves of the fuselage, but only the fuselage forward of the tail was glued together because I had found out in the first kit that adding the rudders would make painting them a headache. I had to use some Vallejo plastic putty to deal with the seams between the fuselage and the intakes.
| COLORS & MARKINGS |
The air superiority scheme I picked only required three colors: FS36495 Light Grey, Dark Ghost Grey and Light Ghost Grey. It turned out to be one of the headache filled paint schemes I had ever done. Added to this was for some reason (plastic?) the usually trusty stick to plastic Xtraycrylix paint would not stick very well to the Shinden's plastic and frustrated me on many occasions.
I first sprayed the canopy with a light coat of Tamiya Smoke to tint the canopy like an F-16's tinted plexiglass canopy and let it dry. What I ended up doing was priming the model and various parts with Tamiya XF-19 Sky Grey which I've used in the past as an acrylic primer. I then masked off the wheel wells and sprayed them flat white. The masked canopy and the cockpit were sprayed with Xtraylix dark gull grey for the interior color. I temporarily glued the canopy onto the cockpit using white glue and then sprayed on FS36495 Light Grey on the various edges including the parts for the rudders, wing edges, wing tips and nose which represents the radar absorbing material.
 Once dry, I
masked off those sections and the wheel wells. The model was then sprayed with
Mission Models Light Ghost Grey because Xtracrylix Light Ghost Grey kept peeling
off with the tape. The Mission Models version had a slightly purplish tinge
(like the Gunze Sanyo version) so I had to repaint various parts I had
originally painted using the Xtracrylix version with the Mission Models
equivalent.
Once dry, I
masked off those sections and the wheel wells. The model was then sprayed with
Mission Models Light Ghost Grey because Xtracrylix Light Ghost Grey kept peeling
off with the tape. The Mission Models version had a slightly purplish tinge
(like the Gunze Sanyo version) so I had to repaint various parts I had
originally painted using the Xtracrylix version with the Mission Models
equivalent.
I first tried free handing the Dark Ghost Grey areas using Mission Models DGG, but that didn't work out well as I had a lot of overspray. I had to paint the model again with Light Ghost Grey and cut out paper masks which were taped onto the model. This worked much better and I didn't have many touch ups to do.
The rudders and canards required a lot more of the same as the RAM coating pattern made things complicated and the dark ghost grey areas needed paper masks to keep the overspray from mucking up the other colors.
All this actually took about six weeks to do and was rather frustrating, but oh so easy to type out. When everything was dry, I sprayed on Tamiya gloss clear for the gloss coat. The formation lights (clear red and blue) and the nose camera mount (Light Ghost Grey) were brush painted.
I used the kit decals for the JSDAF Air Superiority version as per instructions. No problems using MicroSol/Set to make the decals snuggle down into the details. I did not weather this plane and sprayed the final coat of Tamiya Flat Clear.
| FINAL CONSTRUCTION |
Before the paint was fully done, I inserted the painted rudders into their respective positions and glued the tail of the Shinden up using CA glue (to eliminate the phantom seams) while being careful not to glue the rudders into position. I sanded the seams down and then masked off rudders so that I could paint the remaining areas Light Ghost Grey. Next up I glued in the wing tips, the engine petals, the landing gear and the landing gear doors (I used CA glue for those.) These were done before the decals and final coat.
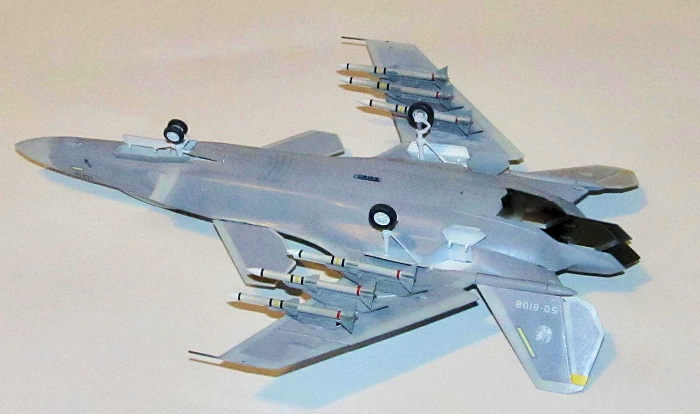 The weapon
pylons were painted Light Ghost Grey while the missiles were actually painted
and done from the first kit. The AIM120 missiles were painted FS36495 Light
Grey, the nose flat white and the fins were brush painted using Dark Ghost Grey.
They were gloss coated for the decals which went on okay (even though the task
was quite tedious.) Once dry, I glued the canards, weapons and pylons in place
using CA glue.
The weapon
pylons were painted Light Ghost Grey while the missiles were actually painted
and done from the first kit. The AIM120 missiles were painted FS36495 Light
Grey, the nose flat white and the fins were brush painted using Dark Ghost Grey.
They were gloss coated for the decals which went on okay (even though the task
was quite tedious.) Once dry, I glued the canards, weapons and pylons in place
using CA glue.
The cockpit was pretty much the last thing I worked on. I used the kit console decals. The seat was painted flat black and the cushions were brush painted olive drab. The pilot was glued together and the seams were filled in using Vallejo plastic putty. Once the filler on the pilot figure was dry, the helmet was painted dark grey, the visor gloss black, the oxygen mask and gloves were painted flat black and finally the flight suit was painted olive green. Console, pilot and seat were glued in place. Once the glue was set, I added the canopy using Krystal Kleer PVA glue, mounted the plane onto the stand and I was done.
| CONCLUSIONS |
CThis was a more difficult kit than I had originally anticipated both in the build and the painting. I have no desire to paint a similar scheme like the F-35 as the scheme proved problematic for me. I would have to say that this kit is for the more advanced modeler in terms of painting and assembly. A beginner might have a bit of a hard time putting this one together.
I found it to be a fun kit of an unusual subject, but it requires care and some experience to build/paint.
20 February 2018
Copyright ModelingMadness.com
If you would like your product reviewed fairly and fairly quickly, please contact the editor or see other details in the Note to Contributors.
Back to the Main Page Back to the Review Index Page Back to the Previews Index Page