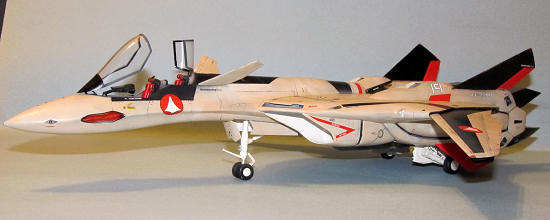
Hasegawa
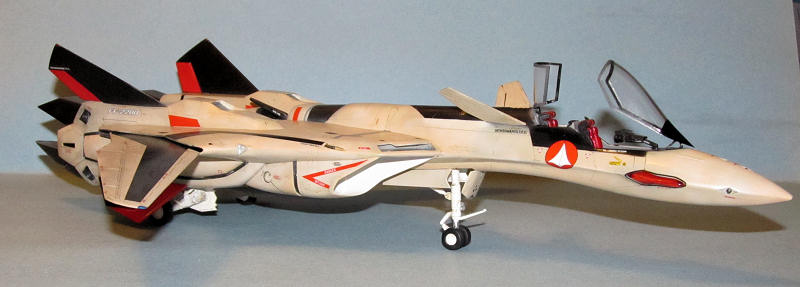
1/48 YF-19 “Excaliber” MC-1
| KIT #: | ? |
| PRICE: | $55.00 or so at HLJ |
| DECALS: | One option |
| REVIEWER: | Dan Lee |
| NOTES: | Includes crew figure. |
| HISTORY |
The YF-19 comes
from a Japanese sequel to the original Macross Series known as Macross Plus.
From Wiki
The VF-19 Excalibur
is the production-line version of Shinsei Industries' YF-19 AVF Prototype which
won the Project Super Nova design contest of 2040. Although destined to
eventually replace the aging VF-11 Thunderbolt as the main variable fighter for
the UN Spacy, distribution to date has been slow. Currently the Excalibur is
being used as a fighter for UN Spacy colonization fleets. The rare VFs are
usually only piloted by the best and brightest pilots, similar to the status
enjoyed by the VF-17 Nightmare. The VF-19 will gradually phase out and replace
the VF-11 as the main fighter of the UN Spacy.
 Statistics
•
Length: 18.62 meters
•
Wingspan: 14.87 meters
•
Height: 3.94 meters (fighter configuration) 15.48 m (battroid
configuration)
•
Weight (Empty): 8,750 kilograms (19,250 lb. or 9.625 tons) (Overload in
Space):
46,102 kilograms (101,424 lb. or 50.71 tons)
•
Maximum Speed: Mach 5.1 @ 22,000 meters
•
Cruising Speed: Mach 1.8 @ 15,000 meters
•
Rate of Climb to 5,000 meters: 65,000 meters per minute
•
Powerplant: Shinsei/P&W/Royce FF2200B x 2, Shinnakasu/P&W/Royce
FF2500E x 2
Three decades after
the great war between the humans and the Zentradi the U.N. government is
developing new technologies to use in their transforming fighter aircraft by
running tests on the colony planet Eden. Military test pilots and former
childhood friends, loose cannon Isamu Alva Dyson and the Zentradi mixed race
Guld Goa Bowman, are selected to each pilot a new aircraft (Shinsei Industries'
YF-19 & General Galaxy's YF-21 for Project Super Nova, to choose the newest
successor to the VF-11 Thunderbolt variable fighter which is currently still in
use by the UN Spacy military forces. Their own personal grudges end up
disrupting the tests, and begin to wreak havoc on the program.
<End Wiki>
| THE KIT |
See my very brief
preview of this kit.
| CONSTRUCTION |
I decided to do
something different and start off with the engine/legs of the YF-19 as these
were the most difficult aspect of the kit.
Hasegawa engineered the kit so that you don’t need to add the
nozzles/feet sub-assembly till after assembly which was fortunate as there was a
lot of sanding/filling to get everything smooth.
The nozzles were glued together, left for a couple of weeks then
sanded/filled. The rest of the leg
assembly was filled and sanded smooth.
Next I tackled the
big gun that is slung underneath the fuselage (actually the main weapon when in
mech mode.) This required some
careful sanding as the surface had some corrugation that needed to be dealt
with. It was painted RLM02 while
the muzzle was painted Steel as per the instructions.
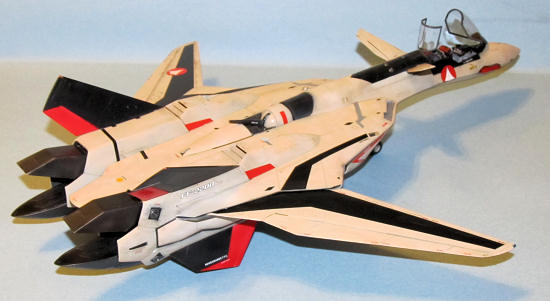 The wings
were ridiculously simple to assemble.
All that was required was some simple sanding along the edges to remove
the mold seams and some
The wings
were ridiculously simple to assemble.
All that was required was some simple sanding along the edges to remove
the mold seams and some
I went to the
intakes next. Unfortunately, the
intakes are rather prominent and have seams that need to be dealt with, but
unlike Hasegawa’s “Teen” series of modern US fighters, the YF-19’s intakes
aren’t that deep so there are not as many headaches.
Added to this work were some very obvious ejection pin marks.
This meant several rounds of filling with CA glue and sanding the excess
down. Eventually, the various seams
and ejection pin marks were sanded/filled to my satisfaction.
This was probably the most tedious part of the kit.
The intake interiors were painted flat white before the silver fan faces
were added.
Next up was the
cockpit. It was painted Dark Gull
Grey and the various cockpit decals were added before it was glued on the bottom
fuselage section. I left off most
of the other parts (ejection seats and consoles) till after painting.
The fuselage was
actually the easiest part of construction.
I glued along the seam and held it together with C clamps.
The leading edges and the “beaver” tail were the only areas that needed a
modest amount of filling and sanding unlike the intakes.
I followed the
instructions and did not combine sub assemblies till after painting.
| COLORS & MARKINGS |
Painting
First step was to
mask off the various openings using tape, foam and liquid mask.
Next the plane and the
various sub assemblies were preshaded flat black along the panel lines.
The instructions state that the color of the plane is a 50/50 mix of
Radome Tan and White. I don’t use
Radome tan that often, but the problem is that I was unwilling to burn my only
jar of Gunze Radome tan on a single model so I used Tamiya Wood Deck Tan instead
as I thought it was pretty close to Radome Tan.
Unfortunately, Wood Deck Tan doesn’t have enough yellow unlike Radome Tan
so instead of a light cream color the YF-19 took on an almost a desert pink.
Instead of freaking out, I just went with it.
 Once dry, I
masked off the various areas that were to painted gloss black.
I find that I don’t have much luck using the big decals over curves so I
prefer to paint the markings instead.
Part of that has to do with my own (traumatic) experience with the Polar
Lights 1/1000 USS Enterprise Refit model.
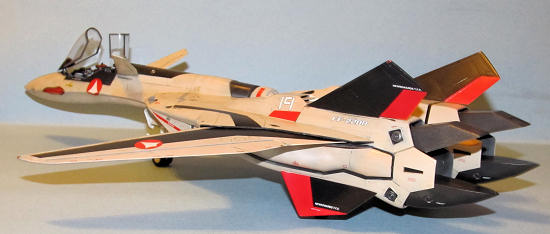
The strakes and tailfins were masked and painted flat black and shine
red. I had to repaint a couple of
sides due to the paint leaking through the masking tape.
The engine pod/leg doors were kept off as I painted various areas black
then when it was dry, masked and painted the fuselage color.
Once dry, I
masked off the various areas that were to painted gloss black.
I find that I don’t have much luck using the big decals over curves so I
prefer to paint the markings instead.
Part of that has to do with my own (traumatic) experience with the Polar
Lights 1/1000 USS Enterprise Refit model.
The strakes and tailfins were masked and painted flat black and shine
red. I had to repaint a couple of
sides due to the paint leaking through the masking tape.
The engine pod/leg doors were kept off as I painted various areas black
then when it was dry, masked and painted the fuselage color.
The canopy clear
bits were masked and painted flat black (interior color) and dark grey (exterior
color) while the nose clear bits were painted clear red.
I used Tamiya Clear Red with Tamiya Paint retarder for the first time and
I have to say it worked out a lot better than my previous experience with Tamiya
clear red which was awful.
When everything was
dry, the model was sprayed with a couple of thin coats of Future to provide a
gloss coat for the decals.
Decals
I had no major
issues with the decals. There were
a lot of decals as the kit has a lot of stencils like the modern jets it
resembles. I left off many of the
big fuselage decals as I painted the markings.
These decals went down well using MicroSet and the stubborn ones went
down with some Solvaset. Once dry,
the model was wiped down with a wet cloth to remove the excess decal solution.
Weathering and
Final Coat
I didn’t do much except put down a watercolor wash on the panel lines. The excess was removed with wetted Q tips. I used Xtracrylix Semi Gloss for the final coat.
| FINAL CONSTRUCTION |
The various sub
assemblies (intakes, legs/engine, engine nozzles/feet, and head) were glued
together. No issues with assembly.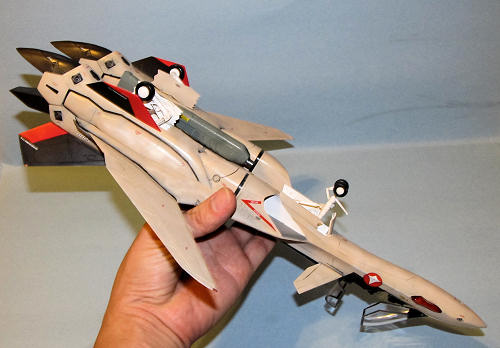
Next were the
cockpit pieces were added and the canopy was glued on.
The various maneuvering thruster nozzles and maneuvering fins were glued
on after.
The various landing
gear parts were painted and assembled with the oleos covered in aluminum foil
glued on with Micro Tinfoil
Adhesive. It was a fairly straight
forward sub assembly.
I glued on the
various landing gear doors and it was then that I realized I had goofed and
reversed the rear landing gear wells so the mounting holes for the doors were on
the opposite sides they were supposed to go on.
Ugh. I ended up gluing the
doors with CA glue to hold them in place.
The landing gear were glued in place without any issues despite my stupid
mistake.
Finally, I painted the various lights with a fine point brush.
| CONCLUSIONS |
 I guess
being a kid of the 1980s and who grew up with Robotech and other Japanese mecha
anime it is no surprise that I have a weakness for these new Hasegawa SF Macross
kits.
I guess
being a kid of the 1980s and who grew up with Robotech and other Japanese mecha
anime it is no surprise that I have a weakness for these new Hasegawa SF Macross
kits.
The one thing I really enjoy about these Hasegawa SF kits is the ease of construction (for the most part) and the fun in putting one of these things together without any concerns of accuracy.
October 2010
If you would like your product reviewed fairly and quickly, please contact me or see other details in the Note to Contributors.