Hasegawa 1/48 Voyager
| KIT #: | SW-02 |
| PRICE: | $40.00 |
| DECALS: | None |
| REVIEWER: | Mark Hiott |
| NOTES: |
Utilized Eduard 48-761 p.e. set |
| HISTORY |
Voyager 1 is a space probe launched by NASA on September 5, 1977. Part of the Voyager program to study the outer Solar System, Voyager 1 launched 16 days after its twin, Voyager 2. Having operated for 38 years and 27 days, the spacecraft still communicates with the Deep Space Network to receive routine commands and return data. At a distance of 133 AU (1.99×10¹⁰ km) as of autumn 2015, it is the farthest spacecraft from Earth and the only one in interstellar space.
The probe's primary mission objectives included flybys of Jupiter,
Saturn, and Saturn's large moon, Titan. While the spacecraft's course could have
been altered to include a Pluto encounter by forgoing the
 Titan flyby,
exploration of the moon, which was known to have a substantial atmosphere, took
priority. It studied the weather, magnetic fields, and rings of the two planets
and was the first probe to provide detailed images of their moons.
Titan flyby,
exploration of the moon, which was known to have a substantial atmosphere, took
priority. It studied the weather, magnetic fields, and rings of the two planets
and was the first probe to provide detailed images of their moons.
After completing its primary mission with the flyby of Saturn on November 20, 1980, Voyager 1 began an extended mission to explore the regions and boundaries of the outer heliosphere. On August 25, 2012, Voyager 1 crossed the heliopause to become the first spacecraft to enter interstellar space and study the interstellar medium. Voyager 1's extended mission is expected to continue until around 2025, when its radioisotope thermoelectric generators will no longer supply enough electric power to operate any of its scientific instruments.
Voyager 1 will reach the Oort cloud in about 300 years and take about 30,000 years to pass through it. Though it is not heading towards any particular star, in about 40,000 years, it will pass within 1.6 light-years of the star Gliese 445, which is at present in the constellation Camelopardalis. That star is generally moving towards the Solar System at about 119 km/s (430,000 km/h; 270,000 mph). NASA says that "The Voyagers are destined—perhaps eternally—to wander the Milky Way."
| THE KIT |
 The kit contains 86 parts
molded in black and white plastic. A blue base representing the Earth and a
small mounting wire are also included. For some strange reason a small alien
figure is included. The parts are very nicely detailed, however, the kit
includes many small parts. While most of the parts are molded in the appropriate
color, most modelers will want to paint it.
The kit contains 86 parts
molded in black and white plastic. A blue base representing the Earth and a
small mounting wire are also included. For some strange reason a small alien
figure is included. The parts are very nicely detailed, however, the kit
includes many small parts. While most of the parts are molded in the appropriate
color, most modelers will want to paint it.
Also included is a card about the Voyager missions, but it's all in Japanese. Sure would have been nice to be able to read it, as it looks to be very informative.
The instructions comprise 12 assembly steps, a parts layout and a painting guide. The painting guide is very nicely done and will help with assembly as well. Colors are also called out in the various steps. One cool thing about the instructions are that they name all the various parts of the Voyager. So you learn something too!
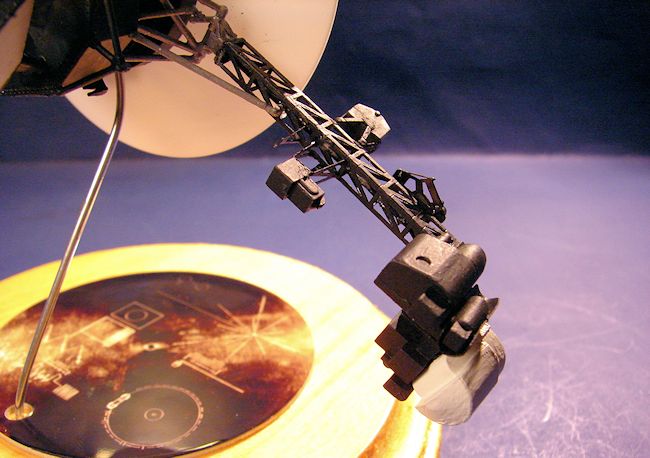
Although the Hasegawa kit
is very nice, molding it in plastic has it's limits. Eduard has come to the
rescue with their very nice ph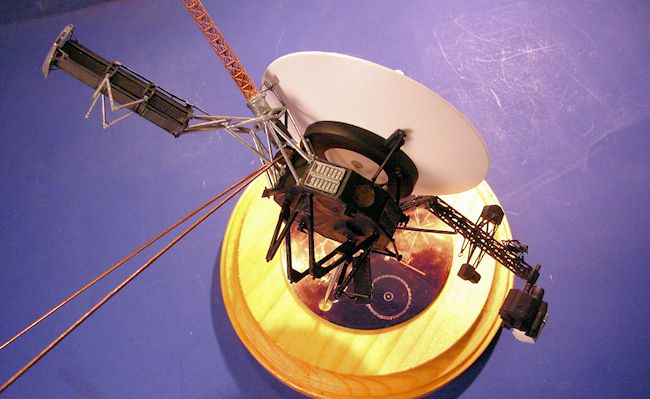 otoetch set. It contains 1 very fine sheet of
parts. Included are legs for the various instruments as well as replacement
booms. The booms are some of the finest photoetch I have seen and are the real
reason for getting this set.
otoetch set. It contains 1 very fine sheet of
parts. Included are legs for the various instruments as well as replacement
booms. The booms are some of the finest photoetch I have seen and are the real
reason for getting this set.
The instructions are clear and are set up to correspond to the Hasegawa instruction steps. However, modelers will want to go through the instructions to familiarize themselves with what needs replaced. Eduard shows you what to remove or modify in order to use the p/e parts. Most of the parts are very small and delicate. Care will be needed to make the most of them.
| CONSTRUCTION |
Even though the instructions do the dish first, I started with the main body. The main section is all the same color, so I assembled as much as I could. There are some p/e parts for the main body and care must be taken as they are quite small and fragile. I set it aside and started on the booms.
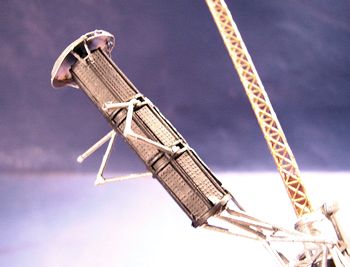
The p/e booms are very
nice, but delicate. The smaller booms are 1 piece that you will need to fold
into a square. I highly recommend you get a p/e bender for these, as they are
just too long to fold by hand. The
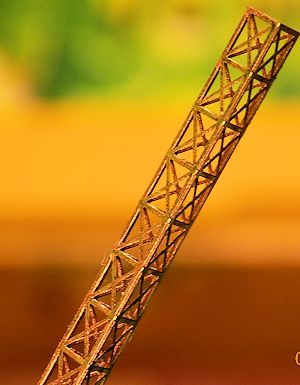 long boom is made up of 2 sections that will
need to be bent into a triangle and then joined together. I was afraid it would
be difficult, as the completed boom is the better part a foot long. Surprisingly
the boom sections went together so well, that it's hard to tell where the joint
is! One point on the long boom; it's suppose to twist 120 degrees along its
length, but no matter how I tried, I could not get it to twist.
long boom is made up of 2 sections that will
need to be bent into a triangle and then joined together. I was afraid it would
be difficult, as the completed boom is the better part a foot long. Surprisingly
the boom sections went together so well, that it's hard to tell where the joint
is! One point on the long boom; it's suppose to twist 120 degrees along its
length, but no matter how I tried, I could not get it to twist.
Back to the main body, I finished adding all the small bits and added the dish supports. Take care here as some of the parts a VERY small.
There are a lot of p/e parts for the "Meter Unit Mast Assembly" (step 6) and the "RTG Assembly" (step 7). These 2 steps gave me the most trouble with the RTG being quite a hand full with the p/e parts. Go slowly and bend carefully and you should be ok.
 In step 10 you assemble
the mount for the long boom. If you opt to use the p/e set, you will need to
modify the mount. The last thing I did was mount to various booms, antenna and
the dish.
In step 10 you assemble
the mount for the long boom. If you opt to use the p/e set, you will need to
modify the mount. The last thing I did was mount to various booms, antenna and
the dish.
Stick the kit on the base,
and you're done.
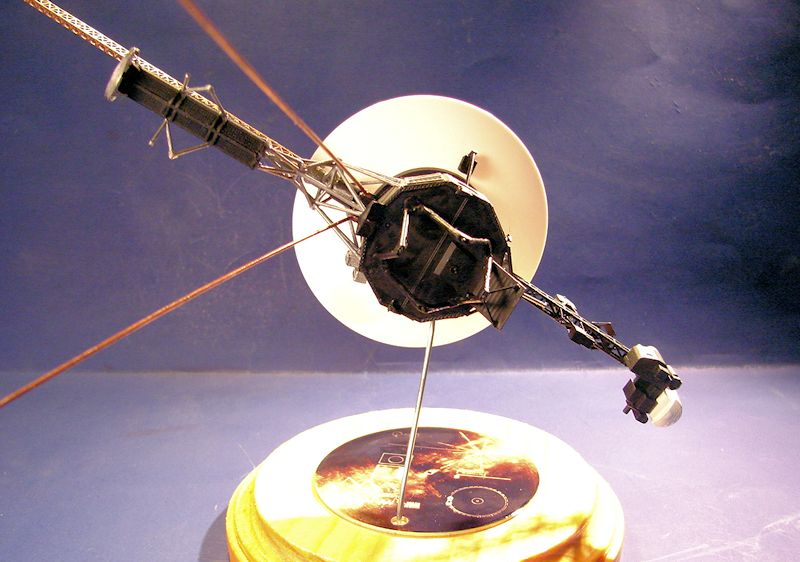
I really didn't care for the plastic Earth base that came with the kit, so I made my own. I picked up a small round pre-made base at Hobby Lobby. I wanted to mount the Voyager with a copy of the "Golden Record" that is attached to its main body. After a bit of a search, I found one on Cafe Press that was perfect. It is 2.75in in diameter and is made of aluminum. I believe it was meant to be a Christmas ornament.
 I varnished the base and
attached the record. The record had a hole already in it, so I just used that
for my mounting pole. I think it looks much nicer then the kit base.
I varnished the base and
attached the record. The record had a hole already in it, so I just used that
for my mounting pole. I think it looks much nicer then the kit base.
Not much to say about painting the kit as it is basically black and white. I followed the instruction callouts for the most part. I assembled as much of the main body as I could before painting the whole shabang flat black. The various p/e panels and fittings were then painted aluminum. The only deviation I made was that I didn't paint the dish. It looked just the right tone of white, so I left it as it was.
| CONCLUSIONS |
A great kit of an important NASA spacecraft. This is one that should be in every space nuts display case. Easy to build, simple to paint. If the Eduard p/e set is used the build becomes a bit more complicated, but it looks even better. There are some small parts, but I don't think anyone would have a hard time building this kit.
| REFERENCES |
Wikipedia for the history, NASA for various photos
CafePress for the base: http://www.cafepress.com/+voyagers_gold_record_round_ornament,762220538
November 2015
Copyright ModelingMadness.com
If you would like your product reviewed fairly and fairly quickly, please contact the editor or see other details in the
Note to
Contributors.