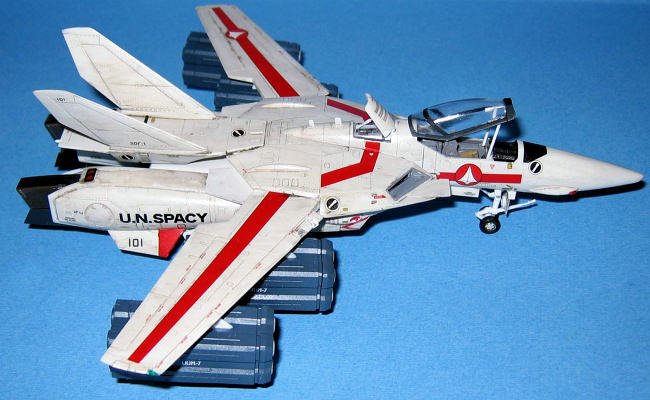
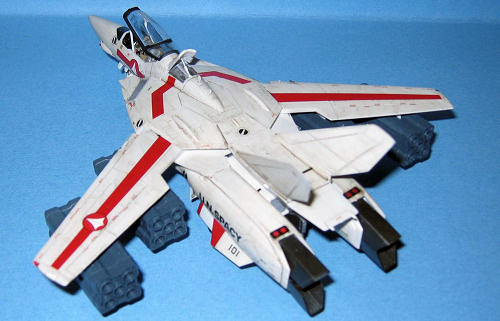
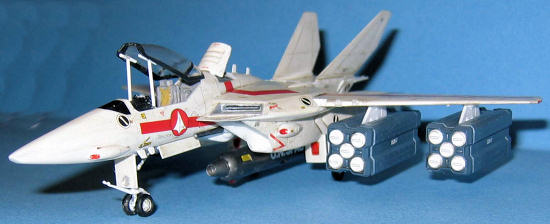
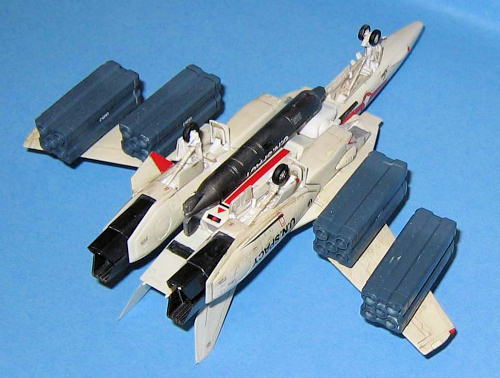
Hasegawa 1/72 VF-1A Valkyrie
| KIT #: | 65719 |
| PRICE: | $20.00 MSRP |
| DECALS: | Four options |
| REVIEWER: | Dan Lee |
| NOTES: |
| HISTORY |
In the early 1980s, the Harmony Gold Company decided to import the classic Japanese anime Super Dimensional Fortress: Macross series over from Japan and bring it to North American TV as an action adventure series for kids 8-15. However, they discovered that TV syndicators liked series to have a minimum of some 65 episodes. Unfortunately, Macross had only some 36 ½ hour episodes. To compensate for that, the American producer added two separate unrelated anime series and smushed all three together into a three generational epic (to the horror of many an Anime purist) and released it as Robotech in 1984/85.
The story begins when a starship
crashed on Earth in the 1990s. The ship was salvaged by the UN and the
technology, known as Robotech, was shared around the world. On the eve of
mankind’s first leap to the stars (the now rebuilt starship was renamed
 the
Super Dimensional Fortress-1 or SDF-1), a fleet of several million warships, uh,
manned by an alien race known as the Zentradi (a race of 50 foot tall humanoids)
entered the solar system with the goal of capturing the SDF-1 for themselves.
Thus began an epic three generations of war against three different alien races
who wanted what the humans accidentally discovered.
the
Super Dimensional Fortress-1 or SDF-1), a fleet of several million warships, uh,
manned by an alien race known as the Zentradi (a race of 50 foot tall humanoids)
entered the solar system with the goal of capturing the SDF-1 for themselves.
Thus began an epic three generations of war against three different alien races
who wanted what the humans accidentally discovered.
The series caught on in North America, despite being heavily edited, for its adult situations and loads of human on alien fighting. What made this series a landmark for animation was that it combined excellent SF combat sequences with good writing (except the annoying songs) and its nasty habit of killing off important characters (villains or good guys) over the course of the series. Unlike most action series, animated or not, it didn’t treat death and destruction as a mere flesh wound to be forgotten the next episode. Many of the characters suffered whether it was the physical or mental wounds such as Post Traumatic Stress Disorder, dealt with the philosophical issues of war and/or regret for actions done or not done.
For most kids and teenagers who saw this show, it wasn’t about emotions, philosophy or trauma, concepts that were alien to many of us till much later. Macross (I will not confuse/bore people with by using Macross/Robotech and simply refer to the series as Macross to avoid confusion) was all about the mecha, namely the various fighters the humans used. The most popular are the various versions of the Valkryie--in Robotechese, the Veritech—Fighter.
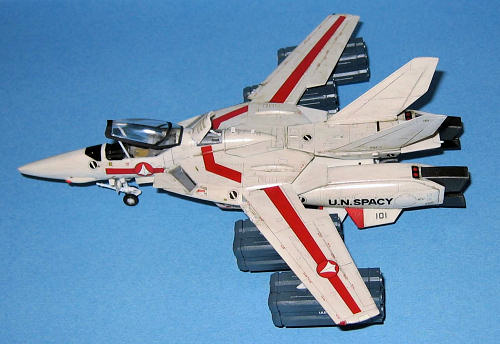
The Macross VF-1 Valkryie fighter looks a lot like a single seat F-14 that had the bonus of transforming into a humanoid shaped mechanized robot. It was armed to the teeth like its F-14 ancestor, with a huge gatling gun, nose mounted lasers and 12 homing missiles.
 Many companies (including
Revell-Monogram) have produced models of the Valkryie/Veritech fighters in their
various combat modes—including some that tried to do all them (not very well I
might add.) From what I understand, they collectively suffered the
stereotypical flaws of SF models. Poor fit and accuracy. It took a lot of time
and effort to make a decent model out of them.
Many companies (including
Revell-Monogram) have produced models of the Valkryie/Veritech fighters in their
various combat modes—including some that tried to do all them (not very well I
might add.) From what I understand, they collectively suffered the
stereotypical flaws of SF models. Poor fit and accuracy. It took a lot of time
and effort to make a decent model out of them.
There was much joy from Macross and Robotech fans when Hasegawa decided to make Macross kits the Hasegawa way. You mean for once there was a SF kit that didn’t require filling and sanding? You bet.
| CONSTRUCTION |
After I cleaned the parts with warm water and soap, I started with the cockpit. The Valkryie has a fairly simple cockpit which consists of a seat, a control panel and a tub (but no stick.) The tub and seat were painted Gunze H317 dark gull grey while the control panel was painted gloss black (to save a step in adding the control panel decal) and the seat cushions were painted Poly Scale Middlestone. The hardest part was the decal because it stuck together while I was applying it and wouldn’t come apart. It took several minutes of gentle tugging and soaking to loosen it up. Unfortunately, this is a common occurrence for me and which is why I generally avoid control panel decals, but due to the size of the kit and the colors required, I felt I had no choice but to use it.
The cockpit tub also includes the front landing gear wheel well which was painted with a light coat of Gunze H1 White.
 The fuselage comes in three
sections. I started with the nose. I took my time inserting the tub into the
fuselage as you need some gentle force to get the cockpit tub to line up with
the tabs. Once the tub was in, I glued the fuselage halves together.
The fuselage comes in three
sections. I started with the nose. I took my time inserting the tub into the
fuselage as you need some gentle force to get the cockpit tub to line up with
the tabs. Once the tub was in, I glued the fuselage halves together.
The center part of the fuselage was pretty easy to build. I attached the intakes and airbrushed them with Dark Sea Grey. The top half of the main fuselage looks somewhat like a doughnut whose hole is filled by a center insert.
On this model, the wings swivel just like the old Revell F-14s. The swivel mechanism was very easy to make, but you should pay attention to cleaning the gears and take some time to align the port and starboard wing attachments. Once the swivel mechanism was set, the top half was glued to the bottom half.
The wings went together well, but the fit isn’t perfect (more than likely I screwed it up.) I ended up using CA glue to fill the gaps between the wings and around the wing tips. Once the glue was dry, I inserted the wings onto the attachment tabs. The fit is okay, but one needs to apply use a little gentle force to get them on completely.
The tail and leg assemblies are a little tricky because several of the parts had to be pre painted before installing them. Most notably are the steel colored rocket nozzles in the tail and the vectored thrust nozzles and the gloss white wheel wells in each of the legs of the Valkryie. Once they were glued in place, I ended up masking them off with Maskol in preparation for painting.
I left off the legs and tail section till final assembly till after painting.
| COLORS & MARKINGS |
I selected Rick Hunter’s Valkryie because was much easier to paint as the color scheme was an overall coat of FS36222 Light Grey Gunze H311. My skill painting overall white schemes is very inconsistent so rather than showcase my lack of skill with gloss colors, I opted for the easier option.
I pre shaded the Valkryie with
dark gull grey and then sprayed on
 several thin coats of FS36622
which didn’t get pebbly (my typical result for light colors.) When it was
dry, I sprayed on several thin coats of Future for the decals.
several thin coats of FS36622
which didn’t get pebbly (my typical result for light colors.) When it was
dry, I sprayed on several thin coats of Future for the decals.
CONSTRUCTION CONTINUED
The tail and arm assemblies were glued on after painting due to the impossible angles required for painting them. Just be warned, the fit is fine, but both tail and arm assemblies require to be clamped down till the glue dries as the attachment points are not all that strong.
The huge Gatling gun was painted Gunze Steel and then glued between the two arm assemblies a couple of days later. You should do your best to secure the gun while the glue is drying as it has a tendency to droop like the tail. The best way to keep the gun aligned is to put the Valkryie upside down while the glue dries (but should only be done when the glue holding tail assembly to tail assembly is dry.)
DECALS
The decals are not typical Hasegawa decals. They are not thick and the white is not ivory and they work well with Microsol. Be warned, even though this is a mere 1/72 scale plane, it has lots of stencils. It took myself a couple of weeks to decal this model as I worked on it one decal at a time. I found the number of stencils rather surprising for a SF model.
Once the decals were done and dry, I put a watercolor wash of one part black, one part burnt sienna and two parts of raw umber with a bit of water and a couple of drops of dish soap on the Valkryie. I personally prefer a watercolor wash over the oil wash because it allows me to correct mistakes (which sadly, I make lots of) and it isn’t as toxic as oil paint with mineral spirits (which make me high and rather incoherent for a couple of hours.) Also water color paints are cheap and easy to use.
I let it dry overnight, wiped off the setting solution residue and sprayed the parts with a flat coat.
| FINAL CONSTRUCTION |
I armed Rick’s bird with four big missile pods from the Hasegawa Macross Weapons Set (sigh.) One thing nice thing I will say is that Hasegawa did a very good job engineering the weapons set.
Rick’s missile pods involved a bit
of work. I did more filling and sanding on the pod seams than I did on the
Valkryie’s. Once that was done, I made a medium dark blue paint based on 60%
Gunze H54 Navy Blue and 40% H56 Intermediate Blue and airbrushed it
 on. It took
a couple of coats because I missed some of the little nooks the first time. I
left the end caps off till the painting was done and when everything was dry, I
glued them in. The instructions say one should paint them gloss white where I,
due to my laziness, decided against it.
on. It took
a couple of coats because I missed some of the little nooks the first time. I
left the end caps off till the painting was done and when everything was dry, I
glued them in. The instructions say one should paint them gloss white where I,
due to my laziness, decided against it.
I mentioned in my preview that the clear bits had no issues. Well, I was wrong. The canopy has a wicked centerline seam that needs to be sanded down. I used Squadron’s medium, fine and very fine sanding sticks to take down the seam. Then I used Revlon’s four step nail polisher to remove even more of the scratches. Finally, I polished the canopy with a small amount of Novus 2 before I dipped it in Future.
For those who don’t know what I’m talking about, the Revlon Four Step nail polisher is basically an eight inch foam stick with emery board style sand paper on the sides and four different grades of cloth polishers—smooth, fine smoother, rough polisher, mirror finish polisher. I remove the sand paper on the sides for two reasons: I don’t need it and sometimes it scratches the surface in tight spots. The Revlon Nail Polisher does a really good job, plus it is very durable and cheap. I liberated one from an ex girlfriend of mine three years ago and is still used today.
One thing I don’t like about 1/72 scale planes is the 1/72 scale landing lights. I have a hard enough time with 1/48 scale lights let alone ones 1/3 smaller. I managed to get the tiny bits without blistering my own ears with bucket loads of profanity.
The rest of the parts (legs and tail) were attached without too many issues.
| CONCLUSIONS |
This kit is very easy (as advertised) to build if you like 1/72 scale jets or science fiction subjects. Part of me would like to see a 1/48 scale version (I’m greedy, I guess) but I doubt that a such a kit will ever be made and if it is, I hope it is a lot easier to build than Hasegawa’s F-14 kits!
August 2006
Copyright ModelingMadness.com.
If you would like your product reviewed fairly and fairly quickly, please contact the editor or see other details in the Note to Contributors.