| KIT #: | 0157471 |
| PRICE: | $95.99 |
| DECALS: | Three options |
| REVIEWER: | Greg Ewald |
| NOTES: |
The best fit of any model I have ever built |
| HISTORY |
The Earth Federation has spread across the limited bodies of the solar system,
to the moon, to some asteroids, and to some engineered compounds that can
sustain human life. Unfortunately, the people back on the third rock from the
sun want to take much of the products being developed by the other satellite
states, and rest on their laurels (anyone see a parable here?), depending on
them to deliver quite a lot of goods to the home world.
Well, of course, you end up with a
bit of revolution, in this case the Zeon Republic, who decide to take the battle
to the world of
 Terra. Defending the Earth Fed are a hard-core group of
marine-types (jarheads-and I mean absolutely no disrespect-many were in my
family) who don’t take kindly to being told what to do by some snotty off-worlders
!
Terra. Defending the Earth Fed are a hard-core group of
marine-types (jarheads-and I mean absolutely no disrespect-many were in my
family) who don’t take kindly to being told what to do by some snotty off-worlders
!
Yeah, the newbie’s might have new Mobile Suits, originally developed to work in
space for construction, and now outfitted with “lasers”,
but these tank drivers know their stuff,
and with dual barreled engines of mass destruction, feel more than able to head
to the battlefield and take on the walking mechs! You guessed it, they pretty
much lose. I do feel bad for all of the tank crews, those MS guys can’t shoot
straight for losing, but they seem to kick the rear of any tank they come across
for the most part. Rommel always
said it was a matter of elevation, and the MS’s are far taller than the already
overweight tanks.
The Gundam universe is a fascinating alternative timeline (at least I hope so),
with some of the best combat animation around. Lots of whiny corporals and tough
as leather DI’s. Those of you who have been in the military will feel right at
home watching the episodes.
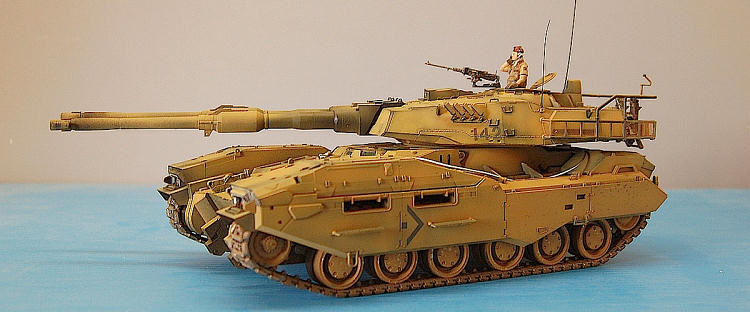
The Type 61 twin barreled (150mm’s) tank was the earth standard heavy tank , used for wreaking destruction on all sorts of foes. Separate elevation and ranging for each barrel meant that they were basically “land battleships”. Of course, in the Gundam universe, missiles are almost completely useless due to jamming systems, so combatants have to go head to toe with each other in combat, and the 61 was the mainstay for many a year…until the Mobile Suits arrived. Game over.
| THE KIT |
: (see the preview here for a brief bit:
http://modelingmadness.com/reviews/misc/scifi/previews/0157471.htm
The styrene is molded in a light tan, and the figures are molded in a variety of
flesh and gray. The quality of the plastic is superb, easy to cut and sand. I
found no flash or sink marks in any of the castings, though the sprue injection
points are rather large, so hedging shears, sharp blades, or a “laser” are
necessary to remove the pieces from the main sprue.
The instructions, as noted in the preview, more resemble a well published anime book than the old newsprint stuff I am used to. Glossy paper, colour photos, and a plethora of illustrations. They remind me of the old Shep Paine/Monogram instructions in quality, even though I can not read Japanese (my fault, I should have studied harder), they are very easy to follow, and as you will see, you will want to follow them exactly!
| CONSTRUCTION |
With tanks, you start at the bottom and work your way up, so we begin with the
under-hull, the part that makes the tank move. The
lower hull is not molded in one piece, like most tank kits, but has the tightest
fitting side plates I have seen yet in a model.
 The two pieces go together with
a satisfying “click”, sort of like sticking your knuckles from each hand
together, weaver-style.
The two pieces go together with
a satisfying “click”, sort of like sticking your knuckles from each hand
together, weaver-style.
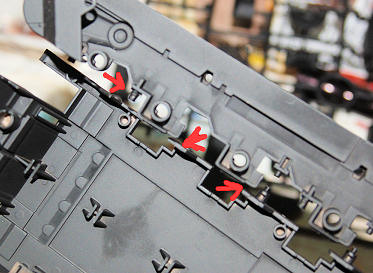
Typically, the axles and wheels are the most dreaded part of a tank build, due
to the monotony of making endless sets of bogies, wheels, and struts. Bandai has
definitely passed that bar, this almost falls together quickly. Watch a few
re-runs or a movie, and “viola” ! you have a bottom. Wait, that sounded off,
sorry. Do pay attention to the numbering of the shock struts, they are slightly
different from front to back, and from side to side. Don’t rush this!
Veering off from the instructions, as is normal for me, I decided to not attach
the steps and railings on the rear of the tank upper hull at this time. We can
always attach them later, when they won’t be subjected to model handling that
leads to carpet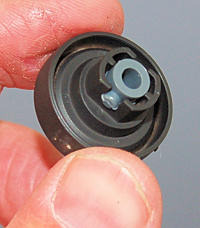 monster dinner.
Wheels: Each of the wheels has a
vinyl insert to hold it to the axle, which is quite nice, they fit into place
snugly. Looking at the ‘toon, it seems that the desert tanks had steel wheels,
so I did not do a black rubber rim. If you decide to do the urban fighting
model, you may want to. The wheels
fit firmly on, and need no cement. Do, however, pay attention in step 5 to keep
the front and rear sprocket wheels separate, like I didn’t. It will lead to much
confusion ! (I did finally get it figured out)
 Tracks: Interesting job on these,
possibly the first vinyl tracks I have ever liked on a tank model. Each track is
made of two segments, held together by metal pins, and extremely well detailed.
With the rear sprocket wheel on, you manipulate the front into the grooves of
the track, and simply slide it onto the front mounting axle. Ingenious. I did,
of course, do my standard paint job on the tracks prior to mounting (see below).
Tracks: Interesting job on these,
possibly the first vinyl tracks I have ever liked on a tank model. Each track is
made of two segments, held together by metal pins, and extremely well detailed.
With the rear sprocket wheel on, you manipulate the front into the grooves of
the track, and simply slide it onto the front mounting axle. Ingenious. I did,
of course, do my standard paint job on the tracks prior to mounting (see below).
The Hull: Getting the massive
hull parts together is a bit of a chore, and hopefully, you haven’t glued on all
the little do-dads yet, because it will require some elbow grease. Hint: put a
little bit of lubricant on the mounting pegs, mineral oil works fine.
The clear parts for the driver’s bay fit in snugly, if you want them
anything but clear, paint prior to snapping the part in. I usually test fit
clear parts, but in this case it was to my undoing, as once these things are in
place, good luck trying to get them out. There is a finality to the “click” of
this kit that can not be persuaded to be undone, no matter how much lube you
have used. Hmmm.
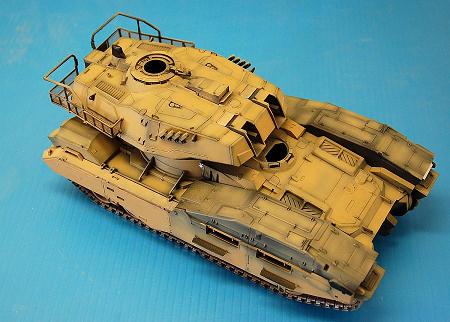
 The hatches of the upper hull are pose-able, and if you are so inclined, the
instructions include a plethora of illustrations of the interior. This kit would
be a super-detailers dream ! I
painted the upper engine intakes chrome silver, then fastened on the mantlet
covers for them. The lights have
covers too, you can have them up or down…my attitude is down, as I want to show
off as much stuff as is possible.
The hatches of the upper hull are pose-able, and if you are so inclined, the
instructions include a plethora of illustrations of the interior. This kit would
be a super-detailers dream ! I
painted the upper engine intakes chrome silver, then fastened on the mantlet
covers for them. The lights have
covers too, you can have them up or down…my attitude is down, as I want to show
off as much stuff as is possible.
The engine exhausts, parts I 1 and 2, were painted a dark flat gray before being
assembled into the rear housing and mounted on the deck. I’ve always felt that
painting tank parts separately makes for a more interesting model, rather than
another amorphous blob of olive drab or khaki.
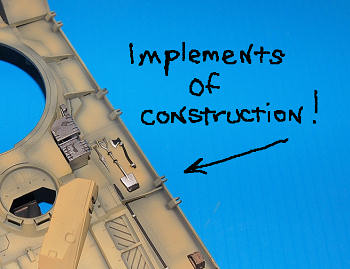
If you are not going to add on the side armor in step 13, there a bunch of
shovels, picks, and things used for digging you can glom on. I would imagine for
quick latrines, because digging out this tank would be pointless. A squad of
fifteen couldn’t make it hull-down in a day. I think a thunder-bucket would be a
better addition to the tank’s side supplies.
Personally, adding on more armor to a tank is a given, so of course I built the
panels to be attached. I did paint them slightly off from the main hull colour,
so they looked like they were field applied. And, I wanted to. There are also
foot steps that you can pose up (boring) or down (yes!) on each side. The only
plus to this would have been if they were photo-etched also, like the bits on
the 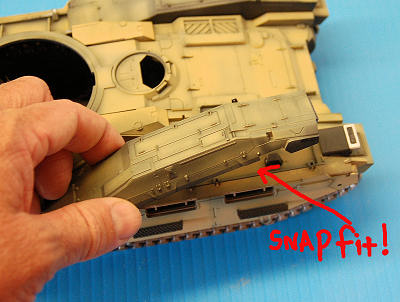 turret. The upper front mantlets cover all of the stuff on the nose of the
tank, once again, if you have a roto-tool and the will, there is a ton of room
for detailing.
turret. The upper front mantlets cover all of the stuff on the nose of the
tank, once again, if you have a roto-tool and the will, there is a ton of room
for detailing.
Tow Cables: I only had one in my
box, but that was o.k. Using some steel picture hanging wire, and the
measurement chart so thoughtfully placed in the instructions, I made my own. I
don’t know how realistically useful these would be on a real tank, this thing
would outweigh the Maus.
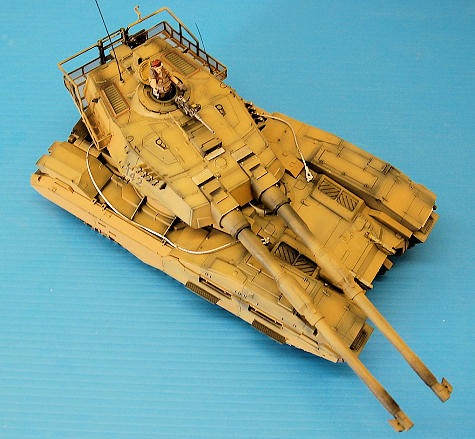
The Turret: May I wax poetic for a
moment? My oh my, this is really something else, almost another kit in and of
itself !
Follow the instructions very carefully however (and take note, because you know
how little I usually do), the assembly sequence for the turret is quite precise.
I can’t believe I am saying this.
I used a roll of masking tape as a mounting jig for the turret during
construction, once you sand off those pesky mounting tabs, it fits right in.
(You know, the tabs that hold the turret to the hull- trust me, you won’t need
them, gravity will work just fine)
I painted the entire interior of the turret a dirty white, to get rid of the
blah’s, and then began assembly of the unit. I did pick out the commander’s
chair with some olive drab and tan. Once again, there are a number of lovely
illustrations of the tank turret interior for those of you moved to go nuts. The
barrel mantlet/receivers of the twin 150’s slip nicely into place, I checked
them, then removed them again until the final stages. This is my only beef with
the kit, I think aluminium barrels with plastic add-ons would have been better,
but a little bit of scraping and sanding…hey, not much sweat.
The rear of the turret has a catwalk ( I did say this was a large tank, right?),
made of several styrene bits and some photo etch grating. I tried assembling it
two ways:
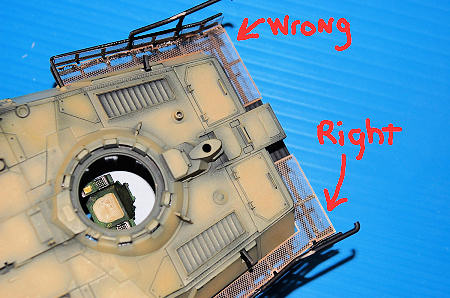 My way: glue the main bits separate from the turret, and then attach the PE.
Attempt to mate this to the hull turret.
WRONG
My way: glue the main bits separate from the turret, and then attach the PE.
Attempt to mate this to the hull turret.
WRONG
Their way: glue the styrene bits onto the turret, and then add the PE. RIGHT.
Dang people at Bandai really know their stuff. I guess I will have to start
paying attention to directions.
The rest of the railings fit into place in a rather irritatingly fashion, that
is, perfectly smooth. The ladder that goes at the rear can be placed in a folded
or unfolded position, though I think an able lad would be agile enough to jump
from the deck to the hatch when faced by an oncoming Mobile Suit.
The lights and cupola rings fit in snugly, I am being spoiled by this model. The
same thing goes for the clear commander’s ring as did the driver’s…if you want
it anything else but clear, paint it first.
Smoke ‘em if you got ‘em ! The
smoke discharger tubes are wonderful, and incorporate PE chains, though the
location is a little dubious for the metal. I hit mine with some CA glue onto
the tube bases, and let them dry for an hour or so, then bent the chains up to
meet the tube tops. Hit that with some glue, let it dry, then use your trusty
silver Sharpie marker to highlight. Very, very, very convincing.
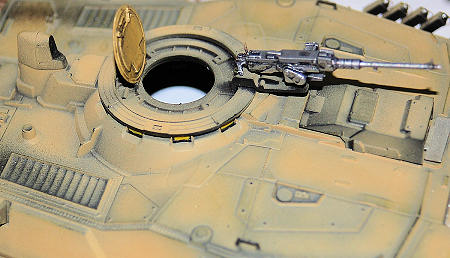 Machine guns: What is a huge tank
without some .50 cals? O.K. , this one has two machine guns that are easily
assembled, in fact, the breech top is molded separately on the commander’s gun
if you want to pose it open. Again, the parts seem to almost fall together with
a sound “click”.
Machine guns: What is a huge tank
without some .50 cals? O.K. , this one has two machine guns that are easily
assembled, in fact, the breech top is molded separately on the commander’s gun
if you want to pose it open. Again, the parts seem to almost fall together with
a sound “click”.
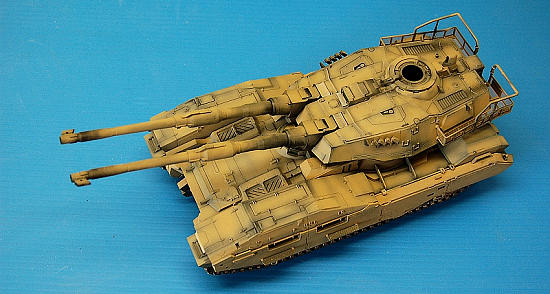
The Big Barrels: The reason you have a tank is to haul some serious ammo, and
this one does it double time! The
barrel halves fit together nicely, and only required a bit of psr to make them
smooth. The fit into the receiving slots is amazingly tight, but easy enough to
do with a bit of oil and a firm grip. Get your mind out of the gutter.
There are two different holding jacks for the main guns, ostensibly the “hull
down” for in transit, and the “free willy” for when you are in a gunfight. A
tank without a moveable turret is like a dull Sunday morning to me, so this
particular beast is free, loose, and full of juice ! This means I used the
lowered gun jacks for those of you not used to my diatribe.
The ends with the flared out bits snap on satisfyingly , and definitely add a
certain “pizzaz” to the barrels. I gather it is some sort of uber-modern
anti-backlash thingy-mo-bob. (who cares, it looks really cool)
The turret has two antennae, but only the stubs are included with the kit, so I
just lit a candle, and stretched some sprue, leaving the base end fairly thick
so I could trim it to fit. If you want a curved job, hold the section (after it
has cooled down of course) in one hand, and apply pressure with your thumb to
the side you want swept back, and pull quickly
while pinching. The thin sprue will bend towards the most pressure.
| COLORS & MARKINGS |
Painting and Markings: As with most of
my tank models, I like to begin by painting all of the sprues flat black from
the get go. During the assembly, I use a double action Badger to fade in the
olive drab and light tan, working from a center point out towards the edges. I
suppose you could use a black tint to make the lines, but this is far easier ( a
tip from IPMS Stockholm). It
is really
 quite easy to do, just don’t try to apply much paint all at once.
Spray a bit, then go watch a vid or something. If you are health conscious, jog
around the block. Then come back and lightly hit it again. Repeat this step over
and over until it looks like you want it to.
quite easy to do, just don’t try to apply much paint all at once.
Spray a bit, then go watch a vid or something. If you are health conscious, jog
around the block. Then come back and lightly hit it again. Repeat this step over
and over until it looks like you want it to.
I used pastels to weather the panels a bit, but didn’t go too heavy, sometimes it is better to leave well enough alone
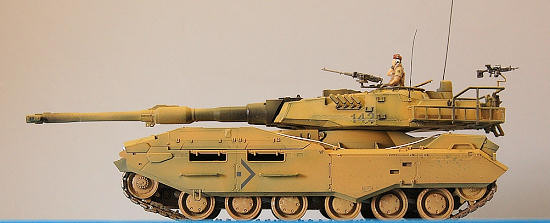
Decals: The markings are for three
vehicles, two of the desert battalion, and one of the more urban brigade.
I chose the second of the desert tanks, number 142. The decals are super
thin, and settle well with just a touch of solvent, but be careful, I destroyed
one of the markings by using too much!
I did hear a comment about this tank being somewhat of a “super merkava”, and I
have to agree, even the markings are similar to the Israeli tanks being used
today, with the Delta markings and all.
It certainly does lend itself to the idea of an open area conflict.
I did find that they silvered after drying, but a few coats of a clear satin
knocked that down a bit. Using a floor finish works wonders, and though I have
used Future in the past, I have become a fanatic supporter of Jasco acrylic
satin clear finish. You can pick this up in any good flooring or hardware store.
Those of you in Europe may want to check into the fine Swedish wood floor
finishes such as Bona. It sprays
without thinning, and has a luster that is just perfect.
 Tracks: I painted the vinyl tracks
matte silver using a rattlecan enamel, and set them aside to dry for a night. A
light sprinkling of salt after being spritzed with water, and a light coat of
Krylon almond enamel spray ( I use the stuff made for appliances as it holds up
to abuse) was applied. Let this dry once again overnight, then lightly scrub off
the salt. Wet brush with a decent
wood stain, I still like Minwax “cedar”, and buff a bit. Hey now, we have worn
tracks !
Tracks: I painted the vinyl tracks
matte silver using a rattlecan enamel, and set them aside to dry for a night. A
light sprinkling of salt after being spritzed with water, and a light coat of
Krylon almond enamel spray ( I use the stuff made for appliances as it holds up
to abuse) was applied. Let this dry once again overnight, then lightly scrub off
the salt. Wet brush with a decent
wood stain, I still like Minwax “cedar”, and buff a bit. Hey now, we have worn
tracks !
I used rattlecan metal colours for the gun barrels and what-not, I like the
automotive Krylon series because they are buffable. Of course, one could use any
of the metal finishes available on the market, my personal favourite is Testor’s
metalizer, but the others are creeping into my paint stash.
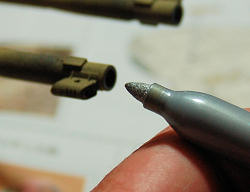 I always like to hit the ends of the interior of the barrels with a silver
Sharpie marker lightly, though you could use a silver pencil too. I like that
little bit of extra “worn-ness”.
I always like to hit the ends of the interior of the barrels with a silver
Sharpie marker lightly, though you could use a silver pencil too. I like that
little bit of extra “worn-ness”.
Figures: Three figures are
included, the driver, a tank
commander, and a one-eyed psycho in a beret. Why do they always have the left
eye with a patch? The only thing I can figure out is that most actors are right
eye oriented, so they have to blind out the left…wait a minute, this is a
cartoon. Hmmm.
Yes, the figures are as well molded as any I have seen, including resin pops.
The Psycho-cyclops does need some filler on the left arm, but that is about it.
Interestingly enough, Bandai molded the parts in different colours on the
same sprue, similar to a snap-tite kit.
This does give you the luxury of painting the different body parts prior
to assembly, saving a lot of touch up work.
Full colour profiles are in the instructions for each figure, yeah, you guessed
it…hey, how about khaki? There are several little fiddly bits to be attached to
each one, the commander gets earphones, the other guys get an assortment of hand
guns and things that look like pacemakers. Universal Sol…wait a minute. I did
add a piece of foil to replicate the earphone band on top of the beret, using a
thin bit of sparkling wine stuff I had in the spares drawer, for some odd
reason, it is much thicker than regular wine bottle foil, and suitable for 1/48th-1/35th
application. Pressure, I suppose.
Since I wasn’t building the 144 tank, I left off the Piratical figure, the commander serves to give a sense of scale to the vehicle. I can’t imagine being the gunner in this beast, two 150’s going off less than a meter above your head must be quite something! Hence, the hatch was left shut.
| CONCLUSIONS |
 I have built a lot of models. Thousands
perhaps. This one would stand out in the top ten for sure. Yep, it is very
expensive. If it had aluminium barrels it would be perfect, but it is 99.9 %
there as is.
I have built a lot of models. Thousands
perhaps. This one would stand out in the top ten for sure. Yep, it is very
expensive. If it had aluminium barrels it would be perfect, but it is 99.9 %
there as is.
If you are into super-detailing, this kit is worth it’s weight in Troy ounces,
seriously. The amount of information given to you in the instructions is easily
enough for you to really go to town and make a complete interior, I am sure
there will be some aftermarket items heading down the pike in those regards
also.
I guess I can’t say enough about how much this kit was a pleasure to build, it
really stands out in the realm of scale models as one of the best ever. Thanks
to Hobby Link Japan for sending me this beauty!
| REFERENCES |
http://en.wikipedia.org/wiki
/Type_61_Tank#Type_61_Tank
http://en.wikipedia.org/wiki/Gundam_-_The_08th_MS_Team
Greg Ewald
April 2009
Copyright ModelingMadness.com. All rights reserved.
If you would like your product reviewed fairly and quickly, please contact the editor or see other details in the Note to Contributors.