PST 1/72 PMZ-2 (ZIS-42)
|
KIT # |
72048 |
|
PRICE: |
$8.97 MSRP ($7.96 at Squadron) |
|
DECALS: |
none |
|
REVIEWER: |
|
|
NOTES: |
|
HISTORY |
ZiS
What is ZiS? A simplistic answer would be that ZIS was the Soviet counterpart of Mack, Volvo or Mercedes trucks. ZiS stands for Zavod imeni Stalina, which roughly translates into Plant of Stalin's name. This name was adopted in 1933 to kiss up to the Boss. Prior to this, the truck factory had started in 1931 as AMO (Automobil Moscow Obshchestvo (Enterprise)). Their first product was what became the ZiS-5 flat bed lorry, a loose copy of the American Autocar truck. ZiS-5 mass production started after the name change in 1933 and this ubiquitous truck came to play a huge role in the Great Patriotic war together with the GAZ-AA truck, both becoming the transport backbone of the Soviet Army. ZiS produced 532,311 trucks of this model since 1933 to 1948. The Russians called the Zis-5 "Tryohtonka" for its 3-ton payload capacity, a 3-ton Tonka truck.
In the autumn of 1941 the production line in Moscow was stopped due to the threat of the advancing Nazis and ZiS was moved east to Ulianovsk and to Ural, to Miass, Chelyabinsk region. This last plant started production in 1944 and became the UralZIS or UralAZ plant that up to this day is in the business of making trucks, the circa 1963 URAL 4320 being their main staple.
 The Ulianovsk plant became UASZIS or UAZ and produced
trucks from February 1942 until its closure in 1955. The Moscow plant was
reopened in April 1942 remained open until 1948. Every one of these plants used
their own trademark labels on the radiators.
The Ulianovsk plant became UASZIS or UAZ and produced
trucks from February 1942 until its closure in 1955. The Moscow plant was
reopened in April 1942 remained open until 1948. Every one of these plants used
their own trademark labels on the radiators.
Political correctness does not only afflict the Western democracies but is found in totalitarian regimes too. In 1956 ZiL replaced the ZiS name. Stalin was dead and the Kremlin felt that the teachings of Comrade Lenin had been neglected during Stalin’s years, so the truck plant was renamed ZiL for Zavod imeni Lihacheva (Lihachev's or Lenin’s Plant). Will we ever see a Zavod imeni Putin or ZiP truck? Zipping along in a ZiP, that would be a catchy capitalist jingle.
For a good history of Soviet soft skin vehicles, check Andrei Bogomolov’s site, http://www.autogallery.org.ru/zis5.htm
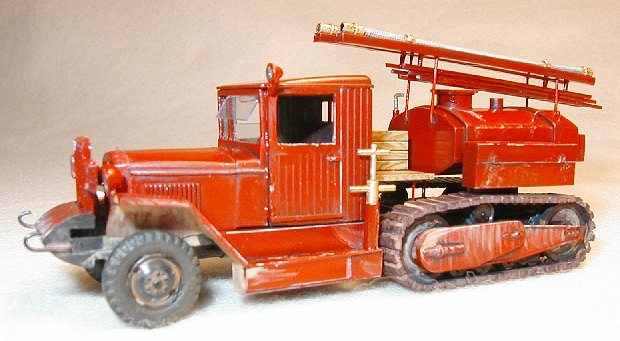
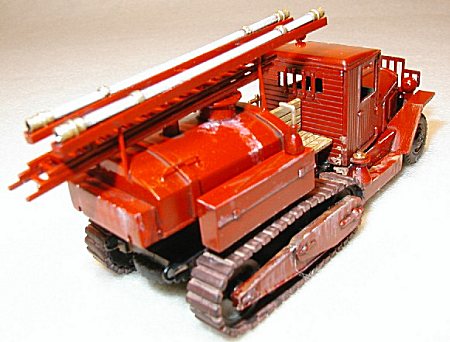
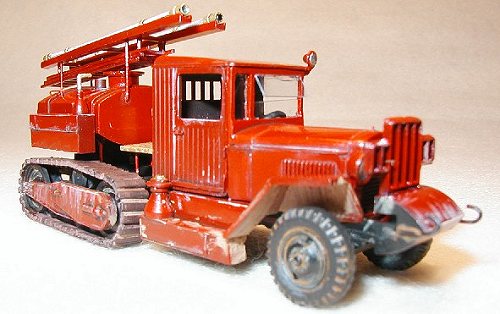
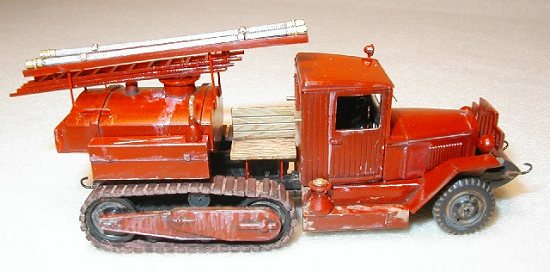
The ZiS-42 half-track army tractor was built from 1940 to 1944 with a short production run of only 5,931 vehicles. It shares the cab and front end with the ZiS-5. During war years such amenities as windshield wipers, bumpers and right head light were omitted, and plentiful Russian wood replaced hard to get steel that was needed for tanks and artillery. Despite being a half-track, the ZiS-42 remained a cargo truck and was never armored as the American and German half-tracks. The Zis-42 was built in response to the Red Army’s demand for a truck that wouldn’t get bogged down in the Russian snow drifts of winter and the muddy roads of spring.
|
THE KIT |
PST (PromSnabTorg) is a kit maker based in Minks, Belarus. They have an extensive line of Soviet vehicles in 1/72th scale. To say that this kit is unique is an understatement. This is a subject that no Western or Asian kit maker would have ever even consider to tackle, a fire truck built on a half-track army lorry. It cannot get more unglamorous than this. For more on the kit itself, please visit the preview.
 The kit provides three sprues in jade green. One of these
sprues is labeled PMZ-2 and has the firefighting equipment. The PMZ-2 fire
fighting equipment was a Soviet standard that could be fitted to many vehicles.
There is a black sprue that contains the half-track bits. Flash is present but
it is very thin and easy to remove. There are enough extra parts to build a
round fender ZiS truck or a flat fender with dual rear tires. There is a whole
flat bed with wooden sides (no canvas top), and there is a steel cab. You can
build a wheeled or a half-track lorry if you want. There are no clear bits and
no decals. The instruction sheet is very good but it does have a few omissions
that I will list later.
The kit provides three sprues in jade green. One of these
sprues is labeled PMZ-2 and has the firefighting equipment. The PMZ-2 fire
fighting equipment was a Soviet standard that could be fitted to many vehicles.
There is a black sprue that contains the half-track bits. Flash is present but
it is very thin and easy to remove. There are enough extra parts to build a
round fender ZiS truck or a flat fender with dual rear tires. There is a whole
flat bed with wooden sides (no canvas top), and there is a steel cab. You can
build a wheeled or a half-track lorry if you want. There are no clear bits and
no decals. The instruction sheet is very good but it does have a few omissions
that I will list later.
All parts are clean and free of mold release grease. The parts are connected to the sprues by thick joints that need to be cut carefully. This problem is more acute because of the very small size of some parts. Ejector marks are present but PST made an effort to put them in places that are hidden or hard to see.
I found a few broken support legs for the water tank and the bench, but considering that this kit made its rounds around the world, I’m not too surprised about it. I could complain about some of the parts being too thick but I won’t. Injection molding technology has a limit and PST, or anybody, cannot make these kits too thin without risking warping and other defects. This is a fact of life you have to live with in this scale.
|
CONSTRUCTION |
I will admit that this is my first armor kit in Braille scale so I did not know what I was getting into. This kit is not for youngsters or those in a hurry looking for quick gratification. You will need a metric ruler and a sharp knife or a saw, and you will have to provide some metal rod to finish this project, plus your own acetate if you want a windshield. Those of you with fat fingers will have a merry time trying to hold on to some of the wee parts.
 The instructions call out for some parts to be trimmed and
the dimensions are given in millimeters. This takes careful measuring and
cutting. I used a saw to do the cutting. The tow hook at the rear of the ladder
frame needs to be cut but the instructions don’t specifically call for this
action. The front bumper needs to be removed. The toolboxes under the stepping
boards need to be trimmed to fit. All toolboxes are molded in single pieces but
are hollow at the bottom so I filled mine with putty. Pay close attention to the
instructions as there are other places that need to be trimmed.
The instructions call out for some parts to be trimmed and
the dimensions are given in millimeters. This takes careful measuring and
cutting. I used a saw to do the cutting. The tow hook at the rear of the ladder
frame needs to be cut but the instructions don’t specifically call for this
action. The front bumper needs to be removed. The toolboxes under the stepping
boards need to be trimmed to fit. All toolboxes are molded in single pieces but
are hollow at the bottom so I filled mine with putty. Pay close attention to the
instructions as there are other places that need to be trimmed.
The drive shaft is called out to be a metal rod so I used brass. I replaced the broken bench legs with steel piano wire and the broken water tank supports with brass rod. The ladders and hoses above the water tank are also supported with brass rod bent to go into the water tank at 90 degrees to provide better anchorage. I added handholds over the water tank with brass rod. These handholds are shown on the box art only. I made the tow hooks out of brass wire because the original plastic ones broke when I tried to get them off the sprue. By the way, two of the green sprues have no numbers printed on their tabs so you have to find your parts by eyeball.
The inside of the wooden cab is smooth so I scribed the wooden boards. I replaced the radiator cap with brass wire. I left the cab out of the truck until all the painting and weathering was done so I could glue an acetate windshield from the inside of the windshield frame. I had to use a little bit of putty around the hood and the chassis, but it was minimal. Fit is good but it is not perfect because it is very hard to put locator pins in such small parts so you have to wiggle the parts into the correct position as the glue dries. The plastic reacted very well to Testor’s liquid cement.
The tracks drove me nuts. There are 39 parts per track,
and they are rather small. The top and bottom sections of the track links are
continuous and rigid but the links around the wheels are individual. Cutting
them from the sprue and cleaning them was difficult as the joints were thick.
These links are part #20. As you glue them around the wheels, you will run out
of links before the tracks are finished. Oddly enough, there are a few extra
rectangular blocks in the same sprue that resemble the track links but are not
quite a match. Beggars cannot be choosers so I use these “extra” parts and the
track was completed. 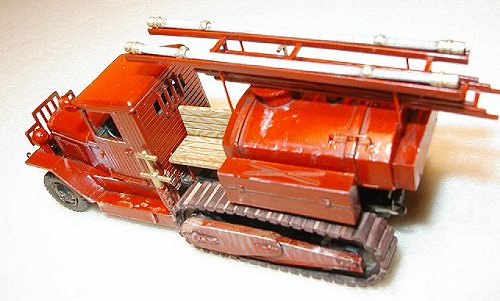 The individual links are not of the same width as the main
rigid sections, and they also vary in width among themselves. Nevertheless, the
whole thing builds into a good representation of the tracks; just keep your
magnifying glass away.
The individual links are not of the same width as the main
rigid sections, and they also vary in width among themselves. Nevertheless, the
whole thing builds into a good representation of the tracks; just keep your
magnifying glass away.
There is some pump equipment on the passenger side of the truck. The instructions point to vague locations were to put these apparatuses but all the views and the box art only shows the driver side of the truck, so you will have to take your best guess as where these things go.
On hindsight, I would not bother with the brush guard in front of the grill. I found this part oversized. Again, this is not PST’s fault as injection molding can only do so much when it comes to such small parts. I would leave this part off and show off the nice radiator and headlights.
My crew bench is flushed against the cab when it should be flushed against the water tank. This was my fault because I drilled the pilot holes for the bench’s legs too close to the cab.
Fitting the cab, the hood and the fenders together takes some work. The pilot holes on the fenders do not align with the pins in the chassis so I removed the pins and went free style. It took some wiggling to get all parts squared away; use slow setting adhesive for this operation.
I added a stick shift but the interior is hard to see so you can skip detailing the interior of the cab without fear.
|
PAINTING |
All of the paints I used on this kit are acrylic.
 The frame and the wheel rims are bright black, as today’s
Ural trucks. Some things never change. I used Walt-Mart hobby black paint I
painted the inside of the cab with Model Master Medium green under the
assumption that a fire truck was really an army truck pulled of the line and
made into one, the red paint being sprayed after the truck was already green.
The bench is Tamiya Dark Yellow XF60 streaked with Liquitex Raw Sienna to
simulate wood grain. I used Liquitex acrylics from the U.K. These are artist
paints that you squeeze out of a toothpaste-like tube. The brass color is Tamiya
Gold Leaf X12 under a coat of Future.
The frame and the wheel rims are bright black, as today’s
Ural trucks. Some things never change. I used Walt-Mart hobby black paint I
painted the inside of the cab with Model Master Medium green under the
assumption that a fire truck was really an army truck pulled of the line and
made into one, the red paint being sprayed after the truck was already green.
The bench is Tamiya Dark Yellow XF60 streaked with Liquitex Raw Sienna to
simulate wood grain. I used Liquitex acrylics from the U.K. These are artist
paints that you squeeze out of a toothpaste-like tube. The brass color is Tamiya
Gold Leaf X12 under a coat of Future.
The red is Tamiya X-7. It ended up being a dark red because I sprayed it onto the bare green plastic. If you want a deep, bright red, do what automotive shops do, start with a white primer coat and spray thin layers of red, buffing in between red layers. That would be good for a Ferrari but for this truck parked under the elements, an ugly red was enough for me.
I sealed the paint with a coat of Future floor finish and added a wash of Liquitex Raw Umber. The tires were sealed with a dull coat from Testor and treated with a wash of Raw Sienna. The tracks got a treatment of chalk pastels mixed with soapy water to simulate rust and dirt. I added some mud splashed using Liquitex Raw Sienna and Unbleached Titanium, some as a wash, some dry brushed.
|
CONCLUSIONS |
This is a nice kit of a dark subject. It is not for the beginner because of the cutting required, the small parts, and the lack of click-in locator pins. If you take your time, you will be rewarded with a nice model. I plan to use mine in a Soviet airfield diorama. PST kits are like good Vodka, you have to develop a taste for them, and they are not for everybody.
You can find this kit and many others at

If you would like your product reviewed fairly and quickly please contact me or see other details in the Note to Contributors.