
Tamiya 1/35 M4 Sherman 'early production'
|
KIT # |
35190 |
|
PRICE: |
$39.00 |
|
DECALS: |
See article |
|
REVIEW: |
Reimund Gerald Manneck |
|
NOTES: |
Built out of the box |
|
HISTORY |
The M4 Sherman medium tank was the main armored vehicle of the allied forces in World War II. A total of 49, 234 Shermans were built in the United States and more than 55,000 were produced during the Second World War, a quantity equaled by only one other wartime tank, the Soviet T-34. Variants of the Sherman tank included flamethrower, rocket launcher, mine clearers, amphibious and tank dozer conversions.
Production began on December 11, 1941 of the welded hull M4 and the cast hull M4A1. Interestingly, the first assembly lines were established by British contract and the first two Sherman bore British Army numbers.
The subject of this article is the welded hulled, gasoline-powered, aircraft engined M4. This particular tank entered production with the Pressed Steel Car Company, a railroad manufacturer. More than 10 factories produced the different variants of the Sherman during the war, which allowed the tank and the armies that employed it to be successful in the battlefields of Italy and Western Europe.
|
THE KIT |
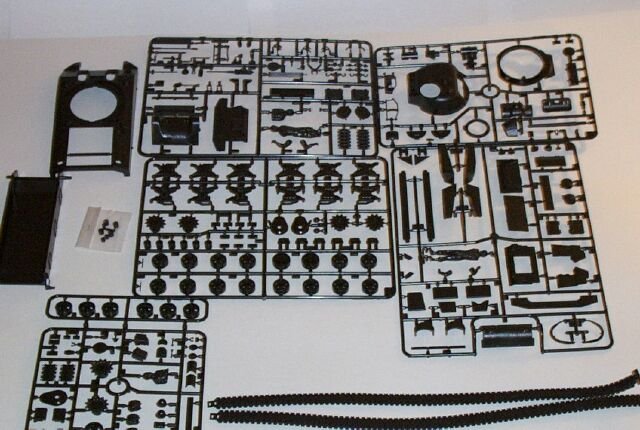 Released in 1995, Tamiya's M4 is a mixture of the old and
new. Some sprues are marked 1987 and others 1995. The kit comes in 6 dark
green sprues of well-molded and flash free parts.
Released in 1995, Tamiya's M4 is a mixture of the old and
new. Some sprues are marked 1987 and others 1995. The kit comes in 6 dark
green sprues of well-molded and flash free parts.
The upper hull, transmission cover, turret and gun mantlet are textured to
a good effect. Talking about transmission cover, Tamiya includes both the three
pieces and one-piece cover. The kit also includes two types of road wheels and
drive-sprockets.
A great addition to the kit is the accessories. These
include spare tracks and wheels, helmets, ammo pouches, knapp sacks, jerry cans,
oil drums and stowage boxes. Also include are two half-figures for the driver
and machine gun operator and a whole figure for the tank commander.
Instructions are typical Tamiya, well organized and concise.
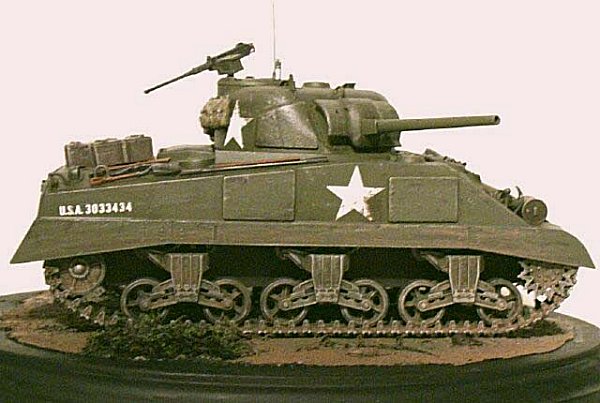
Decals are included for three Shermans: One in overall Olive Drab
(France, Summer 1944, Unit Unknown); one in light sand and OD (C CO., 756th Bn.,
5th Army, Italy, Feb. 1944); and the last one in red brown and OD camo (H CO.,
66th Armd. Reg., 2nd Armd. Div., Normandy, Aug. 1944).
Tamiya labels the kit as an early version M4, but I have read that it actually represents and mid-production machine. Since I am an OTB modeler, I dismissed all warnings and built the kit with no fuss.
|
CONSTRUCTION |
Assembly starts with the lower hull. This piece had no
motorization holes and that saved me one step that must be taken in many old
Tamiya kits (at least their armor kits). The fit of the 3-piece transmission
cover to the lower hull is positive, but leaves small gaps at the side.
Superglue to the attack! The two runs of bolts that fit in front of the
transmission cover also needed some coercing to glue down. Turning to the rear
panel, everything fits well. As a matter of fact, except for the transmission
cover, assembling the rest of the kit was a breeze.
 Next step was to assemble the running gear. Here I had to make a
decision. Would I have my model be nice and clean, or would I have the lower
hull sides covered in mud. I chose the later because it facilitates and speeds
up assembly. That also meant that I would have to put together a simple base
for the model to show it traveling on muddy ground. The bogie assembly looks
very nice and glue very solidly to the lower hull.
Next step was to assemble the running gear. Here I had to make a
decision. Would I have my model be nice and clean, or would I have the lower
hull sides covered in mud. I chose the later because it facilitates and speeds
up assembly. That also meant that I would have to put together a simple base
for the model to show it traveling on muddy ground. The bogie assembly looks
very nice and glue very solidly to the lower hull.
Once the bogies are glued to the lower hull attention is turned to the
upper hull. Here Tamiya have you glue a 4-piece engine cover, and the fit is
very good. The hatch openings for the tank driver and machine gun operator are
not big enough to allow you to put the figures in after the kit is assembled.
Instead Tamiya have you glue them from inside the hull. Since I wanted to skip
unnecessary masking I decided to leave all figures off (and besides, my figure
painting techniques need some work).
The kit includes appliqué armor plates and side skirts. While Shermans
were more often seen without skirts I think they add character to the tank. The
vinyl tracks fit well but float on top of the bogies. No real problem here
since the vinyl Tamiya used can be glued to plastic with CA. Just hold the
track down on the bogies with a knife for a few seconds and shoot some
accelerator.
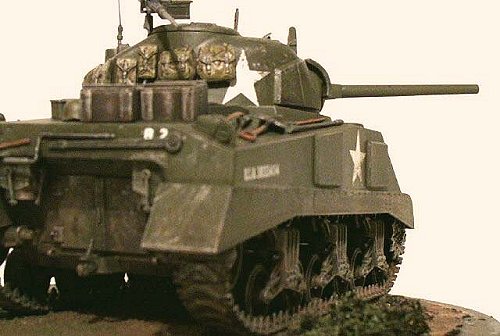
The turret assembles well also. Here I left out all the interior bits (radio equipment and commanders foot plate) because I was going to display my model buttoned and ready for battle. I also left out all the accessories and pioneer tools, so that I could paint them separately and add them when weathering the tank. The turret was primed, snapped into the hull and the Sherman was ready for painting and weathering.
|
PAINT & WEATHERING |
I painted the model with Model Master Acryl. I thought
that their OD was too light, so I mixed in some Marine Corps green to darken it
a bit. I airbrushed the whole model with this mixture being careful to maintain
the running gear and recessed areas black. Next, I hand brushed Future on the
spots where decals would go. The decals were very stuck to the backing sheet,
but they snuggled down on the model's surface very well and did not silver.
After the decals were on and dry and I shot some dull coat and got myself ready
for weathering. 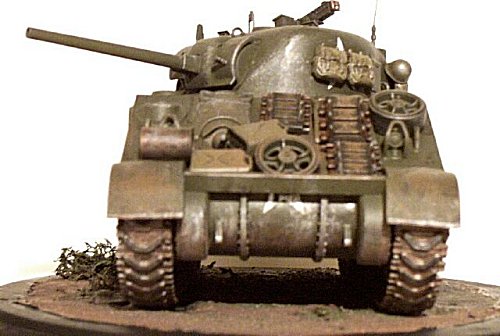
I wanted to depict the Sherman going thru some muddy ground, which meant
allot of weathering had to be applied. First, using a toothpick, I applied
scratches to high wear areas to simulate flaky paint. I used Burnt Umber paint
for that. Next I applied a dark wash to the running gear. While that dried I
glued all the accessories and pioneer tools so that they could be weathered with
the rest of the model. I used the box art to help me with the placement of the
accessories.
To simulate mud I used Tamiya's flat earth and dry brushed it on the
running gear, side skirts and lower hull. After that dried I dry brushed
Floquil dull silver on high wear areas and running gear to give the model a
metallic look. Finally, I applied some pastels to impart a dusty look to the
upper hull and turret. Everything was sealed up with Floquil dull coat and the
model was ready for displaying.
|
CONCLUSIONS |
Tamiya's Sherman was a real pleasure to build. It all falls together really nicely and the addition of accessories really makes the model look interesting. Tamiya has a real winner with this one, a model that can be enjoyed by both OTB and detailing modelers.
Copyright ModelingMadness.com
If you would like your product reviewed fairly and quickly, please contact the editor or see other details in the Note to Contributors.
Back to Reviews Page 2018