 |
 |
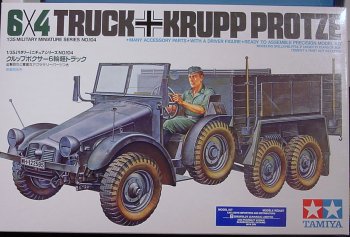
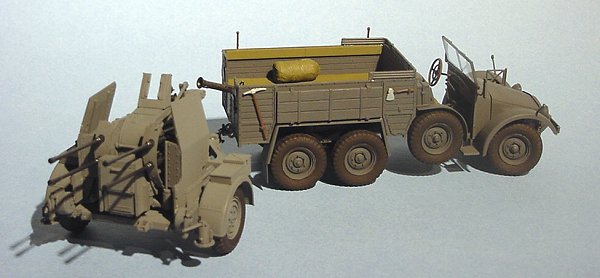
Tamiya 1/35 Krupp Protze & 20mm Flakvierling 38
|
KIT # |
35104 | 35091 |
|
PRICE: |
CDN$23.00 | CDN$ 7.99 |
|
DECALS: |
16 trucks | None |
|
REVIEWER: |
Olivier Lacombe | Olivier Lacombe |
|
NOTES: |
Die-Cut Windshield |
|
|
|
|
HISTORY |
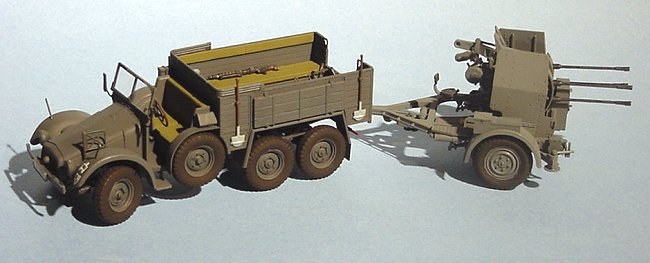
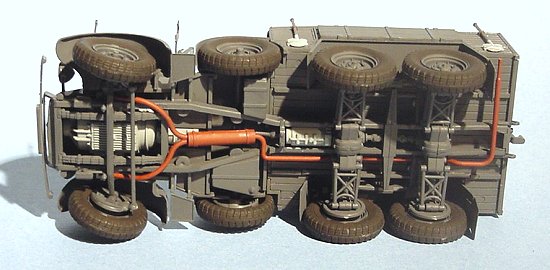
I will be honest with you, I know zilch about this vehicle. Thereby I will summarize what is said in the instruction booklet: this truck formed the backbone of the Wehrmacht, for it stayed in service from the very start to the very end. A four-cylinder boxer engine powered it, thus its early nickname was the “Boxer”. It featured independent suspension system, just like the other six wheelers serving the German arms. It was found everywhere, in a variety of roles: troop transport, ammo carrier, gun tower, AA truck and the list goes on. You might have seen one in a footage sequence that we tend to see rather frequently in documentaries about the Wehrmacht: it is climbing a steep embankment while towing a small gun.
The Flak 38 was the scourge of the Allied fighter-bombers. Its four 2cm canons could be fired in pairs or all at once when the gunner pressed the two pedals, which controlled diametrically opposed guns. The crew was completed by loaders who would frenetically load the 20 shell-clips into the gun, while the gunner controlled the trajectory with two handles (elevation and azimuth) to keep the hated Jabo in the gyro sight (later replaced by a ring and bead one). In theory, the Flak 38 could spit out 1 400 rounds a minutes, but in the heat of battle, a collection of HE, AP and tracer rounds where hurled at a rate of 800 a minute. For transportation, the three seats (one for the gunner, two for the loaders) could be folded, and the whole assembly loaded on a two-wheeled Sd.AH.52 trailer, which was no more than a welded frame.
|
THE KIT |
As with any Tamiya offerings, the kit comes in a sturdy cardboard box with a nice painting of the prototype on the cover. Inside, 4 sprues are bagged together, with 6 plastic retainers for the wheels and a die-cut windshield bagged separately. The plastic is the usual grey styrene, albeit darker than what you usually get from Tamiya.
The parts are well moulded, with no sink holes and a few easily cleaned ejector marks. You get enough parts for one standard Protze (not a specialized version) with a few accessories (mortar, MG 42, a Kar K98 rifle, jerry cans, ammo boxes, two duffel bags and wood boxes and a panzerfaust). For the truck itself, you get two shovels and two axes. The driver is provided in a seated position.
The instructions are very good, up to Tamiya’s standards, with painting tips in the margins and photos of the completed model. You are provided with two instruction booklets, one in English and the other one in Japanese. The later features a picture of a real Protze painted in what seems to be a late-war Ambush scheme.
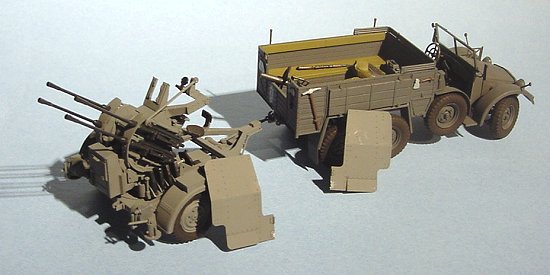
The Flak 38 is an old Tamiya boxing, but the usual quality is nevertheless present. 3 sprues is all what you get, with enough parts for one gun. No decals are provided, since these guns were seldom marked in the field. You have the option to build it in the firing position or on its trailer. The guns can be elevated and the assembly rotated when in the firing position and the shields can be moved to the open position. No figures are included.
|
CONSTRUCTION |
 As I usually do with trucks, I
pre-painted all the sprues with un-thinned Tamiya German Grey (what a stupid idea
anyway). The results, as you can guess, were atrocious. Returning from the
paint shop, I started to build the truck in sub assemblies, repainting
everything in Tamiya German Grey with a brush to camouflage my ungainly
results. The cabin went first, with the seats finished in Model Master Olive
Drab. The frame was the second sub assembly to go. The engine and the transfer
case were finished in Model Master Light Ghost Gray and the exhaust was given a
coat of Model Master Acryl Rust. I skipped a few steps and built the platform
before installing the drive train. As with the cabin, the seats were painted
Model Master Olive Drab and the rear fenders were attached. Be careful with
these, since I nearly decapitated the right one, the plastic is softer than it
seems to be. The drive train was assembled next, with the parts receiving their
coat of German Grey. Be sure to follow the instructions closely, as the
similarity between the two rear axles can cause a not-so-funny surprise. The
box was fitted to the frame before attaching the wheels, since it allowed for a
greater freedom of movement. The cabin went on right before the wheels were
glued in place. If you do it right, the front wheels will turn left and right,
and the whole truck will roll.
As I usually do with trucks, I
pre-painted all the sprues with un-thinned Tamiya German Grey (what a stupid idea
anyway). The results, as you can guess, were atrocious. Returning from the
paint shop, I started to build the truck in sub assemblies, repainting
everything in Tamiya German Grey with a brush to camouflage my ungainly
results. The cabin went first, with the seats finished in Model Master Olive
Drab. The frame was the second sub assembly to go. The engine and the transfer
case were finished in Model Master Light Ghost Gray and the exhaust was given a
coat of Model Master Acryl Rust. I skipped a few steps and built the platform
before installing the drive train. As with the cabin, the seats were painted
Model Master Olive Drab and the rear fenders were attached. Be careful with
these, since I nearly decapitated the right one, the plastic is softer than it
seems to be. The drive train was assembled next, with the parts receiving their
coat of German Grey. Be sure to follow the instructions closely, as the
similarity between the two rear axles can cause a not-so-funny surprise. The
box was fitted to the frame before attaching the wheels, since it allowed for a
greater freedom of movement. The cabin went on right before the wheels were
glued in place. If you do it right, the front wheels will turn left and right,
and the whole truck will roll.
|
PAINT |
After that, all the accessories were painted with inspiration from the instructions and my imagination. The colours go as follow:
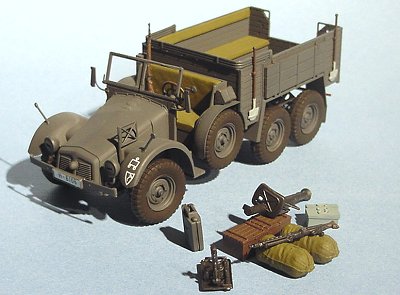 -duffel bags : Model Master Olive Drab
-wood boxes : Model Master Acryl Panzer Schokoladenbraun
-mortar and panzerfaust : Model Master Metallic Black
-jerry cans : Tamiya German Grey
-ammo boxes : Model Master Medium Gray
-shovels and axe : Model Master Panzer Schokoladenbraun handle, Model Master
Medium Gray metallic parts and Testor Aluminium (little jar) fixtures.
-MG 42 and KAR 98K rifle: Model Master Panzer
Schokoladenbraun butt stock and Model Master Metallic Black barrels.
Once all that was dry, the die-cut windshield was cut free from its sheet with a pair of scissors and glued in the frame with Future. I must say that the windshield is just stunning, very clear and no distortion.
It was now time to start the gun. Like the Protze, I painted the kit before starting the construction. This time, the paint used was Model Master’s Gunship Gray, and the results were satisfactory.
Assembly is very straightforward. Clip the part from the three, clean it, glue it, do the mandatory touch-ups and move on. However, a few steps can be tricky and can lead to deceptions. At first, when the pedestal is being built, remember not to glue the shaft, or the gun won’t elevate. I painted the guns Model Master Gun Metal before gluing them to their bases. Also, I painted the gun sight in the same colour at the same time. There is a link arm that attaches on the left canon base to the gun sight assembly. The installation indicates to heat up a screwdriver and to melt the plastic to seal the assembly: it works perfectly, however, a small retainer is not to be glued (you can glue it place, it’ll keep it from falling off at the slightest movement, but again, the gun won’t elevate).
 After that, I assembled the gunner seat
and its controls, before gluing everything in place. I then proceeded to
install the shields, on which you have to glue the supports. Also, you will
have to cut-off the lower hinges if you are planning on having a towed gun like
mine. The base has to be modified according to the plan for a towed gun: the
two side steps must be sawed off and glued vertically as they folded when the
gun was attached to the trailer. The two loaders seats were installed in their
towing position, and instead of inserting four clips into the guns, I glued 4
open breached (very important, as no ammo was chambered during movement). At
this time, I painted the tires and affixed them to the wheels and constructed
the trailer.
After that, I assembled the gunner seat
and its controls, before gluing everything in place. I then proceeded to
install the shields, on which you have to glue the supports. Also, you will
have to cut-off the lower hinges if you are planning on having a towed gun like
mine. The base has to be modified according to the plan for a towed gun: the
two side steps must be sawed off and glued vertically as they folded when the
gun was attached to the trailer. The two loaders seats were installed in their
towing position, and instead of inserting four clips into the guns, I glued 4
open breached (very important, as no ammo was chambered during movement). At
this time, I painted the tires and affixed them to the wheels and constructed
the trailer.
The gun was fixed to the base, which in turn was glued to its mounting platform. I glued the wheels on the trailer and snapped the gun on it. That’s right, I snapped it in place without any glue. I suspect you could remove the gun from the trailer, but I believe that the small hooks that snap around rods on the trailer would break off. Be careful when installing the gun on the trailer, for the end of the gun goes under the beam at the front of the trailer. Lastly, the remaining bits and pieces were glued to the chassis according to plan and the Flakvierling 38 was ready to be towed behind the Protze!
|
DECALS |
Without really knowing what markings to put on the truck, I chose a 1st Panzer SS Division truck, Mechanized Infantry Battalion (I do not know if this last one is ok, but it sure looks good to me!). I chose the second set of registration plates, since it looked more devilish to me than the first one.
The decals were given a coat of Model Master Acryl Dull Coat, the accessories fitted to the box and the Protze drove itself to the display case!
|
CONCLUSIONS |
The Protze is a total winner. It’s easy to build, inexpensive and looks good. I recommend it to anyone looking to do his entry in the 1/35 scale or as a first modeling project, and with the addition of the easy-to-build Flak 38, makes for an interesting combination.
(Your editor built this very same combination back in the early 1980s and also found them to be a lot of fun. Alas, they succumbed to the careful ministrations of Bruno and Spike, the movers that the military often hires for PCS moves.)
|
REFERENCES |
The instruction booklet!
For more info on the armoured forces of the Wehrmacht in WW2: http://www.achtungpanzer.com
Copyright ModelingMadness.com
If you would like your product reviewed fairly and fairly quickly, pleasecontact the editor or see other details in the Note to Contributors.