PST 1/72 T-54/T-54A Medium Tank
|
KIT # |
72045 |
|
PRICE: |
$ |
|
DECALS: |
Several tanks |
|
REVIEWER: |
|
|
NOTES: |
|
HISTORY |
For a short history and a look at what's in the box, please visit the preview.
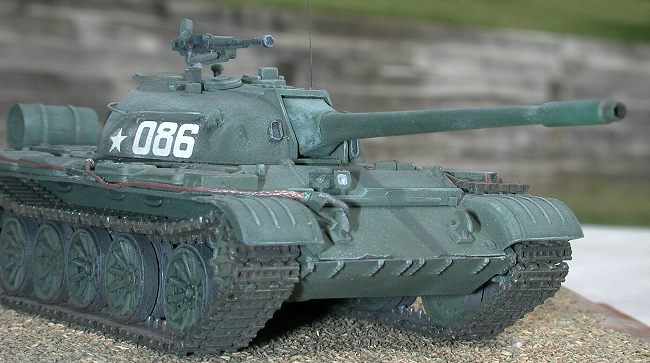
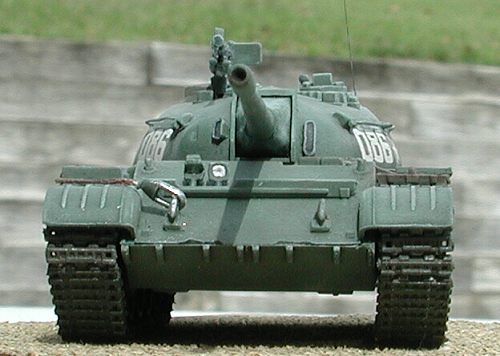
A few months back Scott was sent some newly released armor kits by PST (Belarus) to review. I was flattered when he asked me if I would like to review one. Among them was a 1/72 scaleT-54/T-54A. Now, I do not build much in the armor category but I have done some and I felt I was up to the challenge. Having said that, I did some research on the T-54 but it was not extensive. Please let me know if there are any inaccuracies with this kit. As far as I can tell, this kit checks out as a T-54. I chose to do the T-54A version.
|
THE KIT |
 The T-54 was the result of mating the D-10T 100mm gun
to the T-44 hull. In order to do this, a new turret was designed. In 1955 a
new version of the T-54 appeared which was designated T-54A by the West. It was
fitted with the newer D-10TG 100mm which was gyro-stabilized along the vertical
axis and had power elevation. It can easily be distinguished from the T-54 by
the counterweight fitted at the business end of the 100mm barrel. Internally,
it incorporated new air filters, a bilge pump and snorkel, and was fitted with
external fuel cells.
The T-54 was the result of mating the D-10T 100mm gun
to the T-44 hull. In order to do this, a new turret was designed. In 1955 a
new version of the T-54 appeared which was designated T-54A by the West. It was
fitted with the newer D-10TG 100mm which was gyro-stabilized along the vertical
axis and had power elevation. It can easily be distinguished from the T-54 by
the counterweight fitted at the business end of the 100mm barrel. Internally,
it incorporated new air filters, a bilge pump and snorkel, and was fitted with
external fuel cells.
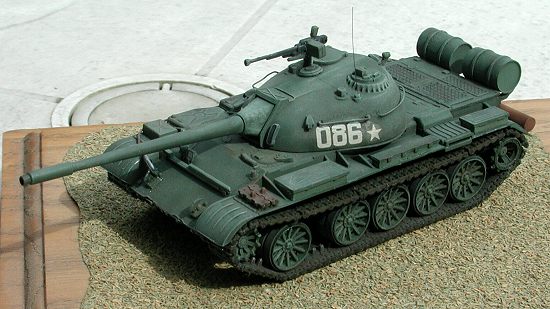
This kit comes molded in two colors, medium green for the tank parts and black for the tracks. PST also makes a T-55 kit in the same scale and the parts for the T-55 are included in this kit. However, there are no instructions included to do the T-55 version, but a good armor modeler would have no trouble substituting the correct parts. The kit’s underside is fully detailed with no numbers or company logo to sand off. There is no interior detail at all.
Molding was fairly crisp but there was some flash on a few parts that had to be cleaned up. The tracks are a combination of some continuous sections and individual tracks. The individual tracks are for the transition from one angle to the next and to go around the drive and idler wheels.
The kit instructions are a series of diagrams broken down into steps. There are no written steps to accompany the diagrams. This makes the instruction sheet somewhat vague in some places and just plain wrong in some others. Experience and dumb luck enabled me to complete this model without much trouble.
|
CONSTRUCTION |
As with most armor kits, assembly started with the chassis and the road wheels. The road wheels consist of an inner wheel and an outer wheel. A half moon shaped key on each wheel is there to facilitate alignment. The drive wheel and the idler wheel also fit together in the same manner.
 The suspension parts for the chassis are right and left
side sensitive so care must be taken to get the exact parts in their proper
place. Also, the alignment of the suspension is crucial at this stage so that
all wheels end up aligned and resting evenly. If your tank is part of a diorama
and is traveling over rough terrain, this is the time to make your adjustments
to the suspension.
The suspension parts for the chassis are right and left
side sensitive so care must be taken to get the exact parts in their proper
place. Also, the alignment of the suspension is crucial at this stage so that
all wheels end up aligned and resting evenly. If your tank is part of a diorama
and is traveling over rough terrain, this is the time to make your adjustments
to the suspension.
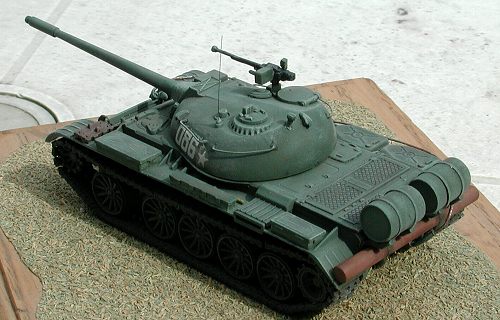
I moved on to the turret next. This is where the difference between the two versions is visible. The T-54 and the T-54A both had a 100mm main gun but the barrels are different for each version. There are two hatches on top of the turret; a commander’s hatch and a machine gunner’s hatch. The hole for the machine gunner’s hatch was way off center so I had to correct it by enlarging the hole so the hatch would fit evenly around the hole.
The grab handles supplied by the kit were okay but I elected to make my own using thin copper wire. I believe it makes a big difference in the overall appearance.
 From there I moved on to the top of the hull.
Everything goes together in a straight- forward manner but pay attention to the
engine cover panel. According to the instructions, shave 0.5mm from the right
and left side of this panel to ensure a flush fit with the sides of the hull. I
did not catch this until after I had already glued it in place. I was lucky
though as I was able to sand off the excess before I had gone any further.
From there I moved on to the top of the hull.
Everything goes together in a straight- forward manner but pay attention to the
engine cover panel. According to the instructions, shave 0.5mm from the right
and left side of this panel to ensure a flush fit with the sides of the hull. I
did not catch this until after I had already glued it in place. I was lucky
though as I was able to sand off the excess before I had gone any further.
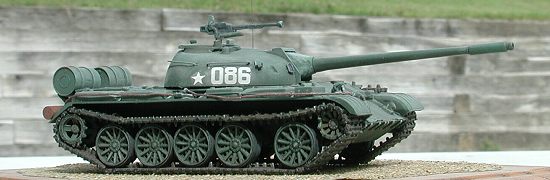
The only other potential difficulty was the tow cables. The ends of the cables are supplied but the cables aren’t. The kit instructions suggest using thread but I knew that I would not be happy with those results. I used some .020 braided wire for model car detailing by Detail Master. I drilled out the cable eyes with a .024 drill bit, inserted the braided wire and set it aside for painting.
To the rear of the tank is where the auxiliary fuel drums are mounted. These appear to be nothing more than 55 gallon drums (or their metric counterpart). I added some tie- down straps to them from strip styrene for detail.
One last item of caution. There is a rod or bar of some kind (I really do not know what it is there for) that mounts on the rear of the tank. Maybe it is a bumper of sorts. Anyway DO NOT attach this piece (C-8) until after the hull is all together. This means the top portion (hull) and the bottom portion (chassis). If it is attached in step 6 as the instructions call for, then getting the top portion (hull) in place will be very difficult. There isn’t enough room for the mud guards to get through.
|
PAINT & DECALS |
I found that painting this kit was about as easy as I have had in a long time. For the base coat I mixed Humbrol topside green and lightened it 25% with Humbrol white. I like to paint my armor kits in subassemblies.
First to be painted was the chassis. Then, all the
road wheels were painted along with the drive and idler wheels. After the
wheels were dry (about a week) they were given an oil wash with a mixture of
very dark green. Then after that dried and the rubber rims were painted I
highlighted the road wheels with a light green oil mix. I also shaded and
highlighted the 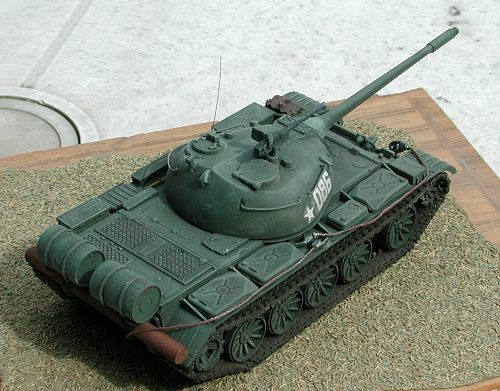 chassis in the same manner. After all these parts were dry they
were then assembled, once again paying close attention to the alignment of the
road wheels.
chassis in the same manner. After all these parts were dry they
were then assembled, once again paying close attention to the alignment of the
road wheels.
The turret was real easy. After assembly of everything except the machine gun, the turret was painted in the same manner as the wheels and chassis with the base coat, wash, and highlight.
The top of the hull was next. All of the more permanent parts such as the hatches, tow hooks, and engine cover were glued into place before painting. The other pieces were all painted separately using the technique mentioned above. Next were the tow cables. They were done with a base coat of rust. After drying I gave the cables a wash with a thin mixture of gunmetal and then highlighted with steel metalizer.
Sandwiched in between the above steps, while waiting for other things to dry is when I painted the tracks. There are probably as many different techniques to paint AFV tracks as there are kits. I used a mixture of rust, black, blue, and gunmetal as a basecoat. After drying I gave the tracks a wash with a dark rust brown. Finally, they received a fine dry brush of steel metalizer for the applicable surfaces.
|
CONSTRUCTION CONTINUES |
 Final assembly consisted of first putting the tracks
on the tank before the hull is attached. That way you have unfettered access
all the way around the wheels. Starting on the bottom and following the
instructions exactly, I worked my way around to the top- side of the road
wheels. The tracks mated with one another superbly, however when I got to the
last section on each side, I found them to be too long. The left side was about
1 link too long and the right side was about 2 links too long. I trimmed them
with a straight edge razor blade and they slipped into place.
Final assembly consisted of first putting the tracks
on the tank before the hull is attached. That way you have unfettered access
all the way around the wheels. Starting on the bottom and following the
instructions exactly, I worked my way around to the top- side of the road
wheels. The tracks mated with one another superbly, however when I got to the
last section on each side, I found them to be too long. The left side was about
1 link too long and the right side was about 2 links too long. I trimmed them
with a straight edge razor blade and they slipped into place.
The bottom (chassis) and top (hull) were then glued together. The accessories were then glued into place. The turret locked into place very nicely and the machine gun was glued onto the turret. After the decals were in place and dry I gave the tank a light dusting with pastels. An antenna was fashioned from stretched sprue.
|
CONCLUSIONS |
In conclusion I would have to say that I was pleased with the final results. However, I cannot recommend this kit to a beginner or a first time armor builder. Although I had a relatively easy time with this kit, the fact that the suspension was tricky, the tracks were too long, and tow cables had to be made from scratch could frustrate the beginner. An experienced armor builder will be able to recognize these shortcomings right away and know how to deal with them. Remember, once you start a kit, all that you lack is the finishing. Until next time…..
Copyright ModelingMadness.com
If you would like your product reviewed fairly and fairly quickly, please contact the editor or see other details in the Note to Contributors.
Back to the Reviews Index Page 2018