 Fellow modelers, let me begin this review by saying
that I know nothing about this particular figure and it’s history. After
an exhaustive search I’ve been able to find two aircraft named “My
Devotion.” The first is a B-17F of the 351st BG/510th BS.
The second is a B-24M of the 380th BG/528th BS.
Neither of the poses on these two aircraft resemble the pose of the kit.
I’m sure someone out there will recognize this figure/pose and I would
very much interested in hearing all about this figure. My best guess is
that “My Devotion” was a popular song or lyrics of a song from that era.
Fellow modelers, let me begin this review by saying
that I know nothing about this particular figure and it’s history. After
an exhaustive search I’ve been able to find two aircraft named “My
Devotion.” The first is a B-17F of the 351st BG/510th BS.
The second is a B-24M of the 380th BG/528th BS.
Neither of the poses on these two aircraft resemble the pose of the kit.
I’m sure someone out there will recognize this figure/pose and I would
very much interested in hearing all about this figure. My best guess is
that “My Devotion” was a popular song or lyrics of a song from that era.
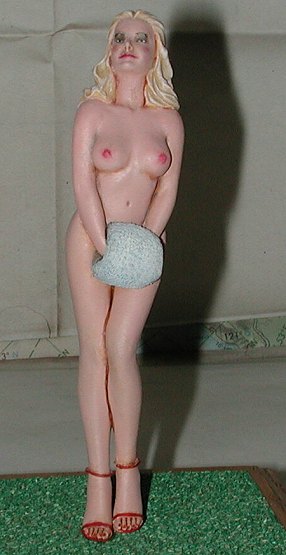
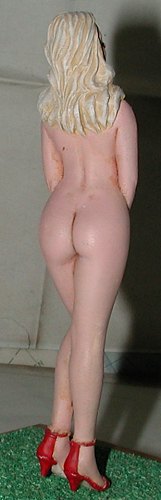
The kit came in three parts (see preview). The entire body and legs down to the ankle straps of her shoes was one piece. Each foot was a separate piece. Detail is crisp and clean except for the resin blocks from the mold that must be cut off and sanded smooth. The modeler will have to supply his/her own base.
|
CONSTRUCTION & PAINTING |
I began this kit by removing the excess resin from
the molding and sanding the kit smooth. I tested the fit of the feet and
was satisfied but did not attach them. The reason for this was that
after examining the kit I thought it would be easier to paint some of the
hard to get places before the feet were attached. In retrospect I guess
it really didn’t matter. I then washed the kit pieces (all 3 of them),
let them dry, and then gave the parts a light gray enamel primer coat.
After drying, I mixed up some flesh colored oils and painted the whole
figure except the hair and muff (for lack of a better word). My mixture
for flesh is red, white, a nd yellow ochre. Mix the red and white to a
light shade of pink and then add the yellow ochre in very small amounts
until you get the desired color. After that had dried I mixed up some
light blue and painted the muff. The hair was painted a lightened yellow
mix and the shoes were painted insignia red enamel. After all parts were
dry I then attached the feet. Some sanding and touch up was needed
around the attach points but it was very minor.
nd yellow ochre. Mix the red and white to a
light shade of pink and then add the yellow ochre in very small amounts
until you get the desired color. After that had dried I mixed up some
light blue and painted the muff. The hair was painted a lightened yellow
mix and the shoes were painted insignia red enamel. After all parts were
dry I then attached the feet. Some sanding and touch up was needed
around the attach points but it was very minor.
The next step for me was the face painting. This
can be a intimidating for some but I always look forward to this step. I
know I will be challenged and I like that. After all, I didn’t want to
end up with a two-bagger. The female modelers out there should have an
advantage in this respect as most of them paint their faces every day.
For those of you who have never done this before let me begin by saying
that there is all kinds of help out there. Seek advice from your wife,
girlfriend, teenage daughter, etc. and find out how they apply make-up
Dig out some women’s magazines or some of your old Playboy mags and
examine the faces. I know this will challenge the concentration for
some. I suggest to those with this problem to sit on your hands while
you look through the magazine. I got help from a dancer that I know from
the local “ballet club”…really!
 Anyway, I applied the eye shadow and lip
stick first. I then painted the eye whites. After drying I then
sharpened a toothpick to a very fine point and added eyes and the eye
brows. When that had dried, I painted eye-liner using my toothpick This
takes a steady hand and a powerful magnifying glass. I then did some
minor shading and highlighting on the face in the appropriate places.
After all was dried I did the final touch by highlighting the hair with
an off-white dry-brush and added a touch of blush to the cheeks. As for
the rest of the body, her nipples were painted a dark pink mixture and
the toe nails were painted scarlet. Most everything else was shading and
highlighting. I mixed up a thin wash of dark brown and using a small
brush I let the
Anyway, I applied the eye shadow and lip
stick first. I then painted the eye whites. After drying I then
sharpened a toothpick to a very fine point and added eyes and the eye
brows. When that had dried, I painted eye-liner using my toothpick This
takes a steady hand and a powerful magnifying glass. I then did some
minor shading and highlighting on the face in the appropriate places.
After all was dried I did the final touch by highlighting the hair with
an off-white dry-brush and added a touch of blush to the cheeks. As for
the rest of the body, her nipples were painted a dark pink mixture and
the toe nails were painted scarlet. Most everything else was shading and
highlighting. I mixed up a thin wash of dark brown and using a small
brush I let the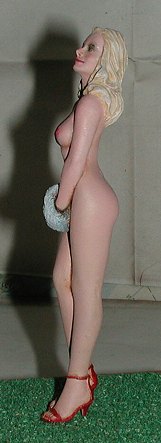 mixture flow into all the little nooks and crannies. The
highlights are a very light skin tone and the muff was dry-brushed with
white.
mixture flow into all the little nooks and crannies. The
highlights are a very light skin tone and the muff was dry-brushed with
white.
After all was dry I used a small block of wood from an old contest award, glued on some model railroad turf, drilled a hole in the bottom of her right foot and a similar hole in the base. I glued in a small metal pin and mounted her on the base…..Okay, I’ll wait for the laughter to die down.
|
CONCLUSIONS |
In conclusion I would recommend this kit to anyone interested in figures. Straight forward, uncomplicated and yet elegant in nature. This kit will grace any figure collection. Happy modeling!
Special thanks to Scott Van Aken for the kit and the opportunity to review it.
Review copy courtesy of the fine folks at Legend