|
KIT: |
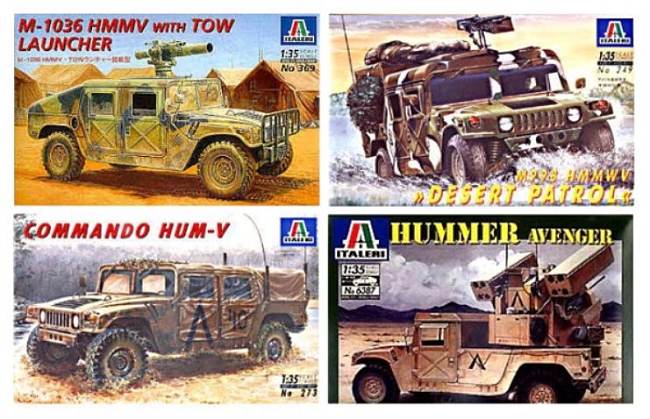
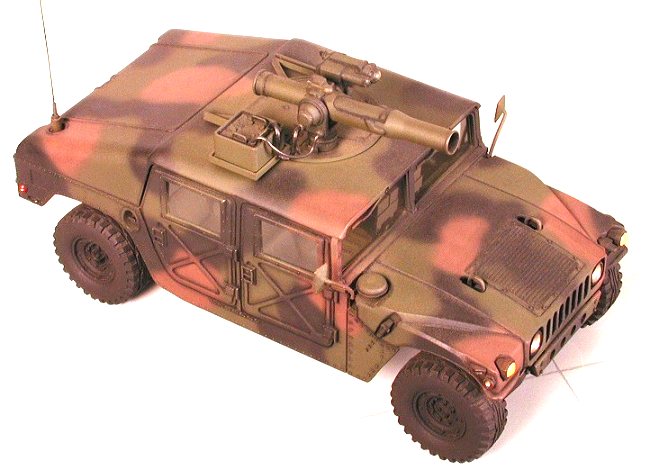
Italeri 1/35
M-998 Humvee's: |
|
KITS # |
247, 249, 273, 6387 |
|
PRICE: |
$16.00 ea |
|
DECALS: |
One vehicle per kit |
|
REVIEWER: |
|
|
NOTES: |
Verlinden wheels used: Review covers two kits |
|
HISTORY |
The US Army’s Humvee series of trucks were designed in the late 1970s by the AM General Corporation to replace a diversity of rapidly obsolescing tactical vehicles, to include the M-151 series jeeps, M-880 series 5/4 ton Dodge Powerwagons, and the M-561 Gamma Goat. Guided by the precepts specified in a newly up-dated FM 100-5 (the Army’s AirLand Battle Tactics and Doctrine bible), with the increased emphasis on fire and maneuver, the engineers at AM General began the design with a clean slate.
The Army demanded a vehicle which was safer to operate than the current jeep, a better performer than its antiquated Dodge 5/4 ton pick-ups, and more reliable than the cantankerous Gamma Goat. A diesel powerplant was specified from the outset to remove MoGas, with its inherent penchant for unintended flammability, from the battlefield once and for all.
 AM General laid out an all-new platform using as much state-of-the-art
automotive design and engineering technology as was practical under the
foreseeably severe conditions of rigorous military service. Independent
suspension featuring shock-absorber damped double wishbones, coil springs,
multiple-linked locator struts, and sway bars front and rear would insure
constant surface contact with all four wheels, permitting operation on side
slopes of 40 degrees thus providing an added safety margin to the occupants
during severe off-road use. Hydraulic-assisted steering with a dampener was
fitted, increasing the ease of drivability and reducing driver fatigue.
AM General laid out an all-new platform using as much state-of-the-art
automotive design and engineering technology as was practical under the
foreseeably severe conditions of rigorous military service. Independent
suspension featuring shock-absorber damped double wishbones, coil springs,
multiple-linked locator struts, and sway bars front and rear would insure
constant surface contact with all four wheels, permitting operation on side
slopes of 40 degrees thus providing an added safety margin to the occupants
during severe off-road use. Hydraulic-assisted steering with a dampener was
fitted, increasing the ease of drivability and reducing driver fatigue.
New, high-profile “run flat” tires were developed, obviating the need to carry a spare or tire-changing tools. Unhindered ground clearance measured 16” and the vehicle would be equipped with a central inflate/deflate system (CTIS), allowing the driver to automatically adjust tire pressures for varying terrain conditions. Vacuum-assisted four wheel disc brakes were employed, with the rotor assemblies mounted on the half-shafts adjacent to the differentials for ease of maintenance. A fording depth of 36” was possible, increasing by an additional two feet when the deep water fording adapter kit was used.
The ladder-type frame would be constructed of welded and gusseted high-tensile strength steel box beam, with forged steel mounts for the engine, transmission, and suspension components. The specified powerplant would be Detroit Diesel’s normally-aspirated 6.5L V-8 with fuel injection, producing 160 bhp @ 3400 rpm and 290 lbs/ft of torque @ 1700 rpm. This would mate to a ruggedized General Motors Turbo-Hydramatic transmission with three forward speeds and one reverse.
Power would be routed to the dual differentials via a modified Quadra-Trac system featuring full-time 4-wheel drive operation and the maximum vehicle speed would be governor-limited to 55 mph. This powertrain/suspension/tire combination would permit the negotiation of a 60% grade, were the driver so bold. A molded phenolic plastic fuel tank was mounted inboard of the frame rails and held 25 gallons of Mil-Spec JP8 or commercial-grade CD, affording a maximum possible range of 337 miles, depending on the terrain and the truck’s GVW.
 The body was designed of riveted aluminum panels attached to a one-piece
floorpan, with a fully removable top, doors, and windshield. The one-piece hood
would be constructed of reinforced epoxy fiberglass resin and articulated from
the front, allowing for easy access when performing major service or routine
PMCS. Inside, racks would provide for secure storage of rifles, with a
shock-resistant tray mount on the dashboard for a variety of communications
equipment. As with all tactical military vehicles, the new truck would be wired
for a 24VDC electrical system. Normal seating for four would be standard, in
individual lightweight bucket seats.
The body was designed of riveted aluminum panels attached to a one-piece
floorpan, with a fully removable top, doors, and windshield. The one-piece hood
would be constructed of reinforced epoxy fiberglass resin and articulated from
the front, allowing for easy access when performing major service or routine
PMCS. Inside, racks would provide for secure storage of rifles, with a
shock-resistant tray mount on the dashboard for a variety of communications
equipment. As with all tactical military vehicles, the new truck would be wired
for a 24VDC electrical system. Normal seating for four would be standard, in
individual lightweight bucket seats.
A number of different roof configurations were envisioned and eventually adopted, to include several fiberglass hardtops and both full and partial canvas covers, allowing the vehicle to perform as a pick-up, weapons- or personnel-carrier, or as a general purpose transport. A palletized ambulance enclosure providing air-conditioned space for four litters was also developed, along with an S-250 metal shelter to adapt the truck to commo, intel, or other specialized duties.
The aluminum floorpan would be reinforced with steel gussets to allow installation of a standard M-7 or M-9A machinegun mount on the driveline tunnel immediately aft of the front seats. The fiberglass tops would be equipped with a scarf ring cupola riding on roller bearings, with a hinged hatch for access. Adapter kits would facilitate the fit of a number of diverse weapon systems on the cupola including the ITAS/TSIP upgraded M-220 TOW missile launcher, M-60 and M-240 7.62mm machineguns, the .50 caliber M-2HB machinegun, and the Mk19 automatic grenade launcher. For reconnaissance missions the AN/PPS-5A, PPS-6 and PPS-12 anti-personnel radar systems could be attached to the .50 caliber pintle mount.
The US Army’s Tank and Automotive Command (TACOM) in Warren, Michigan was suitably impressed with AM General’s innovative proposal and authorized a contract for prototype development and testing in July 1980. Following a competitive ‘drive off’ between lesser rivals from Chrysler Defense Group and Teledyne Incorporated, AM was awarded a full production contract in March of 1983. Over 140,000 units have been built to date for use by all four services, as well as for export to allied nations under the terms of FMS/MAP. A number of specialized combat and combat service support vehicles have been adapted and developed from the basic design and a civilian version is available for sale to the general public as production for the US military continues.
|
THE KITS |
Italeri’s Humvee kits each consist of three sprues of olive green parts, clear styrene transparencies for the windows and headlights, decals for one variant-specific version, and an eight-page assembly brochure with a painting guide. The color callouts correlate to the Testors line of Modelmaster enamels.
 The colored
sprues marked ‘A’ and ‘B’ contain the parts common to all versions, specifically
the chassis, running gear, tires, interior components, and the exterior body
panels. The ‘C’ sprue features the roof and/or the armament for each of the
individual vehicles plus assorted jerrycans and paraphernalia.
The colored
sprues marked ‘A’ and ‘B’ contain the parts common to all versions, specifically
the chassis, running gear, tires, interior components, and the exterior body
panels. The ‘C’ sprue features the roof and/or the armament for each of the
individual vehicles plus assorted jerrycans and paraphernalia.
The chassis is molded as a single unit, thus eliminating geometry problems and hastening the assembly. Separate differentials, coil springs, wishbones, drive shafts, and a two-piece transfer case are adequately detailed with only minor molding dimples noted. A one-piece engine insert is provided, with a separate exhaust system and fuel tank.
The multi-part body is well appointed with rivet and embossment detail where appropriate, marred by several mold release plugs in a few areas. The customary automotive controls are addressed, though the instrument cluster on the dashboard is mediocre at best. Likewise, seatbelts are noticeably absent and the foot pedals are poorly depicted.
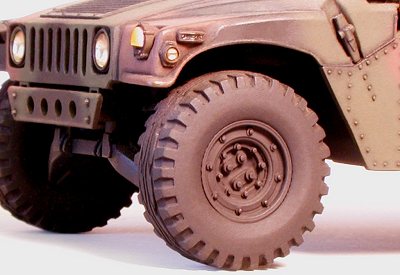
The wheels and tires are the worst aspect of these kits—the hub detail only marginally represents the prototypes’ complex design and the tires are too tall and too narrow, with totally bogus tread patterns. For this reason the wheels were supplanted by resin equivalents from Verlinden on the two kits built for this review.
The transparencies, while clear enough, are too thick by half and beg for replacement. An option for the models which mount the doors is a half-pane window for the driver’s side front position, simulating a partial roll-down. The modeler will be better served by substituting MV lenses for the sealed-beam headlights
 The armed versions contain weapons of average molding and will doubtless beckon
super-detailers to ply their skills profusely. All of the models feature radio
antennas and mounts, though curiously no radios are included. Simulated canvas
for the soft-top variants is poorly done though skillful painting and finishing
will render them serviceable. No figures are included.
The armed versions contain weapons of average molding and will doubtless beckon
super-detailers to ply their skills profusely. All of the models feature radio
antennas and mounts, though curiously no radios are included. Simulated canvas
for the soft-top variants is poorly done though skillful painting and finishing
will render them serviceable. No figures are included.
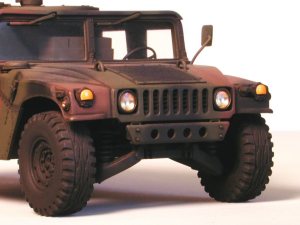
As the first of these kits was released while the actual Humvee was still in prototype form, the front bumper is the early style, with four equidistant lightening holes and no tow rings. Production vehicles features a three-hole design with a clevis mounted on each end. Likewise, the side-view mirrors are the early, smaller style and are no longer issued.
Later variants would also be fitted with a rack for pioneering tools, mounted transversely across the frame rails underneath the rear of the vehicles. Some Humvees are equipped with a 7500 lb electric winch with a fairway lead-in replacing the standard front bumper, while all vehicles have now been retrofitted with a standardized brushguard for the grille.
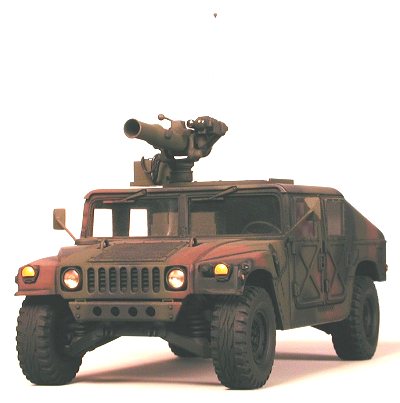
The decals are printed in Italy by Cartograf and are matte-finished, thick, and will not adhere properly over surface irregularities despite the use of the strongest available setting solutions. The TOW model offers Marine Corps markings while the others have assignments with the US Army.
|
CONSTRUCTION |
Assembly followed the recommended steps in the instruction sheet. I used Testor’s liquid cement to tack the suspension pieces into position, followed by Crazy Glue once the correct geometry was assured. Only a couple of hours were required to complete the chassis, owing to the simplified moldings.
To adapt the Verlinden wheels to the kit spindles I first assembled the plastic wheels, then shaved the small retaining lips off of the molded axles. I slipped the kit wheels onto the chassis to check my frame alignment. The left rear tire did not make full contact with my bench top so I chucked the chassis into my Panavise and performed some CQB drill on it, gently flexing the rear several times by hand.
 Refitting the
plastic wheels showed the frame to be true so I prepped the Verlinden pieces by
carefully razor-sawing them from their pour stub and filing the bottoms flat.
After checking them for absolute vertical plumb I marked each wheel on the
bottom with a red rollerball pen as the hubs are specific for front and rear and
the tires have unidirectional treads.
Refitting the
plastic wheels showed the frame to be true so I prepped the Verlinden pieces by
carefully razor-sawing them from their pour stub and filing the bottoms flat.
After checking them for absolute vertical plumb I marked each wheel on the
bottom with a red rollerball pen as the hubs are specific for front and rear and
the tires have unidirectional treads.
Working with one location at a time with the wheeled chassis sitting flat on the bench, I removed the plastic tire and cut off the axle then sanded the spindle area flat. Next I put a dollop of slow-setting Hot Stuff on the back side of the appropriate resin wheel and carefully walked it into position on the spindle. Three repetitions later I had a complete Humvee chassis.
The body assembled fairly rapidly after I added an RT-524 radio pirated from Tamiya’s M-151 kit and scratch-built the shelf mount for the dashboard. New window glass was fashioned from .007” clear acetate, and after hand fitting each pane I painted the interior then attached them with white glue. I reshaped pin heads into ‘T’ handles and used them to spruce up the fuel caps after first removing the molded detail and drilling holes in the centers to mount the new handles.
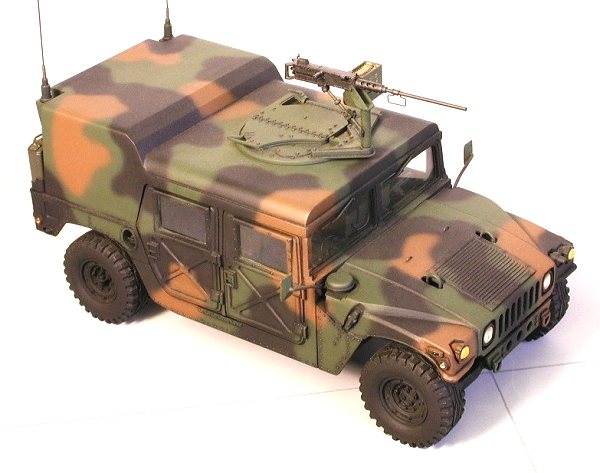
 While building the Desert
Patrol vehicle our motor pool received its first Humvees and I was able to
inspect them at my leisure (after first attending the US Army’s Driver
Improvement Program and receiving a operator’s update to my government driver’s
license—thank you Sergeant Santiago!). All featured the later
production style front bumper. I fabricated a replacement for the kit’s
four-hole prototype unit out of sheet styrene and added tow hooks removed from a
salvaged Tamiya Mutt.
While building the Desert
Patrol vehicle our motor pool received its first Humvees and I was able to
inspect them at my leisure (after first attending the US Army’s Driver
Improvement Program and receiving a operator’s update to my government driver’s
license—thank you Sergeant Santiago!). All featured the later
production style front bumper. I fabricated a replacement for the kit’s
four-hole prototype unit out of sheet styrene and added tow hooks removed from a
salvaged Tamiya Mutt.
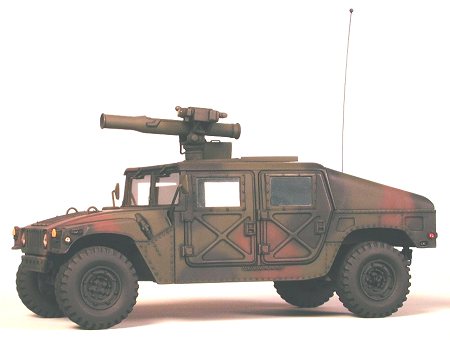
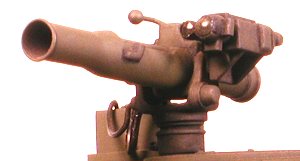
The roof and armament for these two models were assembled next with some overlooked details added where appropriate. I am intimately familiar with the Browning .50 caliber M-2HB but what I know about the TOW launcher would fill a thimble (mebbe!). Several photos in Army magazine were instrumental when detailing this weapon. The basic shape is correct so I refined the optical and IR sights, added a breech lock handle, and installed the interface cables from the launcher to the GCM box.
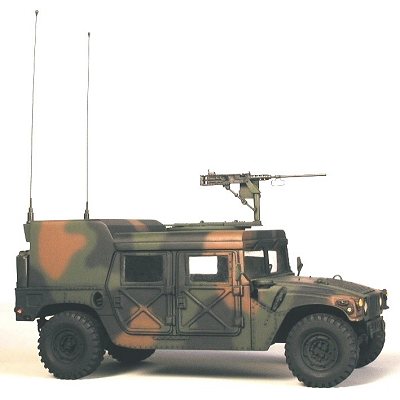
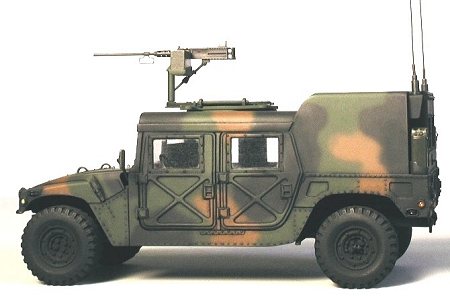
 Radio antennas
were constructed with wound .036” guitar string, with loading coils fabricated
from aluminum tubing. The Desert Patrol model carries a pair of blitz cans on
tray mounts at the rear of the roof shell. I replaced these with racks
scratch-built from thermal-molded .010” sheet styrene strips. Jerrycans from
Italeri’s accessory set would be secured to the mounts using paper straps with
photo-etched buckles.
Radio antennas
were constructed with wound .036” guitar string, with loading coils fabricated
from aluminum tubing. The Desert Patrol model carries a pair of blitz cans on
tray mounts at the rear of the roof shell. I replaced these with racks
scratch-built from thermal-molded .010” sheet styrene strips. Jerrycans from
Italeri’s accessory set would be secured to the mounts using paper straps with
photo-etched buckles.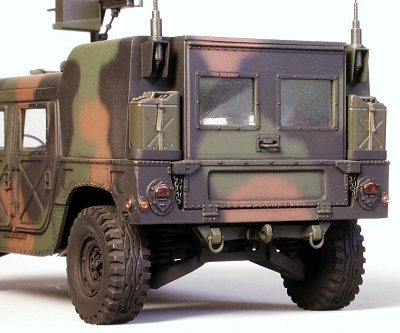
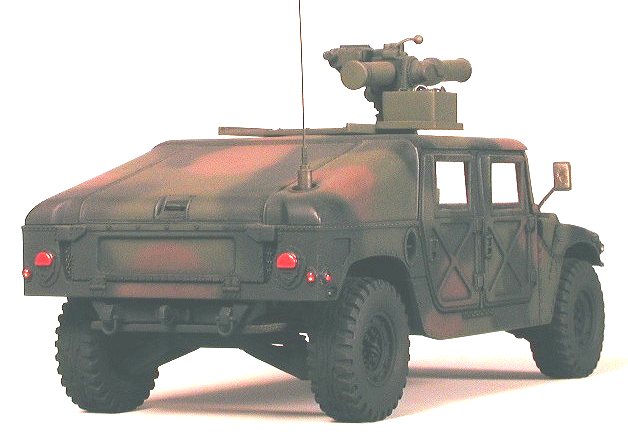
Link chain supports at the tailgates were replicated using ship modeling chain, anchored with brass wire ‘C’ clips at both ends. Tailgate note: Many modelers have decried the blank (ie: no “AM General” logo) center panel. In all fairness to Italeri, the US Army has been second-sourcing replacement parts for these vehicles for a number of years. These replacements are blank, as AM General did not make them—hence, either style may be considered “correct”.
With the roof complete, the underside was painted then I attached it to the model with small drops of CA at the corners of the windshield frame and at the rear of the body. The clearance lights and reflectors were installed using Testor’s liquid cement. When dry, I drilled dimples in the reflectors to mount red and amber MV lenses after painting and weathering. The mirror mounts were tossed after I broke the first one trying to cut it from the sprue. Brass wire was used instead, and I covered the glass portion of the mirrors with Bare Metal foil. After a final inspection it was off to the paint shop.
|
PAINT & DECALS |
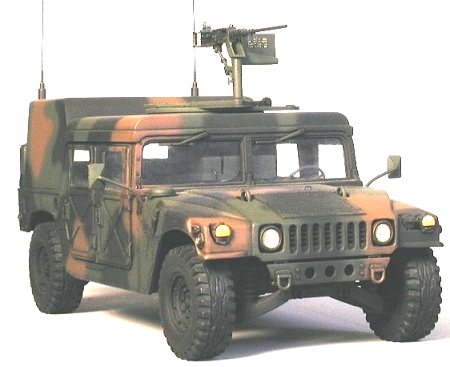
Humvees leave the factory wearing the standard issue three-color CARC scheme consisting of FS 34097 Field Green, FS 30117 Military Brown, and FS 37038 Flat Black unless the customer specifies otherwise. I have personally seen some special purpose factory-painted vehicles in overall FS 34086 Green Drab, overall FS 30277 Armor Sand, and overall flat black. Most US Humvees in Armor Sand were originally in the tri-toned CARC colors and repainted locally at unit motor pools or, in some cases, in the field.
 Italeri includes
a four-view drawing of the correct CARC pattern but thoughtlessly omits the
right side profile. A quick trip to our motor pool produced a sketch of the
AWOL view, and I proceeded to spray the models using Modelmaster enamels.
Wheels, tires, and running gear were done in black as per my personal
observations.
Italeri includes
a four-view drawing of the correct CARC pattern but thoughtlessly omits the
right side profile. A quick trip to our motor pool produced a sketch of the
AWOL view, and I proceeded to spray the models using Modelmaster enamels.
Wheels, tires, and running gear were done in black as per my personal
observations.
Weathering was done with Liquitex watercolors and powdered graphite, all sealed with several heavy coats of Testor’s flat lacquer. As I was already acquainted with the properties of Cartograf’s decals, these were tossed. Truth be told, markings and stenciling on Humvees are difficult, nigh impossible to see unless the vehicle is painted in Armor Sand anyway.
The antennas, blitz cans, and .50 caliber ammo box were painted FS 24064 semi-gloss Olive Green, while the Ma Deuce machinegun was sprayed with flat black then burnished with powdered graphite to replicate a phosphate finish. After installing these pieces I filled the ammo can with a teaser belt of photo-etched Verlinden .50 caliber rounds.
The MV lens headlights and reflectors were affixed using white glue then I painted the clearance lights gloss black. The front directionals were done initially in yellow followed by a thin coat of orange. When they were fully dried I brushed them again with Modelmaster Turn Signal Amber. The brake lights were another ‘experiment’…on one vehicle I undercoated the lens with gloss red and on the other I used gloss black. After they had dried I brushed Modelmaster Brakelight Red over them. The black undercoat made for a more realistic depiction—someday I’ll re-do the other pair.
|
CONCLUSIONS |
 Typical of most
Italeri kits, these models assembly into fairly accurate replicas with most of
the major shapes addressed. Where they fall short is in the finer details,
which shouldn’t be of concern to those modelers whose interests lie solely in
constructing “three footers”. To those who wish to pursue every nuance of the
prototypes there are numerous upgrade and detail sets of every stripe and
persuasion, though many omitted items can be added merely by some minor
scratch-building and an amply-stocked spares box.
Typical of most
Italeri kits, these models assembly into fairly accurate replicas with most of
the major shapes addressed. Where they fall short is in the finer details,
which shouldn’t be of concern to those modelers whose interests lie solely in
constructing “three footers”. To those who wish to pursue every nuance of the
prototypes there are numerous upgrade and detail sets of every stripe and
persuasion, though many omitted items can be added merely by some minor
scratch-building and an amply-stocked spares box.
The most significant shortcoming with these models is the poorly molded wheels and tires. Comparing a kit finished with the stock parts to one supplemented with the more superior resin replacements is akin to likening a Tonka Toy with a professionally-assembled Pocher kit. No matter how skillful the detailing and finish, the model with the plastic pieces will look juvenile by comparison. Sadly, the Verlinden Humvee wheel set has been OOP for about ten years. It’s a real shame too, because the casting on the wheel hubs and tire treads was superb.
The “M-998” designation that all of these Italeri Humvee kits carry is a bit of an anachronism –most military Humvees are now referred to by numbers ranging in the 10XX range. The higher number seems to represent an increase in the vehicle’s GVWR. My GI driver’s license (updated in ’97) certifies me to drive the “Truck, M-1038/M-1038A1, 5/4 ton”. How this applies to modeling a Humvee is for the most part insignificant…with the exception of the up-armored versions (with their visibly different Kevlar-lined doors), most current versions of the vehicle can be replicated using these kits.
|
REFERENCES |
National Training Center – Greg Stewart; Concord Publications
Ground War: Desert Storm – Jim Mesko; Squadron/Signal Publications
Hummer/Humvee In Action – Jim Mesko; Squadron/Signal Publications
USAREUR: The United States Army In Europe – Michael Skinner; Presidio Press
NTC: A Primer Of Modern Land Combat – Hans Halberstadt; Presidio Press
Photos in various issues of The Army Times and Army magazine
Illustrations in various issues of the Army’s monthly maintenance periodical, PS magazine
Personal observations and experience
A special note of gratitude to MSgt Al “Modeler Al” Superczynski, USA-SC, Retired for background on these kits and the boxtop scans…Thanks, Top!
Ó July 2002 by Roger M. Jackson
If you would like your product reviewed fairly and quickly where it will be seen by well over 150,000 visitors a month, please contact me or see other details in the Note to Contributors.