RealSpace Models 1/144 Titan IIIC
|
KIT: |
RealSpace Models 1/144 Titan IIIC |
|
KIT # |
? |
|
PRICE: |
$50.00 |
|
DECALS: |
One missile |
|
REVIEWER: |
Mike Idacavage |
|
NOTES: |
Resin with photo-etched parts |
|
HISTORY |
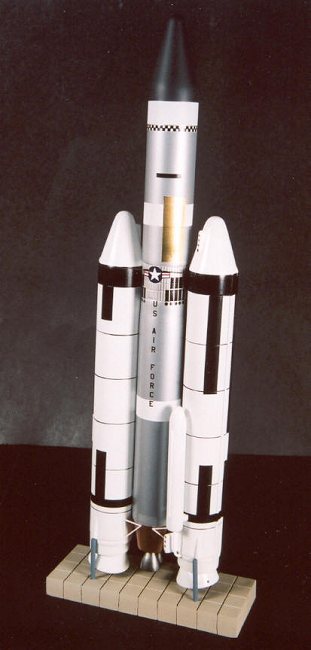
The US Air Force Titan III program began in 1962 in order to fill the need for a medium lift launch vehicle. The Titan IIIC was developed from the two-stage Titan II missile. The obvious changes were the addition of two 10 foot diameter Solid Rocket Boosters (similar to the SRBs later developed for the Space Shuttle) and an extension to the basic vehicle with the addition of a transtage on top of the Titan stack. The trans-stage was a restartable rocket designed to carry multiple satellites to a range of orbits. The two small tanks on the SRBs contain Nitrogen Tetroxide, used to steer the SRBs by changing the exhaust plumes. The first Titan IIIC lifted off from Cape Canaveral on June 18, 1965. Over it’s career, the Titan IIIC lifted numerous satellites to orbit. One of the more unusual payloads was the mock-up for the Manned Orbiting Laboratory (MOL) n 1966. This payload used the Gemini 2 spacecraft. This configuration is also represented by a RealSpace Models kit. The final flight of a Titan IIIC involved a launch of a pair of military satellites in October, 1983. This model depicts an early (mid1960s) version of the Titan IIIC.
|
THE KIT |
The kit used was the resin Titan IIIC kit from RealSpace. Upon opening the box, the kit looks like a straightforward build. In the box you get 13 resin parts, two segments of PVC pipe, a three part base and a photoetch set. Decals are included.
|
CONSTRUCTION & PAINTING |
 I started by assembling the main Titan stack. This
involved making a “sandwich” of the resin nose cone, first PVC pipe, segmented interstage, second PVC pipe and finally the engine base. Care is definitely
needed to make sure the complete stack is in alignment. I did run into
problems with the joint between the interstage segment and the PVC pipes which
required several rounds of filling in the small gaps at the join line. I
drilled out two small holes where the engine bells would go which allowed me
to stick a small rod inside to serve as a handle while painting. Once
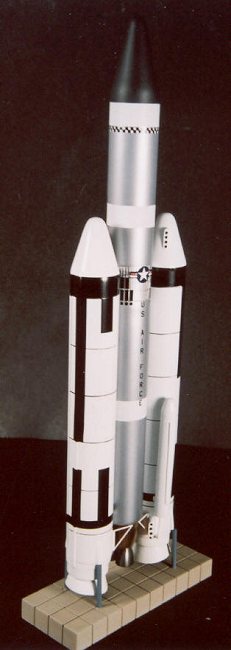
finished, the stack was painted using Alclad Copper for the engine base,
Alclad aluminum for the main body and Alclad Highly Polished aluminum for the
interstage. The nose cone was finished in ModelMaster Interior Black.
I started by assembling the main Titan stack. This
involved making a “sandwich” of the resin nose cone, first PVC pipe, segmented interstage, second PVC pipe and finally the engine base. Care is definitely
needed to make sure the complete stack is in alignment. I did run into
problems with the joint between the interstage segment and the PVC pipes which
required several rounds of filling in the small gaps at the join line. I
drilled out two small holes where the engine bells would go which allowed me
to stick a small rod inside to serve as a handle while painting. Once
finished, the stack was painted using Alclad Copper for the engine base,
Alclad aluminum for the main body and Alclad Highly Polished aluminum for the
interstage. The nose cone was finished in ModelMaster Interior Black.
The SRBs were next and went together with minimum problems. I did have to spend some time filling in several areas of resin pin holes. I carefully drilled out each engine bell. In a manner similar to the main stack, I drilled a long hole through the bottom of the engine bell to serve as a support for a wire used as a handle. I also drilled holes at the attachment points of the SRB to the main body. With a small piece of brass rod inserted in each hole, I was able to produce a sturdy model when assembled. Remember that each SRB is essentially solid resin with a bit of weight, so anything you can do to improve the SRB/Main Stack interface will help in the long run. The SRBs were painted in ModelMaster gloss white and the engine bells in dark gray. The two Nitrogen Tetroxide tanks were completely redone with milliput and styrene strip to correct the shape and the feed lines added from the tank to the base of the nozzle using a white plastic coated wire.
The main engine bells were drilled out and painted using Alclad Jet Exhaust. The stand was completed and painted in various shades of ModelMaster paint over a base coat of PollyS concrete.
|
DECALS |
 Both kit decals and decals from the spare parts box were
used. The decals that come with the kit are well printed and in alignment, but
my version was only in black and white. This is not a problem for the most part,
but I was modeling a specific Titan vehicle, and the color photo that I had
showed a colored version of the stars and bars. This came form the usual spare
parts box. I found it much easier to use SuperScale black stripes for the roll
pattern rather than masking and painting the design. White SuperScale decal
stripes were used for white segments on the main stack while a gold rectangle of
Bare Metal foil was used to represent the gold segment on the launch vehicle.
Both kit decals and decals from the spare parts box were
used. The decals that come with the kit are well printed and in alignment, but
my version was only in black and white. This is not a problem for the most part,
but I was modeling a specific Titan vehicle, and the color photo that I had
showed a colored version of the stars and bars. This came form the usual spare
parts box. I found it much easier to use SuperScale black stripes for the roll
pattern rather than masking and painting the design. White SuperScale decal
stripes were used for white segments on the main stack while a gold rectangle of
Bare Metal foil was used to represent the gold segment on the launch vehicle.
|
CONCLUSIONS |
The end result was definitely worth the small amount of effort that was put into this kit. The model looks great sitting on the shelf with other, more usual Air Force vehicles. I would recommend this kit to all fans of actual space models and those with an eclectic Air Force collection. For those who do not have the Detail & Scale publication on the Titan launch vehicle (only kidding!), here is an outstanding Internet site containing a large collection of Titan photos: http://hea‑www.harvard.edu/QEDT/jcm/space/images/lv/Titan.html.
I received a recent email from RealSpace which mentioned that the Titan IIIC kit has been improved and now comes with both the engine and SRB bells already hollow. Also, the base of the SRB and the engine bell are one piece for ease in alignment. You can’t beat a company that takes a good kit and makes it better!
Copyright ModelingMadness.com
If you would like your product reviewed fairly and fairly quickly, please contact the editor or see other details in the Note to Contributors.