Tamiya 1/48 German infantry and maintenance personnel
| KIT #: | 32512/30/47 |
| PRICE: | €10.00 each |
| DECALS: | None |
| REVIEWER: | Sjon van der Heiden |
| NOTES: | Not all 39 figures assembled. |
| HISTORY |
Some seventy years ago, there was a war going on in most of Europe. Apparently, some of those who fought in it, looked a lot like the little men in these boxes.
| THE KITS |
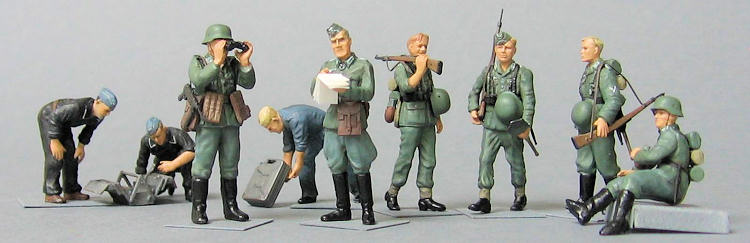
Tamiya is bringing us ever more in injected quarterscale. Not only armour, but a
lot of figure sets as well. The first set (512) contains 10 infantry men and 5
tank crewmen. All infantry men are in very active poses. They’re all running,
jumping and guns ablazing. The second set (530) contains 12 infantry men and 3
tank crewmen, but these guys are more relaxed as they are supposed to be on
manoeuvres. Most of them are bear headed or wearing their M43 field caps instead
of a helmet. Most of them sport M43 style uniforms contrary to the M36 uniforms
worn by the figures of set #512. The tank crewmen are wearing a mix of panzer
and assault gun tunics. Both sets come with 2 sprues each containing every
conceivable item needed in warfare, ranging from canteens and duffle bags to
very heavy machi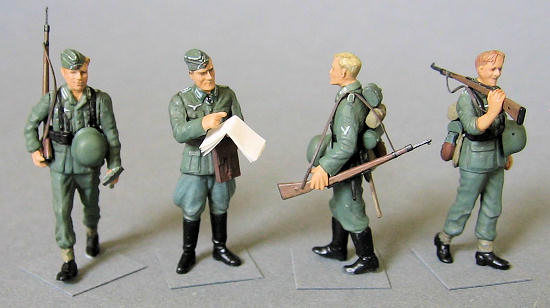 neguns
indeed. Set #530 has a small additional sprue containing a folded tripod
intended to be carried on ones back.
neguns
indeed. Set #530 has a small additional sprue containing a folded tripod
intended to be carried on ones back.
To start with the good news: the accessories sprues
are amazing. You simply have to see all the small details yourself to believe
this to be for real. There is absolutely no flash, no sink marks and the few
ejector pin marks that are there will give you no troubles once assembled. You
are also given plenty to choose from, early or late war issue. All in all there
is way more than you will actually use with either of these sets. And now the
bad news: Nearly all figures are a bit of a letdown. The details on the uniforms
are OK I suppose, but their hands and especially their faces are quite
featureless (does anybody remember Odo from Deep Space nine?...it seems he has a
lot of German relatives). The mould separation line is also quite evident and
will take some time to get away with. And another thing; if this is supposed to
be quarterscale, they are all midgets. They all size around 1,55m’. I realize
such people exist, but to have a whole platoon full of them defies all odds. And
they’re all emaciated! To be fair I would have to admit that some of the figures
in set #530 do not look as bad as most others do. They too are rather dwarfish,
but at least they’re not undernourished, have lifelike poses and some facial
expression.
Set #547 contains 8 maintenance crewmen and 1 tank commander. According to the
box art, these figures are supposed to work on tanks, but since most of them are
wearing coveralls and M34 caps, they may just as well be servicing planes when
painted black or blue instead of field grey. No need for guns for these guys and
so this set comes with a sprue consisting of crates and several types of shells
to fill these, a stepladder, a folding table and a plethora of tools and
toolboxes. All of these items will be perfect for any diorama. Again, the
accessories sprue is superb. The sprue even has a moulded-in template to assist
in constructing the stepladder (hardly necessary, but it’s a nice touch just the
same). The figures in this set are definitely better than the other ones. Still
too short, but very lifelike poses and quite acceptable faces. You will still
need to clean the mould separation line though.
The instructions are quite elaborate and leave no room for error. Colour
callouts are generic and in Tamiya numbers, and are quite detailed. Another very
helpful feature are the sides of the boxes where numerous accessories are
depicted in full colour. No decals are provided.
| CONSTRUCTION |
 Thanks to
the excellent instructions, assembly would be a breeze. That is if you would
build them “out of the box”, which would result in some serious disproportioned
people. Some look as if their coat hangers are still in their jackets, others
are attempting to walk with both knees bent (a feat only ever really
accomplished by John Cleese). And let’s not forget their height problems and
troublesome faces. Some faces were mostly obscured by binoculars or helmets,
others were acceptable and the really bad ones were replaced by resin ones from
the spares box, or leftovers from several ICM sets. Some figures were sawn in
half at the waist or just below their jackets and had some plastic shims
inserted to get some extra height. The silly walks were cured by cutting the
back of the knee and straightening the leg, after which the void was filled with
Tamiya putty. I ended up using only two figures from set #512 because their
poses were all way too animated for my purposes. I altered a crouching figure
into a sitting one. He is taking a well deserved swig from his canteen. All
chosen infantrymen from set #530 were given Mauser 98k carbines instead of the
intended heavy machineguns. Ventilation holes were made in all helmets with the
help of a new #11 blade. All figures were assembled minus their accessories.
These were painted while still on the sprue and attached later on.
Thanks to
the excellent instructions, assembly would be a breeze. That is if you would
build them “out of the box”, which would result in some serious disproportioned
people. Some look as if their coat hangers are still in their jackets, others
are attempting to walk with both knees bent (a feat only ever really
accomplished by John Cleese). And let’s not forget their height problems and
troublesome faces. Some faces were mostly obscured by binoculars or helmets,
others were acceptable and the really bad ones were replaced by resin ones from
the spares box, or leftovers from several ICM sets. Some figures were sawn in
half at the waist or just below their jackets and had some plastic shims
inserted to get some extra height. The silly walks were cured by cutting the
back of the knee and straightening the leg, after which the void was filled with
Tamiya putty. I ended up using only two figures from set #512 because their
poses were all way too animated for my purposes. I altered a crouching figure
into a sitting one. He is taking a well deserved swig from his canteen. All
chosen infantrymen from set #530 were given Mauser 98k carbines instead of the
intended heavy machineguns. Ventilation holes were made in all helmets with the
help of a new #11 blade. All figures were assembled minus their accessories.
These were painted while still on the sprue and attached later on.
| COLORS & MARKINGS |
All figures were brush-painted using Humbrol enamels (except for the hands and
faces, for which I use Revell enamel #35 as I think it’s a better approximation
of skin tone than Humbrol’s equivalent). All base coats were wash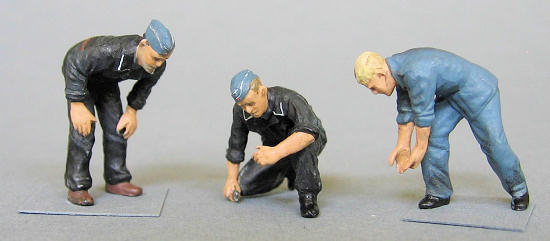 ed
with darker colours and then highlighted some with the original basecoat colour.
I try to keep this process as subtle as possible as the effects are easily
overdone! The black coveralls were painted flat black and drybrushed with
panzergrau. The hands and faces were washed with a dark brown to accentuate the
contours and some slight colour was applied to the lips. Finally I put a little
graphite-pencil on their eyes to give the faces some focus. One guy’s hair was
painted copper and gold (#12 and 16) which makes him a very convincing redhead.
Most silver details on their uniforms (piping and badges) were done in white, as
I think silver or even aluminium is way too shiny for this scale. The buckles of
their belts and Y-suspenders were picked out with a graphite-pencil. All of this
was done with the help of an opti-visor as my spectacles are no longer able to
compensate for my age.
ed
with darker colours and then highlighted some with the original basecoat colour.
I try to keep this process as subtle as possible as the effects are easily
overdone! The black coveralls were painted flat black and drybrushed with
panzergrau. The hands and faces were washed with a dark brown to accentuate the
contours and some slight colour was applied to the lips. Finally I put a little
graphite-pencil on their eyes to give the faces some focus. One guy’s hair was
painted copper and gold (#12 and 16) which makes him a very convincing redhead.
Most silver details on their uniforms (piping and badges) were done in white, as
I think silver or even aluminium is way too shiny for this scale. The buckles of
their belts and Y-suspenders were picked out with a graphite-pencil. All of this
was done with the help of an opti-visor as my spectacles are no longer able to
compensate for my age.
| FINAL CONSTRUCTION |
Set #547 offers some very interesting items, such as a
lightweight folding table, a closed and open metal toolbox, a little box with
socket spanners, a bucket, 3 metal oil canisters and several tools. The wooden
tabletop was washed and drybrushed in several shades of tan and grey. After this
I drew multiple circular stains with different shades of colour-pencil. I
drilled out the cap of one of the oil canisters and laid it on its side on the
table and simulated spilled oil with gloss brown. Some very short pieces of a
very tiny straw made for 3 excellent tin cans. I made a rag out of tissue paper
moulded into shape wit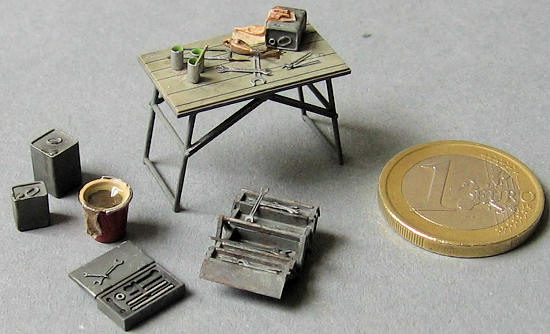 h
the help of diluted white glue. The whole scene was topped of with a few
photo-etched tools from Hauler’s toolset HLX 48016.
h
the help of diluted white glue. The whole scene was topped of with a few
photo-etched tools from Hauler’s toolset HLX 48016.
The open toolbox was assembled according to the instructions after which I added
2 lids from Evergreen sheet. It was painted, washed and drybrushed every shade
of grey I have in my inventory. Then it was painted with a mixture of rust and
gun-metal. Finally some edges were highlighted with a silver pencil. The box was
filled with various items from the Hauler set.
I wanted to depict the bucket filled with murky water, so I cut a disc out of
Evergreen sheet and glued this halfway in the bucket. I purposely glued it at a
slightly odd angle, so the water would sit level when I would place the bucket
at the same slightly odd angle in the yet to make diorama. I painted the water
gloss brown. The bucket itself was painted off-white on the inside and bright
red on the outside to give the diorama some colour. A rag was made with the help
of tissue paper and finally the water level was given 3 coats of Testor’s
Kristal Kleer.
Now all that is left is to assemble all accessories. Everything was attached
with CA glue. The binoculars for the non commissioned officer had its lenses
drilled out with a new #11 blade and these were filled with Testor’s Kristal
Kleer. A strap was fashioned out of the finest electrical wire I was able to
find. One of the soldiers is carrying his shovel in his hand. I used the stem of
the kits item and made a blade out of wine bottle foil. A shovel minus the stem
was used to depict the empty leather holster on its back. All carbines and the
MP40 were given a sling made out of very fine strips of wine bottle foil. And
finally, the officer was given a map made out of cigarette paper. It’s a bit
immaculate so I’ll have to give it a little colour some day.
| CONCLUSIONS |
 In recent
years the line of quarterscale figures has vastly expanded. This is good news
for anyone who builds an aircraft or two in this scale and wants to bring some
life to his dioramas. Still, the figures Tamiya is bringing us, are not of the
same quality their other products invariably are. I can imagine creating a
lifelike figure 1/48 times of real size is hard at best, but I can not
understand why Tamiya can’t at least get the size of their figures right (if
anything they should know that every head has two ears but many of them have
only one!). Besides, other companies such as ICM seem to be able to produce very
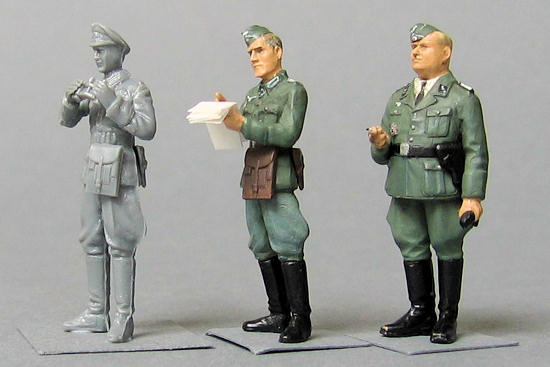
lifelike figures at around the same costs. I took a picture of an unmodified
Tamiya figure, a modified one (a new resin head, added height and altered
posture) and an unmodified ICM figure (not entirely true, I cut him below his
jacket to reduce his height to get him to match the Tamiya figures,… go
figure!). Even with the time and effort, I think the ICM figure is the better
product. But maybe I am just being a bore, because these Tamiya figures will
definitely bring some life to your diorama. The accessories sprues are simply
amazing and because there’s plenty of it will find their way into other
projects. Especially set #547 offers some very interesting items. The figures of
this set are also definitely superior when compared with the other ones, which
makes this the best set out of the three. But if it’s Wehrmacht you’re
interested in, the other sets will do just nicely.
In recent
years the line of quarterscale figures has vastly expanded. This is good news
for anyone who builds an aircraft or two in this scale and wants to bring some
life to his dioramas. Still, the figures Tamiya is bringing us, are not of the
same quality their other products invariably are. I can imagine creating a
lifelike figure 1/48 times of real size is hard at best, but I can not
understand why Tamiya can’t at least get the size of their figures right (if
anything they should know that every head has two ears but many of them have
only one!). Besides, other companies such as ICM seem to be able to produce very
lifelike figures at around the same costs. I took a picture of an unmodified
Tamiya figure, a modified one (a new resin head, added height and altered
posture) and an unmodified ICM figure (not entirely true, I cut him below his
jacket to reduce his height to get him to match the Tamiya figures,… go
figure!). Even with the time and effort, I think the ICM figure is the better
product. But maybe I am just being a bore, because these Tamiya figures will
definitely bring some life to your diorama. The accessories sprues are simply
amazing and because there’s plenty of it will find their way into other
projects. Especially set #547 offers some very interesting items. The figures of
this set are also definitely superior when compared with the other ones, which
makes this the best set out of the three. But if it’s Wehrmacht you’re
interested in, the other sets will do just nicely.
| REFERENCES |
The box art is very helpful, but you can definitely do with a visit to www.atthefront.com. Everything you want to know about German, US, Russian or Japanese uniforms, is there to be found. And it’s a darn funny website to boot!
April 2009
If you would like your product reviewed fairly and quickly, please contact me or see other details in the Note to Contributors.