| KIT #: | 16030/1 |
| PRICE: | These can be found for around $30.00 |
| DECALS: | |
| REVIEWER: | Stephen Venters |
| NOTES: | Kit-bashed and scratch-built |
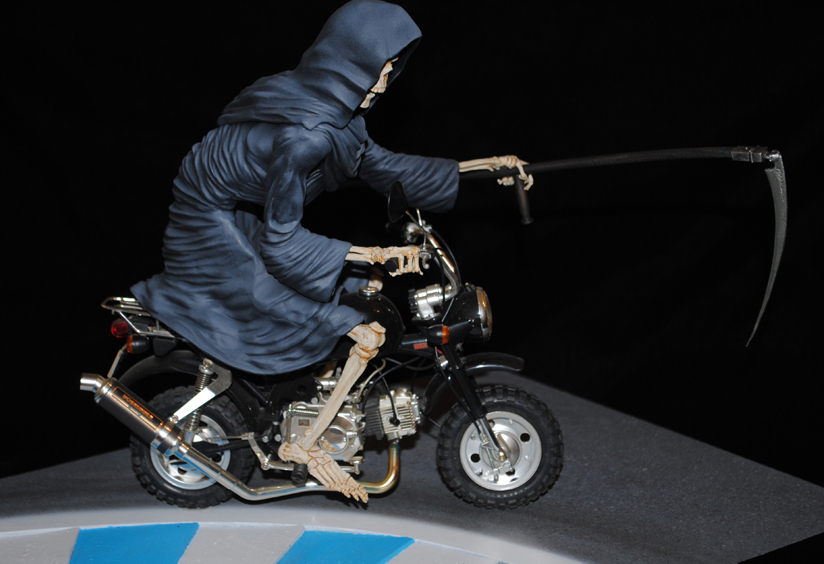
DEATH ON A MONKEY
| HISTORY |
“The Honda Z-Series refers to the lineage of mini bikes manufactured by
Honda Motorcycles. Though Honda's official model designations are typically
Z50A, Z50J, Z50M, Z50R and ZB50, they are more commonly referred to as the
"Monkey" or "Gorilla" because of the way people are said to look when riding one
of such bikes. Sales of the bike b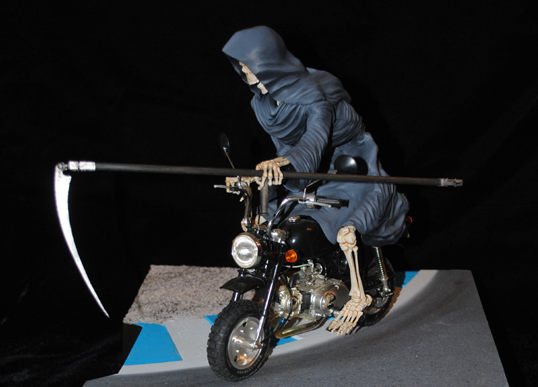 egan
in March 1964 with the Z50M model. Most Z-series bikes are small, light,
collapsible motorcycles made for convenience and ease of transportation. Their
outstanding feature is a 50 cc four-stroke engine with an overhead camshaft.
Some have a centrifugal clutch and three gear manual transmission, while others
have a three-speed semi-automatic easy-shift transmission for learners. The
original model of the Honda Z-series was originally produced as a children's
ride at a Japanese amusement park, but was eventually refined and put into mass
production, hitting the European market in 1967.[citation needed] Since then
Honda has produced a wide variety of Honda Z-series mini bikes, with annual
model updates still in effect. Starting from 2008, the well-known 50 cc engine
will be adapted and fitted with an injection kit instead of carburetor. Today,
cheaper replica versions of this bike are being manufactured in China.
(Wikipedia)
egan
in March 1964 with the Z50M model. Most Z-series bikes are small, light,
collapsible motorcycles made for convenience and ease of transportation. Their
outstanding feature is a 50 cc four-stroke engine with an overhead camshaft.
Some have a centrifugal clutch and three gear manual transmission, while others
have a three-speed semi-automatic easy-shift transmission for learners. The
original model of the Honda Z-series was originally produced as a children's
ride at a Japanese amusement park, but was eventually refined and put into mass
production, hitting the European market in 1967.[citation needed] Since then
Honda has produced a wide variety of Honda Z-series mini bikes, with annual
model updates still in effect. Starting from 2008, the well-known 50 cc engine
will be adapted and fitted with an injection kit instead of carburetor. Today,
cheaper replica versions of this bike are being manufactured in China.
(Wikipedia)
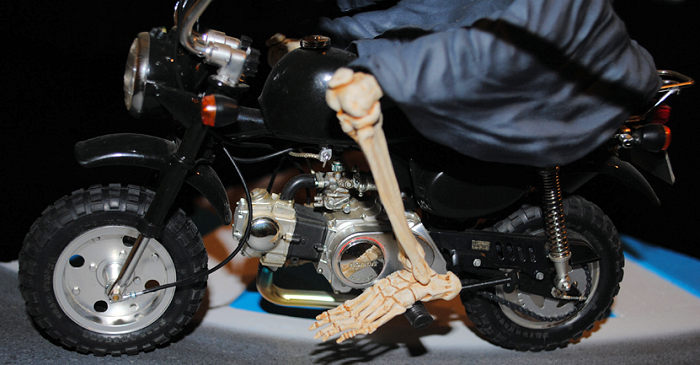
The inspiration for “Death on a Monkey” was provided by my son, Stephan, who, along with a bunch of his equally unstable friends, actually get together and track race on these things.
| THE KIT |
 Tamiya’s
line of 1/6th scale motorcycle kits
need no introduction. Every detail that can be reproduced in injection-molded
plastic is reproduced and the parts fit together like a glove. “Death on a
Monkey” combines parts from Tamiya kit #16030: Honda Monkey 2000 Anniversary and
kit #16031: Honda Gorilla Spring Collection combined with a scratch built
license plate and some additional wiring here and there. The only deviation I
took from building the kit out of the box was the chain drive. The chain drive
in the kit is molded in one piece. I very carefully removed both sprockets and
then sawed the chain itself into two parts. I made a jig and sanded the inside
of both halves until they were the scale thickness of a double chain link. I
made individual link pins from plastic rod and new sprockets from sheet styrene.
This assembly more closely replicates a real chain drive and is worth the
additional effort.
Tamiya’s
line of 1/6th scale motorcycle kits
need no introduction. Every detail that can be reproduced in injection-molded
plastic is reproduced and the parts fit together like a glove. “Death on a
Monkey” combines parts from Tamiya kit #16030: Honda Monkey 2000 Anniversary and
kit #16031: Honda Gorilla Spring Collection combined with a scratch built
license plate and some additional wiring here and there. The only deviation I
took from building the kit out of the box was the chain drive. The chain drive
in the kit is molded in one piece. I very carefully removed both sprockets and
then sawed the chain itself into two parts. I made a jig and sanded the inside
of both halves until they were the scale thickness of a double chain link. I
made individual link pins from plastic rod and new sprockets from sheet styrene.
This assembly more closely replicates a real chain drive and is worth the
additional effort.
| CONSTRUCTION |
Some time ago I began with resin
copies of the skull and hand bones I had to sculpt for my original “Chronos, the
Grim Reaper” and sculpted a full male skeleton in 1/6th
scale so I had copies of that on hand when I began this project. I first
assembled the skeleton in position on the completed model bike that I had
covered with Saran Wrap™ for protection. The next step was to use aluminum foil
to form the basic shape of the robe and coat any exposed parts of the skeleton
with petroleum jelly to act as a barrier. I scu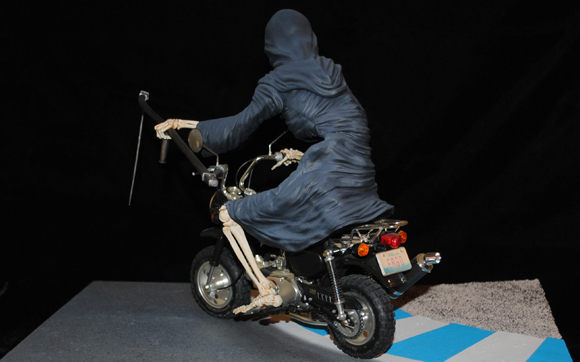 lpted
the robe in sections with A/B epoxy putty over the aluminum foil, coating each
cured section with petroleum jelly as a barrier to the next. Once the entire
robe was sculpted, I carefully removed each section for clean-up and painting.
lpted
the robe in sections with A/B epoxy putty over the aluminum foil, coating each
cured section with petroleum jelly as a barrier to the next. Once the entire
robe was sculpted, I carefully removed each section for clean-up and painting.
The skeleton and robe parts were washed thoroughly in warm soapy water
using dishwashing liquid and then sprayed thoroughly with Windex™, all the while
scrubbing with a soft paint brush. Then the process was repeated to assure that
no petroleum jelly remained on any of the parts. Petroleum jelly makes a great
barrier to keep parts from sticking together but it’s insidious so make sure you
wash it all away. After rinsing thoroughly with hot water and allowing the parts
to air-dry for a couple of days, I primed them with Rust-Oleum™ Painter’s Touch™
Ultra Cover flat white primer which is the absolute best primer for vinyl, resin
and plastic that I have found to date. Here’s a tip or two. How do you know when
lacquer based primer, or finish paint for th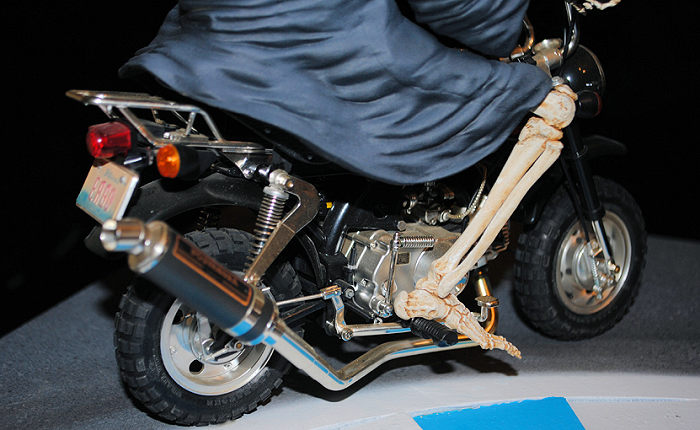 at
matter, is dry? When you can put your nose right down to the surface of the
paint and not smell an odor, it’s dry. Another tip is to use white primer,
especially if the finished paint job is going to be with acrylics. Acrylic paint
is not completely opaque no matter how thick the coats and gray primer will
cause the finish colors to appear dull and dead. This is especially true with
reds and yellows.
at
matter, is dry? When you can put your nose right down to the surface of the
paint and not smell an odor, it’s dry. Another tip is to use white primer,
especially if the finished paint job is going to be with acrylics. Acrylic paint
is not completely opaque no matter how thick the coats and gray primer will
cause the finish colors to appear dull and dead. This is especially true with
reds and yellows.
I mount all my large-scale figures on a base and try to tell a bit of a
story with each one. A base can turn any commercially available figure kit into
a unique, one of a kind piece you’ll be proud to have in your collection. The
theme for this one is a downward, treacherous curve from a motorcycle race
track, like the ones my kid risks his
 neck on! I first designed the artwork for
the nameplate which was produced in photo-etched metal by my friend Fritz, the
Headless Hearseman. Thank you Fritz. The base is constructed with a frame of
half-inch thick wood laminated with .040 sheet styrene with 1/8” plywood for the
top using 5-minute epoxy. The ground work is constructed from Bondo™ and the
corrugated ‘rumble strip’ bordering the curve is made with balsa wood coated
with 2-part polyurethane resin. You have to work quickly with 2-part resin
because it cures fast.
neck on! I first designed the artwork for
the nameplate which was produced in photo-etched metal by my friend Fritz, the
Headless Hearseman. Thank you Fritz. The base is constructed with a frame of
half-inch thick wood laminated with .040 sheet styrene with 1/8” plywood for the
top using 5-minute epoxy. The ground work is constructed from Bondo™ and the
corrugated ‘rumble strip’ bordering the curve is made with balsa wood coated
with 2-part polyurethane resin. You have to work quickly with 2-part resin
because it cures fast.
| COLORS & MARKINGS |
The motor bike was painted using Testors Model Master™ Flat Black for
coverage and then several coats of Testors™ Crystal Clear sealed the deal.
Details were painted using lacquer based colors. Artwork for the license plate
was created in Adobe Photoshop™. Two photos of the artwork were printed on .10
point photo paper and the lettering for ‘ERGO’ was cut from one and glued onto
the other to give it a three dimensional pressed-metal effect. Then the license
plate art was cut out and glued to the license plate frame of
 the model
bike along with a couple of resin screw heads to finish it off. “Ergo” is an
inside joke between my son and I.
the model
bike along with a couple of resin screw heads to finish it off. “Ergo” is an
inside joke between my son and I.
The skeleton was painted using acrylic colors starting with unbleached titanium white as a base. Washes of a burnt sienna/burnt umber mix brought out all the detail of the bones. The robe begins with a base color of dark charcoal gray (never use black on a scale figure anywhere) with lighted versions of the base color airbrushed and dry brushed to bring out the details of the folds and wrinkles. The robe was assembled onto the skeleton after it was affixed to the bike.
The base proper was painted with Rust-Oleum™ Painter’s Touch™ Ultra Cover Satin Black from the rattle can. The ground work on the base was painted with acrylics and model railroad ballast stone was used to replicate the gravel inside the curve. Pastel powder was used to simulate tire marks on the pavement. The groundwork was sealed with several coats of clear flat acrylic. The name plate was rendered in acrylics and sealed with clear lacquer.
I was lucky to have a few sets of metal parts left over from the old “Chronos” kit run so I made a shaft from mahogany and added the scythe for the final touch.
| CONCLUSIONS |
If nothing else, creating “Death on a Monkey” was a lot of fun and an excellent break from the meticulous research realistic modeling demands. As I stated, the Honda Monkey was built out of the box for the most part and once in a while I even deferred to the kit instructions! Everything else was created with the go-crazy-go-nuts method. The finished project certainly adds a spot of interest to my collection of aliens and vampires! I hope you like it.
18 September 2017
Copyright ModelingMadness.com If you would like your product reviewed fairly and fairly quickly, please
contact
the editor or see other details in the
Note to
Contributors.
Back to the Main Page
Back to the Review
Index Page
Back to the Previews Index Page